A few weeks ago I came across this little notepad at Michael’s in the $1 bin. I new I wanted to do something with it and finally had a chance this afternoon. This is what I started with, I love the saying on it. 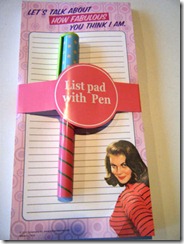 And this is what it looks like when I got done with it.
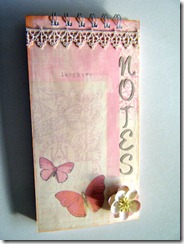 I cut a front and back cover out of some Bristol board. I cut the covers approximately 1/2” larger than the actually pad size. My covers were cut to 4 1/2” X 8 1/2”. The patterned paper is from a K & Company paper pack. I cut the patterned paper the same size as the cover. I adhered the patterned paper to the outsize and inside of the front cover. I then punched the cover with my bind it all and bound it with a 1/2” size wire. I adhered the pad to the inside back cover with some scor tape. To finish the front cover I added a piece of lace from my stash and a flower to the lower corner. I cut the word Notes using the font from Once Upon a Princess and flooded it with a brown from the Nursery Tails Imagine cartridge. I used a piece of shimmery cream card stock so the letters have a shimmer to them. It went together fast and I am very pleased how it turned out.
Tuesday, March 29, 2011
Altered Notepad
Saturday, March 26, 2011
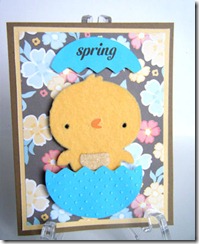
Spring Chick!
After spending time blog hopping through several spring time blog hops and the fact that the sun actually came out today, I decided I had to make a spring card.
I started with a Kraft card stock card base scored and folded to 4 1/4” X 5 1/2”. My patterned paper is a scrap in my stash. It is two sided paper so the yellow mat is actually just the reverse of the flowers. The yellow mat was cut at 4” X 5 1/4” and the patterned paper was cut at 3 3/4” X 5”. The chick and the egg are both from Create a Critter Cricut Cartridge. I used my Imagine and some RGB codes to flood the layers with color. The orange and black are stock colors on the Imagine. The chick and its layers and the egg were all cut at 3”. I used some canary colored flocking powder to flock my baby chick to give him a fuzzy look. I used some spray adhesive to apply the flocking and actually gave the chick two coats of flocking. The lighter colored belly of the chick is flocked using Ultra Fine Flower Soft in Sand. I ran the lower half of the egg through my Cuttlebug and embossed it with the Swiss Dots folder. The top half I left as is so I could stamp my sentiment on it. I adhered the chick and the egg top with one layer of foam tape and the lower half of the egg is on two layers of foam tape. Thanks for visiting.
Thursday, March 24, 2011
Guest Designer - Cutters Creek Design Team Blog
Sunday, March 20, 2011
Plant a Flower Day Card
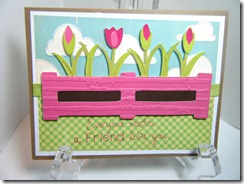 Abby over at Scrapbookaholic by Abby is having a Pick Your Own Holiday challenge over on her blog. I picked March 12th, Plant a Flower Day.
My card is a 4 1/4” X 5 1/2” Kraft card stock base. I added a white mat sized to 4” X 5 1/4”. I then used my Imagine and the 1:2 proportional rectangle sized at 2.5” and my Hopscotch colors and patterns Imagine cartridge to create the sky and the green “grass” section of the cards. I cut these down to 1 7/8” X 5”. I added some olive green ribbon from my stash over the seam where the two papers met. For my flowers I used my Freshly Picked Cricut cartridge and colors from my faulty Audrey Imagine cartridge for the colors of the flowers and the planter box and from the Imagine More Cards cartridge for the green leaves of the flowers. I cut the tulips and the layers at 2.7”. I ran the pink layer of the planter box through my Cuttlebug. Not sure what the name of the embossing folder is but it has a wood grain texture to it which I thought added to the planter. I pop dotted the flowers to the card for some dimension to the card. The sentiment I added is from The Greeting Farm Because of You sentiment I bought at Cutters Creek and says Everyone needs a Friend like you. Sorry it doesn’t show up better in the photo. Thanks for visiting.
Monday, March 14, 2011
Red Hatters Blog Hop Winner!
Penny said... WOW! Great frame. Hope I met the time deadline. Congratulations Penny. I will be emailing you to get your mailing info so I can get the cartridge out to you.
Thanks everyone for visiting my blog during the blog hop and for all your wonderful comments. Hope you come back and visit again.
Sunday, March 13, 2011
Paper Playtimes Challenge
 I started with a 5” X 7” pre-folded white card base. I topped that with a blue mat cut at 4 7/8” X 6 7/8”. I used my Imagine and the 8:10 proportional rectangle and flooded it with this pattern from the Better Together Imagine cartridge. This pattern reminded me of the little wishes that Horton in Horton Hears a Who carried. My elephant was cut at 3” and is from the Create a Critter Cricut cartridge. I used my imagine to flood each layer of the elephant with color. The top layer is filled with a blue swirly pattern. All the colors and patterns on this card are from the Better Together cartridge. I added some bright yellow ribbon to my card and layered my little elephant together. The elephant is pop dotted to the card and I added some googly eyes and gave him a little hint of pink in his checks with some chalk. I added some faux stitching around the end of the card and sentiment and some doodle dots to the elephant. I printed out my sentiment on the computer and used the RGB codes for my font color so it matched the dark blue on the elephants ears. The sentiment I chose was, “I meant what I said, I said what I meant, and elephant’s faithful one-hundred percent”. I thought that was a inspiring and would perfect to thank a friend for being there for you through thick or thin.
I had a lot of fun creating this card and hope you will hop on over to Paper Playtime Blog and play along with us.
Cricut Cardz Challenge #65
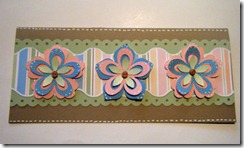 The challenge this week over at the Cricut Cardz Challenge Blog is to make a a tall card (4 X 9”). For my card I stared with a piece of Kraft card stock cut to 8” X 9” and scored and folded it at 4”. I then used my Imagine and the 1:2 proportional rectangle in the stock images on the Imagine. I sized the rectangle to 4.5” and flooded with the darkest green on the Nursery Tales cartridge. I then printed and cut the striped Icon on page 31 of the handbook at 2”. I also used the new Mother’s Day Bouquet Seasonal Mini cartridge to cut my flowers. I cut three layers at 2.5”, 2.3” and 1.3” and chose several different flowers. I flooded the first layer of one flower with the darkest blue on the Nursery Tales cartridge and the other two with a dark orange from the Nursery Tales cartridge. The second layer was flooded with either an orange or blue pattern from the Nursery Tales Imagine cartridge. For the final layer I flooded all three flowers with the lightest green from the cartridge color pallet. I sprayed this layer with some Honey Dew Mist Glimmer Mist. I attached the flower layers together gluing only in the very center of the flowers. This allows the flower petals to curl slightly and add some dimension to my card. I added a small button to the center of each flower and attached the flowers with some foam tape. To finish off the card, I added some faux stitching to the top and bottom of the card and some doodle dots to some of the flower petals. Thanks for visiting.
Saturday, March 12, 2011
Feeling Green? Twisted Easel Card
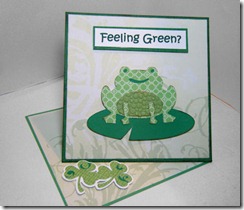 Janis at Pause Dream Enjoy is having a Fun Fold card challenge on her blog and a chance to win a set of Peachy Keen stamps. I wanted to play along and just recently heard about a twist on the Easel card. It is a Twisted Easel card and thought it would work great for this challenge. While blog hopping recently I saw a really cute St. Patrick’s Day card with some frogs and the saying Feeling Green. I just thought it was so super cute and wanted to make my own version of the card and knew it would be perfect for this challenge.
To make the card I followed the tutorial on Pam Sparks blog. I can’t take credit for finding the tutorial Bob at Happy Cardmaker posted the link and was my inspiration to give this a try.
My finished card is a 6” X 6” Square card. I started with a piece of card stock cut 6” X 12” and scored it at 6”, then scored one side from corner to corner diagonally. I used some dark green card stock I had in my stash for the card base. The patterned paper on the card is from a K & Co paper stack. I used my Cricut Imagine and the Audrey cartridge for frog. The frog cut was cut at 2.7” and is from the Once Upon a Princess cricut cartridge. The shamrocks on the inside of the card are cut at 2” and are from the Celebrate With Flourish Cricut Lite cartridge and I again flooded the layers with colors and patterns from the Audrey Cricut Imagine cartridge. I ran the frog's stomach through my Cuttlebug and embossed it with the Tiny Bubbles embossing folder. I printed the Feeling Green sentiment out on my computer.
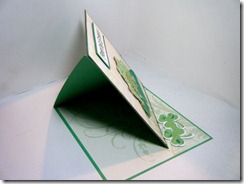
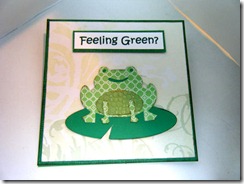 I am really pleased how this turned out. I hope you give this card a try, it was a lot of fun to make and actually very easy. Thanks for visiting
Friday, March 11, 2011
Red Hatters Blog Hop
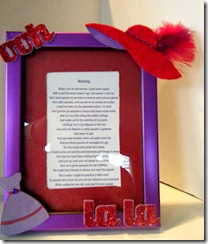 I found a purple metallic frame at the store and it was perfect for my project. I cut one of the hats from the Forever Young Cricut cartridge at 2.5”. Using my Imagine I flooded the first layer with a purple color and the next layer with red, hit print and cut. Once done, I sprayed the red layer with some spray adhesive and sprinkled it with some Martha Stewart red flock. It took two layers to get the look I wanted. I then added some small purple rhinestones to the hat. Before adhering the red and purple hat layers together, I added some red and purple feathers rather than the flower that came with the cut. I then cut the two layers of the dress from the Nifty Fifties Cricut cartridge using some Pearlescent Core’de nations cardstock. I cut the base layer at 2 1/2” in red and the shift layer at the same size in flooded with the same purple at the hat. I adhered the layers together and added a purple rhinestone where the belt buckle should go. I then cut the phrase Ooh La La from the Forever Young cartridge at 1 1.2” using the same purple and red colors and Pearlescent cardstock. I then ran the red layer through my Xyron upside down so I could adhere some red glitter to the letters before attaching them to the purple shadow. I adhered everything to the frame with some foam tape. To finish my project I covered the white mat that came with the frame with some red cardstock and printed out the Red Hatters Society poem on white cardstock and cut it to fit the frame opening. I adhered these last two layers together with my ATG gun and put the frame back together. I am really pleased how this turned out.
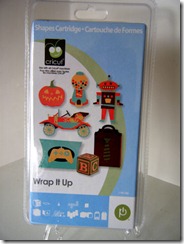
Now for the blog candy. What is a blog hop without a little candy? I am giving away the Wrap It Up Cricut cartridge. You do not have to follow my blog to sign up to win but I would love it if you did. I can only ship to a US address, sorry. Please leave me a comment along with a way for me to get a hold of you. You will have until 5:00 PDT to enter for the blog candy. I will post a winner by 9:00PM PDT on the 14th.
Here is a complete list of all the participant of the hop. I hope you get a chance to visit everyone’s blogs and view their awesome projects.
Saturday, March 5, 2011
Cricut Cardz Challenge #64
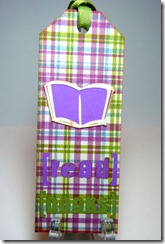 The challenge this week over at Cricut Cardz Challenge is to make a bookmark. I didn’t have a lot of time but wanted to play along so here is what I came up with.
Unfortunately I didn’t write down all my sizes but I cut the tag for my book mark using Plantin Schoolbook and the tag found under the Italic option. I resized the tag on my Gypsy so it was 2 1/2” wide and 6” tall. I cut the tag twice once out of cream cardstock and then again out of the patterned paper as I wanted the bookmark sturdier than the pattern paper alone would have made it. The rest of the cuts are from Graphically Speaking and these are the ones I am not sure of the sizes, I believe about 1 1/2” to 2”. I inked all the edges with some Tea Dye distress ink. Attached everything to the bookmark and added some olive green ribbon at the top.
Thursday, March 3, 2011
Birthday Card
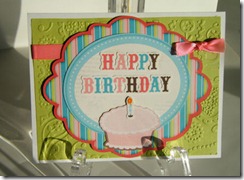 My niece turns 24 on Monday so I had to come up with a quick card to get in the mail in the morning. This is what I came up with.
I started with a piece of white card stock folded to 4 1/4” x 5 1/2” as my base. I used the 8:10 stock image on my Imagine and cut it at sized it to print and cut at 4 1/2” and flooded it with a light olive green from the Imagine More Cards cartridge. I cut this mat down to 4” x 5 1/4” and ran it through my cuttlebug using the Paisley embossing folder. I then cut the Happy Birthday Chick image found on page 10 of the handbook for the Image More Cards cartridge at 3 1/2” using the layers feature and deleted the chick and his hat so it didn’t cut. I then cut just the birthday cake from the image on page 2 of the handbook. I again did this using the layers feature and deleting the images I did not want. I cut the cake at 2.3”. I added some yellow and orange stickles to the candle flame. Since I have to mail this card I limited the use of foam tape to just the back of the striped paper to adhere the image to the card. All the other layers were adhered together using my Zig Two Way glue pen and added some ribbon from my stash. Thanks for visiting.
I am a Queen at Paper Playtime
I am so honored that Janis has selected me to be part of her Queen Designers at the Paper Playtime challenge blog. The blog features challenges twice a month. The 2nd Monday of each month is any paper project that follows the challenge theme and the last Monday of the month is Digi Monday and the challenge is always Anything Goes. Please check out all the wonderful Designers blogs.
Janis (ME!): Pause Dream Enjoy
Pam: Simply Pam
Sheree: Cravin Scrappin
Theresa: The Scrapbooking Queen
Lisa: Crop And Create
Glenda: Glenda's Cards
Kathi: Kards By Kathi
Heather: Princess' Paper Projects
Melissa: A Paper Journey
Denise: Lala's World
Georgiana: Carson's Cricut Creations
Carley: The Real iCarley
Sharon: MeeMee's Creations
Don & Judy: Airing Out
Corri: Bug Lover Cards
Maria: Joyful Stamper
Michelle: Purple Monkey Moments
Sandra: 365 Days of Cricut
Elsa: Cricut Lvr
Jen: Honeybean Creations
Rose: Pink Lemonade
Gloria: Oma's Crafts
Mary: Marebear Scraps
Deanna: Deanna's Papercrafts
Dawn: Always Crafting
Amanda: Amanda's Crafts And More
