Sunday, May 29, 2011

Weekend Vinyl Projects

I had some quick little projects I wanted to get done this weekend using some vinyl and my Cricut. 
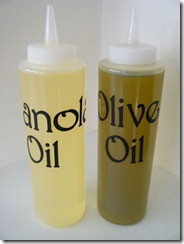
20110529_4My first project was to label some plastic squeeze bottle I got when I was at the coast to put oil in. I used the font on the Nursery Rhymes cartridge for the Olive Oil and Canola Oil. I cut  the letters at 1 1/4” out of black cricut vinyl. I used the kiss cut method with my blade depth at 6 and my pressure at 2. Cutting it this way only cuts through the vinyl and not through the backing. I pulled off the excess vinyl, weeded my letters and used some clear contact paper as transfer tape to apply the vinyl to the bottles.

My second project I did as a gift for my stepdad for Father’s Day. He has been going through a rough time lately, his estranged son passed away a month ago from cancer. So, I thought this might cheer him up.
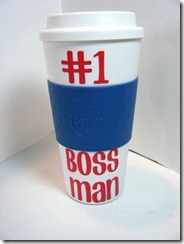
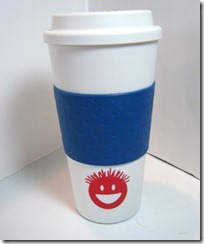
20110529_8I bought a reusable eco coffee cup from a local store. I used my Don Juan cartridge for the font and cut the letters #1 Boss Man at 1” out of red vinyl again using the kiss cut method. I used my scrapper from my cricut tool kit and more clear contact paper as transfer tape to apply the letters to one side of the cup. On the back I added a little crew cut smiley face from Graphically Speaking cut at 1.65”. I am pleased how this turned out and think he will like it.20110529_10
Wednesday, May 25, 2011

Retirement Card

20110522_3

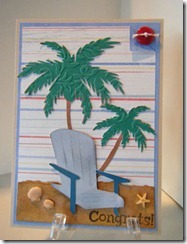
I have a coworker who is retiring on Friday. This is the card I made for him. I started with a piece of bamboo colored card stock cut to 10” X 7” and scored and folded to make a 5” X 7” card base. The patterned paper I used is from Cloud 9 Tropical Stripe. The paper is two sided and I used the blue side for my first mat cut to 4 3/4” X 5 3/4”. I then used the striped side and cut a mat 4 1/2” X 5 1/2”.  I then cut a scrap piece of bamboo cardstock to 5 1/2” and tore it to give it a rough edge. I didn’t measure the height of the piece but I think it is about 1 1/2” wide. I used some Tea Dye and Wild Honey distress ink and inked the entire piece to help it look more like sand. I then lightly sprayed the piece with some antique lace glimmer mist. I then attached it to the card front. The palm trees were cut from the Life’s A Beach cricut cartridge at 4.4” . I ran the tree tops through my cuttlebug and embossed them with the Victoria A2 embossing folder.  I attached this straight to the card and put the end of the trunks just under the “sand”. The chair is also from the Life’s A Beach cartridge and is cut at 2.7”. I used some Weathered Wood distress ink to ink the char to give it a weathered look and help the slats stand out. I attached it to the card front with some foam tape. To finish the card I added few shell embellishments that I had to the sand. The top upper right corner of the striped paper I folded down to show and added a red button with some brown and white striped twine tied in a knot. I stamped my sentiment with some Walnut Stain distress ink.  I finished the inside with a small piece of the striped paper and added another stamped sentiment that says Enjoy Your Retirement also stamped in Walnut Stain ink. I am envious that he is able to retire. I have a 3 or 4 more years. I hope he enjoys the card and his retirement.

Sunday, May 22, 2011

21st Birthday Wishes

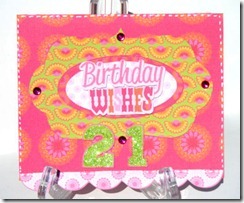
Birthday WishesThe new challenge at the Scrappy Frogs Blog is to make a Birthday project. My niece just turned 21 and this is the card I made for her. The card base was cut using the Cricut Imagine cartridge All Wrapped Up at 5 1/2”. I used the layer feature when cutting card. I then cut the sentiment at 1 1/4” also using the layers feature. I used the font from the Birthday Bash cricut cartridge to cut the 21. I cut the shadow from pink and the base layer in green. I added some firefly stickles to the 21 to make them stand out. I also added some gems to the mat and some faux white stitching around the card base. It was a quick easy card to put together.

Birthday Card


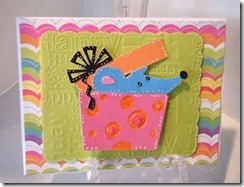
20110521_10I recently bought one of the 6 X 6 pads of the Echo Park Paper from Cutter’s Creek. As soon as I received the Summer's Day pad I knew the colors in the patterned paper would work great with my All Wrapped Up Cricut Imagine cartridge. All of the solid colored cuts are flooded with colors from the All Wrapped Up Imagine cartridge.

For my card I started with a 9” X 6”Bazzill Simply Smooth white card stock that I scored at 4 1/2” and folded to create a 4 1/2” X 6” card base. I then used a piece of the patterned paper from the Echo Park Summer’s Day paper pad cut the 4 3/4” X 5 7/8”. I really just wanted a very narrow white border on the card. I used my Elegant Edges Cricut Imagine cartridge and using the Oblong feature on the cartridge cut just the shadow of a scalloped rectangle that I flooded with a bright lime green color from the All Wrapped Up cartridge. I cut this rectangle at 4.4”. Instead of adding stamped sentiment to my card I decided to emboss this green mat with the Happy Birthday cuttlebug A2 embossing folder. I attached this to the card with some foam tape. The mouse image is from the Birthday Bash cartridge and was cut at 3.0” again all flooded with colors from the All Wrapped Up Imagine cartridge. I added some Orange Peel Stickles to the orange dots on the package and some Fruit Punch Stickles to the pink dots on the gift. I added some white doodle dots with my Sakura Gel Pen. I attached the mouse to the card with an Action Wobble.

The cartridges used on the project are not listed on the Cutter’s Creek store site but Kim may be able to get them for you. The Action Wobble’s are on the site for Pre-order and should be available sometime in June.

Saturday, May 14, 2011

Graduation Card

Here is a quick graduation card I made for my cousin’s son who is graduating this weekend from the University of Southern California.  My card base is 8 1/2” x 5 1/2” cream card stock scored at 4 1/4’ and folded to make a 4 1/4” X 5 1/2” card base. I added a red mat cut at 4” X 5 1/4” and then a cream mat cut at 3 3/4” X 5” and then added a piece of patterned graduation themed paper cut at 3 1/2” X  4 3/4”. I then used my Everyday Pop up Cartridge to cut the graduation cap. I cut all the layers at 2 1/2” I used cream for the shadow and darker red for the base layer. I cut everything with my Expression after laying it out on my Gypsy to help with sizing.  The red I used for the top layer of the cap is a shimmery paper from Recollections that was a scrap I had. I cut the tassel from a golden yellow and adhered it to the hat.  I then used my paper piercer to pierce a hole through all the layers of the hat and also the end of the tassel and added a small brass brad to the center of the cap. I then stamped my sentiment with some Tim Holtz Walnut Stain Dress ink on more white cardstock and then cut a rectangle around the sentiment. I added a red mat cut about 1/4” larger then the cream mat with the sentiment. The hat and sentiment are both adhered to the card base with foam tape.  Thanks for visiting.

Friday, May 13, 2011

Anniversary Card

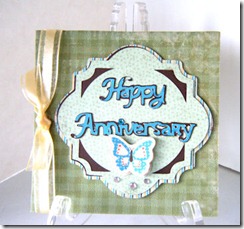
20110512_3 My 23rd wedding anniversary is this Saturday. My husband and I are headed to a bed and breakfast at the Oregon Coast to celebrate.  Because May is such a full month for us with birthdays, Mother’s Day and our Anniversary we usually don’t do much other than go to dinner. I decided to make a card and take with me to give to my husband while we are gone. My card base is an 9” X 4 1/2” rectangle flooded with a green gingham pattern from the Imagine More Cricut Imagine cartridge. I then used one of the images from the Elegant Edges Cricut Cartridge and flooded each layer with  a pattern or color from the Imagine More cartridge. I adhered the layers and shadow together and pop dotted to the from of my card. I then cut the Happy Anniversary from the Sweethearts Cricut Cartridge and a dark brown and blue and flooded each layer with the colors from the Imagine More cartridge. I cut the sentiment at 1 1/4”. I then cut the butterfly also from the Imagine More cartridge at 1 1/2”. I cut the image using the combine feature and cut it twice. I layered the butterfly cuts with a glue dot in the middle and some small pieces of foam tape under each wing so the butterfly wings were raised. To finish the card I used some clear heat set rhinestones under the butterfly and added a cream colored ribbon. I think the colors and simplicity of the card will work well for my husband. Thanks for visiting.

Sunday, May 8, 2011

Paper Playtime Challenge #45

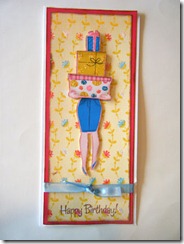
The challenge this week over at Paper Playtime is to make a tall card with an optional Cricut Cut if you have a cricut. Here is what I came up with for you.20110430_23 I started with a piece of white card stock at to 8” x 9” and scored it at 4” so I ended up with a card base 4” X 9”. Using my Gypsy, Cricut Imagine and the Better Together cartridges I laid out all the elements for my card. I used the George and Basic Shapes cartridge to create the colored rectangles. I sized both rectangles to 8” and flooded one with the solid red from the Better Together cartridge and the other with this flower print also from the Better Together Imagine cartridge.  I cut the image of the lady with the presents at 6” using the layers feature.  I inked the edges of all the cuts with some brown chalk ink and adhered the two mats together and added a blue ribbon to the lower part of the card. Using the same brown chalk ink I stamped my Happy Birthday sentiment and adhered the mats to my card base with my ATG gun.  I used pop dots to adhere the individual presents to the main image cut and the pop dotted the entire image to the patterned paper. To give the card a little more bling I used Yellow stickles on the flowers on the middle package, Glam Pink on the ribbon on the small top package. In addition to these two stickle colors I also used Tutti Fruiti and True Blue on the dots of the larges package. One final touch was to add Tutti Fruiti stickles the pink flowers on the background paper along with Star Dust stickles to the blue and white flowers. This added some glitter and glitz to the card. Thanks for visiting and I hope you join in the challenge at Paper Playtime.

Friday, May 6, 2011

Baby Wall Hanging

Baby Wall Hanging
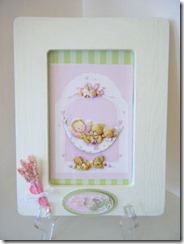
I started my project with an unfinished frame that I picked up at my local craft store for $1. I painted it with some Wicker White acrylic paint and then sprayed it with some Honey Dew Mist Glimmer Mist. After I sprayed on the glimmer mist I rubbed it with a paper towel like you would stain. I did this twice. It doesn’t show up well in the photo but it gave the frame a pretty light pale green color and the gold glimmer shows up in the light and makes the frame just shimmer.
For the picture I put inside the frame I used a Reddy Card image from Baby and Birth Ecstasy Craft .  These are so simple to use and look wonderful when you get done.  All of the images punch out and are numbered in the order you layer them. For my image I layered the images using the Joy Foam Pads between the layers to give that 3d effect.
I covered the chip board backing for the frame with some two toned green striped paper and mounted my  picture to the chipboard piece with my ATG gun. I used a cut from the Cricut Imagine Nursery Tails cartridge. For the flowers, I used some Flower Soft Wires that I covered with the Flower Soft Adhesive and then I sprinkled the adhesive covered wires with the Sweet Pea Flower Soft turning the wires as I sprinkled the  Flower Soft over them to ensure that all sides were coating. I used a 2” square of pink tissue paper to create a cone shape to put the flowers in, tied a narrow sheer white ribbon around the cone and glued it to the frame with the Flower Soft Adhesive. The Ecstasy Craft items are a great way to make a quick project that looks fantastic. I hope you give them a try.

Thursday, May 5, 2011

Happy Mother’s Day Card

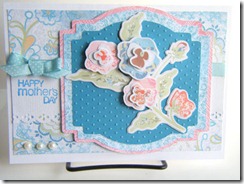
20110501_4 For this card I started with a 5” X 7” white pre-folded card base. I used the Lori’s Garden cartridge for all the patterned papers. I started with the 5:7 stock image rectangle and flooded it with the floral blue pattern and cut it down to 4 3/4” X 6 3/4”. I then cut a piece of white card stock 2” x 6 3/4” and used  Martha Stewart border punch on it and put that across the middle of my card. I added a light blue and white dotted ribbon across the top of the white to cover the edge of the card stock. I then used my Elegant Edges cartridge and flooded the shadow of this image with a pink patterned paper and cut it at 4”.  I cut the base layer flooded with a blue patterned paper. I then cut the image one more time at 3 1/2” and flooded it with a solid dark blue also from Lori’s Garden Imagine cartridge. I ran the solid blue piece through my Cuttlebug and embossed it with the Swiss Dots folder. I cut the pansy image from Lori’s Garden as well at 3” using the layers feature. I pop dotted many of the layers of the flowers to give dimension to the card. I adhered mat cut from Elegant Edges to the card with pop dots but the individual layers where adhered together with my ATG gun. To finish the card, I tied a small bow and adhered it to the ribbon with a pop dot. Added some pearls at the lower edge of my card and stamped my sentiment. Thanks for visiting.

Sunday, May 1, 2011

It’s a Girl Mini Album

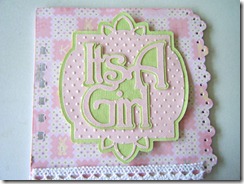
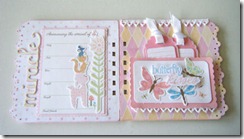
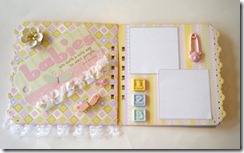
CoverThe challenge this week over at Scrappy Frogs Challenge Blog  anything goes. Here is my first post as a Design Team Member. I recently bought the Elegant Edges Cricut Cartridge and knew the book creative feature would make a great mini album. I also had the want to make a mini album for a co-worker who is having her first baby, a girl this summer. Mindy challenged us to go out of our comfort zone and make something we don’t usually make. Since I am a diehard card maker what a perfect time to challenge myself to make a mini album.  The album isn’t bound yet, I am waiting for my wires for my Bind-It-All to arrive probably Monday or Tuesday and will get it bound and a picture added to this post when I do.  I used the Elegant Edges and one of the images from the cartridge to cut the image for the cover. I cut the wording from the Nursery Rhymes cricut cartridge. I sprayed the green mat with some Honey Dew Mist Glimmer Mist and the pink with Pearl Glimmer Mist.

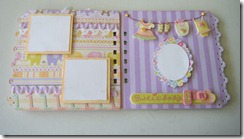
I used the Lace Edge image from page 44 of the handbook and use the book creative feature to cut my pages at 5” for my mini album. Since I didn’t have chipboard I cut each image twice out of colored cardstock and then again from my patterned paper. To cover the base pages I used some heavy patterned paper from K & Company.

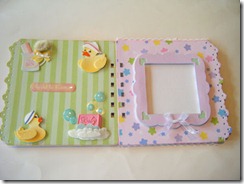
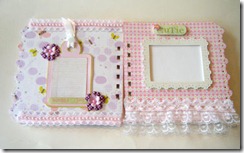
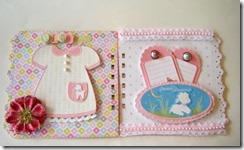
page 2 and 3 I also used Images printed and cut from my Imagine and the Nursery Tails cartridge. Lace, and trims from my stash adorn many of the pages as well as some stickers and embellishments from K & Company and from my stash.

pages 4 and 5 page 6 and 7 page 8 and 9 The tag on this page is actually from the Imagine More cartridge. It is the one with the little strawberry on it. I cut it at 3” and flooded the base layer with green, the next layer with pink and then left the lined paper image as is. I did not use the strawberry or the word Sweet. All of the frames in the book are also cut from the Elegant Edges cartridge.page 10 and 11 final pagesI left the back of the back cover as is. It is the same patterned paper as the front cover. This was a huge challenge for me as I do not scrapbook and have never made a layout. This is the second mini album I have made and the first of this kind. It was a lot of work but I am very happy how it turned out.