The winner of the blog candy from the Echo Park Blog Hop is:
Jovan said...WOW, this looks so super spooky cute! I love all the details
Jovan I will be emailing you for your mailing address. Congratulations and thank you to everyone for your nice comments on my project.
Monday, September 26, 2011
Trick or Treat!
We are having a Halloween Challenger over at Paper Playtime. I decided to do something for you that wasn't a card. Here is what I came up with.
 I got this wooden sign from Craft Warehouse on clearance for $2. I painted the edges with some black acrylic paint. I cut some Halloween paper to cover the sign and applied it with some Mod Podge. I did the same with the boots. They reminded me of witches boots. I added some orange ribbon around the top of the boots, and a little felt bat to each boot. For the bottom of the sign I added some black fringe trim I had leftover from Halloween last year. I cut Trick or Treat from the Mini Monsters cartridge at 2" and added some firefly stickles to the top layer for some bling. The sign was quick and easy to make and I thought was perfect to sit behind a little dish of candy. I hope you will play along with us at Paper Playtime.

Friday, September 23, 2011
Cutter's Creek Echo Park Blog Hop
Welcome to the Cutters Creek Design Team Echo Park Paper Blog Hop! If you just came from Lori's blog you are on the right track! If you just stopped by my blog, you can begin the hop at the CCDT blog here. Here is what I made for you today (Sorry this picture isn't better, I had trouble photographing the full project).

For my blog hop project I made a home decor project, a Happy Halloween sign. To make the sign I started with 3 pieces of chipboard cut to 5" X 7" and covered them with papers cut to size from the 12" X 12" Apothecary Collection Kit. You could easily size this down to a 6" X 6" square and use the 6" X 6" paper pack as well to make this. The next big decision was how to decorate them. For the top and middle layer I used cuts from the Happy Hauntings cartridge, for the bottom layer I used a cut from the Imagine Enjoy the Seasons cartridge and tons of ASI Kool Tak between all the layers of the cuts to provide dimension and depth to the project.
 For my top panel I cut the word Spooky at 2" from white and black card stock from my stash. The background paper is of course Echo Park . I used the Graveyard cut from the Happy Hauntings cartridge and cut it and all the layers at 4". I cut the headstone layer from some light gray paper and misted it with some Slate and Dazzling Diamond Glimmer Mist. I also sprayed the fence with some of the Slate Glimmer Mist. I layered everything with pop dots. For the grass layer I mixed some Ultra Fine Flower Soft in Sage and Pine and adhered it with the flower soft glue. The orange piece for the gate sign is part of the cut. However the Beware that cut just wasn't working for me so I grabbed this Haunted sticker from the paper kit. The small pendant banner is also from the Apothecary Collection Kit.

For my middle panel, I cut the Happy Halloween from the Happy Hauntings cartridge at 2". Both layers are cut from patterned paper from the Apothecary kit. I sprayed the bottom layer with the Slate Glimmer Mist and sprayed the orange layer with some Dazzling Diamond Glimmer Mist. My spider webs were cut from the October 31 mini cartridge at 3" from some Silver POW Glitter Paper. The spider goes with the witches hat on the Happy Hauntings cartridge and was cut from the Charcoal Pow Glitter Paper. Again, I pop dotted between the Happy Halloween layers as well as pop dotted it to my sign for lots of dimension. The black and white lace looking border is also a sticker from the paper kit.

For the bottom layer I printed the haunted house from the Cricut Imagine Enjoy the Season's cartridge using the layers function. I pop dotted all the layers for tons of dimension. I added the Sage and Pine Ultra Fine flower soft to the grassy area under the house and adhered it with the flower soft glue. Finally I bound the individual panels together with my Bind-it-All and some black Bind-it-All wires.
What is a blog hop without some blog candy??? SO I have some blog candy. Want to see?

To get you in the mood for Halloween I have one of the 6" X 6" Apothecary Echo Park Paper pads and two adorable Studio G clear Halloween stamps. For a chance to win the blog candy please leave me a comment with a way for me to get a hold of you. You do not have to be a follower to enter but I love comments and followers and would love it if you decide to follow my blog. You have until Noon on Monday, September 26th to get enter for the blog candy giveaway. I will use Random.org to select a winner by 9:00 pm PST Monday night and post the winner. You will have two weeks to contact me to claim your candy. Your next stop along the hop is Mindy. I hope you are enjoying our hop. If you get lost here is a list to find your way:

For my blog hop project I made a home decor project, a Happy Halloween sign. To make the sign I started with 3 pieces of chipboard cut to 5" X 7" and covered them with papers cut to size from the 12" X 12" Apothecary Collection Kit. You could easily size this down to a 6" X 6" square and use the 6" X 6" paper pack as well to make this. The next big decision was how to decorate them. For the top and middle layer I used cuts from the Happy Hauntings cartridge, for the bottom layer I used a cut from the Imagine Enjoy the Seasons cartridge and tons of ASI Kool Tak between all the layers of the cuts to provide dimension and depth to the project.


For my middle panel, I cut the Happy Halloween from the Happy Hauntings cartridge at 2". Both layers are cut from patterned paper from the Apothecary kit. I sprayed the bottom layer with the Slate Glimmer Mist and sprayed the orange layer with some Dazzling Diamond Glimmer Mist. My spider webs were cut from the October 31 mini cartridge at 3" from some Silver POW Glitter Paper. The spider goes with the witches hat on the Happy Hauntings cartridge and was cut from the Charcoal Pow Glitter Paper. Again, I pop dotted between the Happy Halloween layers as well as pop dotted it to my sign for lots of dimension. The black and white lace looking border is also a sticker from the paper kit.

For the bottom layer I printed the haunted house from the Cricut Imagine Enjoy the Season's cartridge using the layers function. I pop dotted all the layers for tons of dimension. I added the Sage and Pine Ultra Fine flower soft to the grassy area under the house and adhered it with the flower soft glue. Finally I bound the individual panels together with my Bind-it-All and some black Bind-it-All wires.
What is a blog hop without some blog candy??? SO I have some blog candy. Want to see?
To get you in the mood for Halloween I have one of the 6" X 6" Apothecary Echo Park Paper pads and two adorable Studio G clear Halloween stamps. For a chance to win the blog candy please leave me a comment with a way for me to get a hold of you. You do not have to be a follower to enter but I love comments and followers and would love it if you decide to follow my blog. You have until Noon on Monday, September 26th to get enter for the blog candy giveaway. I will use Random.org to select a winner by 9:00 pm PST Monday night and post the winner. You will have two weeks to contact me to claim your candy. Your next stop along the hop is Mindy. I hope you are enjoying our hop. If you get lost here is a list to find your way:
Cutters Creek Blog (Chris)
Wednesday, September 14, 2011
Life is Amazing Card

Monday, September 12, 2011
Happy 21st Birthday

I started with a piece of tan colored card stock cut to 4 1/4" X 11". I then scored this card stock at 2 1/4" and 5 1/2". My mug is cut from the Everyday Pop Up Cricut cartridge at 5". I used my Imagine and the Hopscotch color cartridge for the colors on the mug. I cut all the layers and adhered them together after inking everything lightly with some Wild Honey distress ink. I added some Rock Candy stickles to the foam at the top of the mug and covered the entire mug with Glossy Accents so it gave the appearance of glass. Cheers is also cut from the Everyday Pop Up Cartridge and was cut at 1 1/2". I again used the Hopscotch cartridge and flood filled the shadow layer with a dark blue from the cartidge and the top layer with a pattern. I attached Cheers with pop dots to the inside of my card. Finally I cut a circle from Birthday Bash at 2" and stamped my sentiment in dark blue ink. I threaded some twine through the tag and tied it to the handle of the much and attached the the tag to the front of the mug with a glue dot. He loved the card and had a great birthday!
Oh, by the way, Mary at CardzTV is our guest designer this week at Paper Playtime and has a video tutorial on her blog on how to make an Easel Card. Be sure to pay her a visit. Thanks for visiting and I hope you will play along with us at Paper Playtime.
Tuesday, September 6, 2011
Vintage Card
The challenge this week at the Scrappy Frogs is to make a vintage card. This was a tough one for me, I don't make many vintage style cards. I came across this paper at my LSS and knew it would be perfect for the challenge. The paper is by Cosmo Cricket.

My card base is what card stock scored and folded to make a 4 1/4" X 5 1/2" card base. I cut a mat from the polka dot paper 4" X 5 1/4" and the flowered paper was cut at 3 3/4" X 5". and then added another strip of the polka dot paper (sorry I can't remember the size). The lace is actually a white lace that I sprayed with some Santa Baby and Old Lace glimmer mist. Finally I cut a stripped mat to fit my image and adhered everything to the front of my card. The image of the girl is pop dotted to the card front. I inked the edges of everything with tea dye distress ink. To finish off the card I added a red button to the top corner. Thanks for visiting.

My card base is what card stock scored and folded to make a 4 1/4" X 5 1/2" card base. I cut a mat from the polka dot paper 4" X 5 1/4" and the flowered paper was cut at 3 3/4" X 5". and then added another strip of the polka dot paper (sorry I can't remember the size). The lace is actually a white lace that I sprayed with some Santa Baby and Old Lace glimmer mist. Finally I cut a stripped mat to fit my image and adhered everything to the front of my card. The image of the girl is pop dotted to the card front. I inked the edges of everything with tea dye distress ink. To finish off the card I added a red button to the top corner. Thanks for visiting.
Monday, September 5, 2011
Patchwork Kitty
So for Tutorial Tuesday I wanted to give you an idea on how to use some of those scraps building up in your scrap bin. If you are like me, you hate to recycle a piece of paper that you just might be able to use on another project. Here is what I have for you.
 To make my patchwork kitty, I started with a 4" X 6" piece of regular bond, printer paper and ran it through my Xyron. You could also use a large adhesive label but I didn't have any so had to improvise and it worked beautifully. I then cut 2" X 2" squares from some of my scrap paper. My paper for this project is from several Echo Park Paper Pads.
 I then randomly picked up my squares and attached them to my paper using the adhesive applied by the Xyron. Here is how it looked.

I then selected my imagine which was the Kitty from Create-a-Critter. I cut the base layer out of black card stock (another scrap) and then the top layer from my patchwork paper I made. I grabbed a scrap of pink for the bow and the kitty's nose. My card base is 4 1/4" X 5 1/2" white card stock. The yellow and purple paper are from the Echo Park Summer Days Paper Pad. I used my white gel pen to add some faux stitching around the outside of the card as well as to "stitch" all the seams and along the outside of the kitty. I added some black nail head embellishments from my stash for her eyes and a silver rhinestone from the new Want2 Scrap embellishments, to the kitty's bow. I used some Memento Tuxedo Black Ink to stamp my Hello. I attached my kitty to my card front with an Action Wobble I hope I have inspired you to trying something new with those scraps. Thanks for stopping by. Be sure to come visit us again as we will be featuring projects using the Echo Park Paper Pads all month.
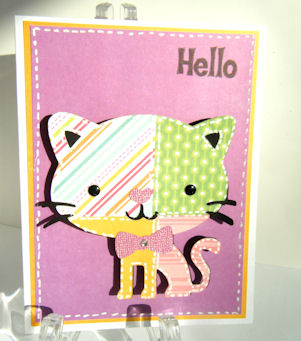

I then selected my imagine which was the Kitty from Create-a-Critter. I cut the base layer out of black card stock (another scrap) and then the top layer from my patchwork paper I made. I grabbed a scrap of pink for the bow and the kitty's nose. My card base is 4 1/4" X 5 1/2" white card stock. The yellow and purple paper are from the Echo Park Summer Days Paper Pad. I used my white gel pen to add some faux stitching around the outside of the card as well as to "stitch" all the seams and along the outside of the kitty. I added some black nail head embellishments from my stash for her eyes and a silver rhinestone from the new Want2 Scrap embellishments, to the kitty's bow. I used some Memento Tuxedo Black Ink to stamp my Hello. I attached my kitty to my card front with an Action Wobble I hope I have inspired you to trying something new with those scraps. Thanks for stopping by. Be sure to come visit us again as we will be featuring projects using the Echo Park Paper Pads all month.
Subscribe to:
Posts (Atom)