Saturday, April 27, 2013

Hello Sunshine!

We have had some awesome weather the last few days and it just seemed like a good idea to make a card that  celebrated our sunshine. For my card I made a circle easel card. It was a fun a quick card to put together. The card base and all the pieces but the bee were made using dies and my eBosser. I used a Scalloped Spellbinder Die to make my card base, the front and the little part on the inside of the card so it would stand up. I also used a set of circle dies that Kim special ordered for me. Here are pictures of the die sets I used.
I started with a piece of  white card stock that I cut and score to make a 4 1/4" X 5 1/2" card base. I then took my Scalloped Spellbinder Dies and using the biggest die in the set I cut the die shape out of my folded card base, being careful to place the die about a 1/2" above the fold line on my card base. This created the hinge in my card and gave me the scalloped circle card. I then cut the largest die again out of a second piece of white paper so I had a complete scallop. I took my scalloped card base and scored it down the middle so I could fold it in half. I also scored it at 2" from the top of one of the scallops.  Here is a picture of the inside of the card so you can see the score lines.
Next I the circle die set the Kim special ordered for me. I cut the largest of the circle out of black. I cut the next size circle out of some patterned paper from the Echo Park Country Drive paper pad. (The store is currently out of stock but if you are interested in the paper pad please contact Kim through the Customer Service link in the store.) Once I had adhered the different layers to the single scallop which would serve as my card front I attached it to my card base. I used my Scotch Quick Dry adhesive to put all my pieces and layers together. While the glue does dry quickly you still have a few seconds to move your layers around to be sure they like up properly. This is one of my favorite adhesives and I use it on almost all my projects.
The honeycombed pattern paper is actually the reverse side of the  blue bee paper. To get these layers, I used the scalloped dies starting with the largest and going one step down for each layer. I cut the base layer in white, the next layer in black and the final layer out of the honeycombed patterned paper. When I cut these I cut only half of the die out. Once I had them all cut I trimmed them down so I could layer them. The white layer is approximately 2", the black layer is approximately 1 3/4" and the patterned paper layer is approximately 1 1/2". I stamped my sentiment with some Memento Tuxedo Black ink. The Memento ink is my go to ink and I strongly recommend it. Now for my little bee! He was cut at 2 1/2" from the Create A Critter cartridge. This is one of my favorite cartridges and Kim can special order it for you. I cut the base layer out of black, the second layer out of the yellow and the wing layer out of some heavy tracing paper that my DH gave me from his work. For the wings, I wanted a bit of sparkle to them so I used some Butterscotch Glimmer Glam to the wings to give them some sparkle. I added the bee to my card front with some foam tape and added some Black Stickles to the ends of the antennas. I sure hope you have enjoyed my card. I would love to hear what you think.

Friday, April 26, 2013

Your the Man Blog Hop!

I'm so glad you could join us today for our Your the Man Blog Hop! We have divided the Cardz TV Design Team into a Saturday Team and a Sunday Team, so grab your favorite beverage, sit back and relax, and get ready for some fun, inspiration, and the chance to win some blog candy too! And don’t forget to come back tomorrow to Cardz TV for Day 2 with our Sunday team, for even more fun, inspiration and another chance to win some great blog candy!

Here's what I made for today's blog hop using Cardz TV Stamps Your the Man stamp set.


My card base is Kraft card stock cut and scored to make a 4" X 9" card base. (This card will fit in a regular business size envelope). I cut a blue mat at 3 3/4" X 8 3/4". My patterned paper is from an Authentique paper pad. The blue patterned paper is cut at 3 1/2" X 6". I then cut a brown mat from the same paper pad at 3 1/2" X 3". Finally to cover the seam where the papers covered each I used the reverse side of the blue patterned paper and cut a strip 3 1/2" X 1". I inked the edges of all my papers with some Tea Dye distress ink.

My gentleman is from the Art Deco Cricut cartridge. I cut him at 6". I used some Glimmer Glaze and a small paintbrush to add some stitching to his jacket and to the small blue patterned mat.


I used an EK Success punch to punch out the mat for my sentiment, and inked it with Tea Dye distress ink as well. Rich Cocoa Memento Ink to stamp my sentiment.


What's a blog hop without some blog candy!  Mary will be giving 2 sets of Cardz TV Stamps for her blog candy, so if you’re a follower of Cardz TV, just leave  a comment on her blog! Mary will use random.org to pick a winner, and will announce the WINNER on Monday!

Below is a list of all the stops in today's Your the Man Blog Hop. If you get lost, just come back here to check the list and find your way again!

Thank you for hopping with us today…we hope you had fun! See you tomorrow at Cardz TV for Day 2 with our Sunday Design Team, and lots more fun!

Your next stop is Karen.

1. Mary - http://www.cardztv.blogspot.com/
2. Jeri - http://www.bugnme.blogspot.com/
3. Ginger - http://www.mysistersscrapper.com/
4. Jennifer - http://www.creativecricutdesigns.blogspot.com/
5. Sharon - http://www.meemeescreations.blogspot.com/
6. Kristin - http://www.pinkldycrafter.blogspot.com/
7. Deanna - http://www.deannaspapercrafts.blogspot.com/
8. Karen - http://www.littlescrappieces.blogspot.com/
9. Shawnee - http://www.quiverofangels.blogspot.com/
10. Gloria - http://www.girliascards.blogspot.com/
11. Amanda - http://www.craftsbyamanda.blogspot.com/
12. Julie - http://www.readysetstamp.com/
13. Nicole - http://www.teachdanz.blogspot.com/
14. Rachelle - http://www.creationsbyrachelle.blogspot.com/

Friday, April 19, 2013

Cute as a Button Challenge


Over at Cardz TV Mary has decided to end the Crafty Cardz Challenge. However she did invite me to join her Cardz TV Design Team. This is my first project. The challenge is to make a project and to use buttons! This is what I came up with.

My card base is 4 1/4" X 5 1/2". I added a blue mat cut at 4" X 5 1/4" and then a white mat cut at 3 3/4" X 5".  I added a piece of patterned paper from a My Minds Eye paper pad cut at 2 1/2" X 3 3/4". I then added a piece of blue gingham looking washi tape.

I cut my steams from the Straight From the Nest cartridge. I cut two at 3" and one at 3 1/2". My "Flowers" are my buttons that I threaded some bakers twine through. Finally I added a green mat at the bottom cut at 1 1/4" X 3 3/4". I used an EK Success border punch on it and stamped it with a sentiment from Cardz TV Simply Said stamp set.

Sure hope you will join us and play along with the challenge.

Sunday, April 14, 2013

Happy Birthday Card

For my project today I am sharing the birthday card I made for my mom who's birthday is later this month. My card base is a cream card stock cut and scored to make a 4 1/4" X 5 1/2" card base. All of my paper is from the Secret Garden paper pads by Graphic 45. I used papers from both the 8" X 8" and the 6" X 6" paper pad. I cut a purple mat at 4" X 5 1/4" and then cream paper at 3 3/4" X 5". Next I cut a mat using my Silhouette Cameo. I cut the shadow at approximate 3 1/2" and the base layer at 3". I ran the cream scalloped through my eBosser and embossed it with the Swiss Dots Cuttlebug folder. (If I could only have one embossing folder the Swiss Dots folder would be my choice. It is so versatile.) I inked all my mats with some Tea Dye Distress ink and a sponge dabber.  I had a piece of cream lace with pearls on it that I used a paint dabber to apply some of the Tea Dye distress ink to.  I applied the lace to my card with some Scor-Tape.My dress and hanger are a Memory Box die. (No Kim can't get these yet, but I keep asking her! One of these days soon I hope she can). I cut my Hanger from some Kraft card stock and then inked it with some of the Tarnished Brass Distress Stain. (Distress Stain is a special order item, but don't hesitate to ask). The pearls I added to the waist of the dress are some I cut off from the lace. I adhered the dress to the scalloped mat with some foam tape. I cut 6 flowers using the George and Basic Shapes cartridge and inked them with some of the Shaded Lilac distress ink. I used my Petal Roller by Imaginisce to make my roses. I hot glued the layers together. My leaves were cut at 1" and are from the  Flower Shoppe cartridge (Heart). I inked my leaves with Peeled Paint distress ink and a sponge dabber. I also creased the center of the leaves and inked them with the Peeled Paint distressed ink to create a center vein in the leaf. I adhered the flowers and leaves to my card with some scotch quick dry adhesive.  I added a pearl to the center of one rose using some bisque liquid pearls.  I stamped my sentiment with some Rich Cocoa Memento ink. Lastly I added a small butterfly from my stash.

Sunday, April 7, 2013

Another Birthday Card

I was watching some youtube videos yesterday and saw a project that someone did using a white card base and a white mat with just a little bit of color added as embellishments. I wanted to try making my own version of that card and this is what I came up with. My card base is white card stock cut and scored to make a 4 1/4" X 5 1/2" card base. My card is a portrait card, I cut a white card stock mat 4" X 4" and ran it through my eBosser and embossed it with the Script Texture Cuttlebug embossing folder. I love my eBosser, it does such a wonderful job embossing and die cutting and I love that it is all electric, no cranking to help my white mat stand out from the white card base a bit I laid it on a piece of paper and using my Cool Gray 1 Copic Marker I traced around the outside edge of the mat using the brush tip. This applied a faint line of the light gray marker around the outside edge. I used my Scotch Quick Dry adhesive to adhere my mat to my card base. Now for my pop of color. I wanted to add a flower to my card and found this one in the Silhouette store. I used the print and cut feature to color it and cut it out. The center of the flower was originally a heart which I didn't want, so I cut a small circle instead. Again, I adhered my layers together with Scotch Quick Dry adhesive. I added my flower to my card front with some Kool-Tak Clear foam adhesives. To finish my flower I used my Buttercup Liquid Pearls to add some tiny pearls around the outer edge of my green flower center. That is what I love about Liquid Pearls, I always have the right color and size of pearl I want because I can make whatever size I need. Finally I added a White Opal pearl using Liquid Pearls again, in each corner of my mat to help anchor it. My sentiment is stamped in Rose Bud Memento ink. This was a super quick card to put together but I am really happy how it turned out.

Saturday, April 6, 2013

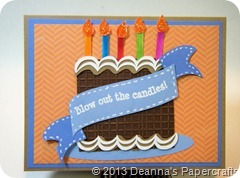
Blow Out the Candles

20130406_3

Most of my family has birthdays in April and May so I am in need of a lot of Birthday cards.  Here is the one I made today.
My card base is 4 1/4” X 5 1/2” Kraft card stock. I added a blue mat cut to 4” X 5 1/4” and then the orange patterned paper mat cut at 3 3/4” X 5”. The patterned paper is from a My Minds Eye paper pad.
My cake is from the Silhouette store and cut with my Cameo. I used some textured dark brown core’denations card stock for my chocolate cake base. I used Kraft card stock for the base icing layer at the top and bottom of the cake. I cut the candles, flames and the trim frosting out of white card stock. I colored the candles and flames with some Tombow markers. I just didn’t feel like digging out all those different colors of paper. I assembled my cake using my Scotch Quick Dry adhesive (my favorite) and attached it to my card with some foam tape. Before adding the banner across the front of my cake I stamped it with my sentiment in Versamark ink and embossed it with some opaque white WOW! embossing powder. To finish the banner I used my white gel pen to add some faux stitching.