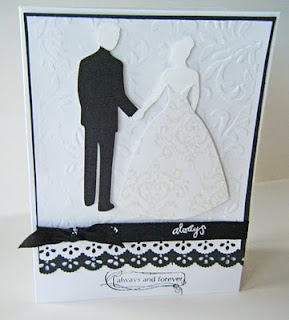
A friend at work asked me if I could make her a card to take to a wedding she is going to in a couple of weeks. This is what I came up with.
I cut my card base using the Sophie cartridge at 5 1/2". I used my Gypsy to hide the cut out that was on the front of the card. I then cut the layer at 5 1/4" so it was just a little smaller than my card base. My card base once folded measures 5 1/2" X 4 1/2" so it will fit in some invitation envelopes I picked up at Walmart awhile back. I embossed this layer with the three dots folder I have from Sizzix. I added this layer to the card front with some foam tape. I spritzed this layer and my white bride and groom with some Dazzling Diamonds Glimmer Mist which gave it a light gold shimmer.
I cut my bride and groom from white cardstock at 3 1/2" and the shadow out of black and adhered them together. I adhered the bride and groom to the card front with some foam tape as well. I then used some White Liquid Pearls to add pearls to the back of the dress, the brides hair and to the scallops on the card. Finally I stamped my sentiment with a CardzTV stamp and adhered that to the card front with some foam tape as well and then added a sheer white ribbon tied in bow to the fold of the card.
I am entering this card in the challenge over at Fantabulous Cricut where the challenge is to make a Wedding or Anniversary card. And I am entering it in the CardzTV Design Team challenge which is anything goes.
Showing posts with label Wedding Solutions. Show all posts
Showing posts with label Wedding Solutions. Show all posts
Friday, July 27, 2012
Monday, June 28, 2010
Wedding Card
Here is a wedding card I made for the Cricut Cardz Challenge. I used the Wedding Solutions cartridge for the cuts. The card is an 4 1/4" X 5 1/2" card. I started with a white card base, added a black mat and another white mat. I ran this last white mat through my Cuttlebug and embossed it with the Victoria embossing folder. I then sprayed this white embossed mat with some Pearl Glimmer Mist to give it a little shine. I also cut used one of my Martha Stewart edge punches to punch the lower edge of each mat. I cut the bride and groom out of white card stock using the black out feature. Then I added the base cut of the bride a groom to my Gypsy mat and copied and pasted it. I placed on image over as far as possible to the left so almost all of the groom was off the mat and cut the bride again using the patterned glitter paper. I did the same thing to on the other side of the mat and cut just the groom using some black card stock. I used some sharp scissors to cut off the pieces I didn't need leaving me with just the dress and the suit and added those to the white cut out of the bride a groom. I added some ribbon and stamped Always and forever to the front of the card. Thanks for looking.
Sunday, May 16, 2010
Happy Anniversary
My husband and I celebrated our 22nd Wedding Anniversary on Friday. We had a nice dinner out together. Here is the card I made him. I didn't want it too frilly or feminine. The card is a standard 4 1/4' X 5 1/2". The patterned paper is from the Best of K & Company paper stack that I picked up at Joanns. The hearts were cut from the Wedding Solutions cartridge. I used a cream card stock for the card base, a brown mat and then the patterned paper with each mat cut 1/8" of an inch smaller than the previous layer. I inked the edges of the patterned paper with some Brushed Corduroy Distress Ink by Tim Holtz and used the same ink to stamp the Happy Anniversary sentiment. The ribbon is some sheer brown ribbon I had in my stash.
Subscribe to:
Posts (Atom)


