Showing posts with label stickles. Show all posts

Thursday, August 27, 2015

Frankly Frightful


Where do you get your inspiration from? I find it all around me.Like this card.  I was just scrolling through some of the images in Cricut Design Space and came across this image.  It just said Easel Card to me so that is what I made.  When I find inspiration like this I can't wait to get started on my project.


For this Easel Card I started with two pieces of Kraft card stock. One piece I cut to 4 1/4" X 11.  I then scored this piece at 2 1/4" and 5 1/2".  I cut a second piece of card stock at 4 1/4" X 5 1/2".  This piece became my card front.

Next I cut a black border at 4 1/8" X 5 3/8".  My pattern paper is from an Echo Park paper pad that I have had for a couple years.  I found this piece with the big moon and a black scary tree with ravens in it and bats flying.  I cut the paper at 4" X 5 1/4" and adhered it together.  Next I added some yellow card stock behind the windows so it looked like there was a light on in the house.  I then adhered the house to my card front and used some yellow stickles in the windows.  Once the stickles dried I used a dauber and some black soot distress ink to go over the yellow to dull it down a bit.  The pumpkins that I adhered to the porch of the house are from the Jolly Jack O Lantern Memory Box die.  I adhered the house to my card front using some foam tape.

I then added my little stop to the inside of the card.  It is stamped with Frankly Frightful from the Cardz TV stamp set with the same name.  I added the remaining two pumpkins to the left side of the easel stop and stamped my sentiment on the right hand side.

I hope you enjoyed my card. Come back and visit again soon.

Friday, June 5, 2015

The Cutting Cafe - Design Team Planner Project.

First, I just have to say how excited I am to be working with Regina and the other Design Team members over at The Cutting Cafe.  If you've never visited before, you should make a shopping trip over there a priority. There are so super cute files over there for you to enjoy in your crafting.


So for my first project was to utilize the files for The Design Team Planner or the Craft Supply Planner.  I chose to use items from both planners.

For the cover I added lots of stickles to the butterflies.  I resized my planner to be 5 X 7 so it would fit in my purse so I could take it shopping.  For more details check out the video below.


Be sure and visit the Cutting Cafe store to check out all the awesome files. Also be sure to visit the blog  on the 7th and 21st of the month to check out all the design teams great projects.

Thursday, April 16, 2015

Butterfly Kisses

It is time for a new 3D Challenge over at CardzTV  T-his weeks challenge is to create a 3D project using flowers.  I had a lot of fun with this one and hope you do too.  Here is my project.

.
I found these daisies in the Silhouette store.  They were designed with just two cuts, the flower and the center.  They way they were intended to be put together was to put a straw through the holes.  However wouldn't you know it, my straws were just a tiny bit two small. SO I had to improvise.

I cut one end of the straw down both sides about 1/2" and spread the straw apart and pushed down on the ends so they were flat.  I used some glossy accents to attach my straw to the yellow center with the hole in it.  Now I had to figure out how to cover the holes.  The yellow centers were cut at 1 3/4".  So I used a 1 1/2" scalloped punch to punch a scallop out of this bright pink color. Then I used a 1 1/4" circle punch to punch another yellow circle. Finally I stamped this second yellow circle with a Peachy Keen stamp face. I used the 1" size stamp and Memento Tuxedo Black ink.  Using my white gel pen I added some freckles to the pink cheeks.  The pink cheeks were add with a rose colored Prima Watercolor pencil and blended with a Dove blending pen.

Next I cut out this cut butterfly from the Create a Critter cartridge.  I used my Explore and Design Space to  flatten the butterfly so I could do a print and cut on it.  I cut the butterfly out at 2".  I added some Raspberry Stickles to the dark pink areas on the butterfly's wings and some Lime green stickles on the very end of his antenna's.  Once the stickles was dry I glued the butterfly to a straw. 

I found this little biodegradable pot at my craft store and thought it would be perfect for this project.. I added some floral oasis inside the pot to hold my flowers. I bent each straw slightly so that you could see the flowers cute faces.  I added some leftover green Easter grass to cover the oasis.  Next I put my butterfly in the center of the pot.  For my sentiment I used some white and pink butterfly Washi Tape and some Staz-on black ink I stamped my sentiment unto the Washi tape and the carefully wrapped it around a straw.  I cut the end of the tape to make it look like a flag.  My sentiment is from the Think Spring CardzTv Stamp Set.

Now it is your turn. Show us what you can do with a 3D Challenge using flowers.  And don't forget to hop over to Mary's Stamp blog and get your stamps ordered..  Please leave me a comment and let me know what you think of my project. I love hearing from you.  Don't forget to visit the other Design Teams blogs to see what they made for the challenge.

Thursday, October 2, 2014

CardzTv 3D Treat Holder Challenge

Our hiatus is over and we are glad to be back bringing you fun challenges from CardzTV.  For our first challenge on the 3D team was to make a Halloween treat holder. So much fun!!! Here is what I have for you today.
 I found these cute little snack size candy bar boxes in the silhouette store. There are several different designs to choose from these are the two I picked.  The boxes are easy to put together. I used score tape as my adhesive to hold the boxes together. For the spider box I added some stickles to the web and the spider. The bat box comes with the piece for the top of the box and the bat. I used some stickles for his eyes.  Of course what is a treat box without a treat??? So of course I had to go out and buy some of the fun size bars just to be sure they fit the boxes. Guess what? They do fit,  just perfectly.  For the sentiments on the boxes I used Trick or Treat and Going in Circle.

Be sure to pop over to the CardzTV blog if you haven't already and see all the other inspiration provided by the 3D team. I know my Design Team sisters would love if  you would stop by their blogs and leave a comment.  I too would love to hear what you think and would love it if you decided to follow my blog.

A new addition to the CardzTV Design Teams is the CardzTV Gallery. New projects are posted daily so be sure you pop over there and sign up to follow that blog as well.

Now it is your turn. Join in the fun with this challenge and link your project up over at CardzTV for a chance to win a set of CardzTV stamps.  There are 3 new stamps sets that have just been released, so be sure to check those out also.

Sunday, August 31, 2014

You Put a Spell on Me!

So the we have had some very fall like weather the last couple of days. Cloudy, rain, wind, AND I saw some of the trees with their leaves changing color to those coral, red and orange colors so familiar with Fall. However, what type of card did I make? A Halloween card.

I found this cute circle card in the Silhouette store and of course I had to make it. The file cut as is makes a 5 1/2" round card. My base layer is the light gray, then I cut the scallop out of black, the circle out of the light gray and the top layer out of black. Once I had the card put together, it just screamed that it needed a little pizazz. So, I added some Firefly Stickles glitter to the bats eyes. Once that dried and then added some Glossy Accents to add some dimension to the eyes.

Next came the sentiment. I chose the "You put a spell on me" sentiment from the CardzTV stamp set "Trick or Treat". I stamped the sentiment in some tangerine ink on the gray paper. I used some Black Soot distress ink to ink around the edges of the sentiment after I rounded the corners. Next, to jazz it up a bit more, I used some Times Square Glimmer Glam and brushed it over the whole sentiment. The Glimmer Glam added some sparkle and shine but also helped the sentiment square look a little spookier and distressed. Finally to finish the card, I added some Cantaloupe Liquid Pearls to each of the big scallops.

I hope you are having a great Labor Day weekend! Come back and visit again.

Sunday, May 11, 2014

Party Animal

I have a fun birthday card for you today! The little owl is a print and cut image from the Silhouette store. (Yes, Kim can order you a Silhouette!). The card base is white card stock cut and scored to make a 5" X 7" card base. I added a purple mat cut at 4 3/4" X 6 3/4". The patterned paper is from  my stash and is cut at 4 1/2" X 6 1/2". After I print and cut the owl, I added a bunch of Stickles to his hat and stomach. Because, of course a party animal has to sparkle and shine!  I added my owl to the front of the card with some foam squares. Finally I stamped the sentiment some Memento Tuxedo Black Ink.

Tuesday, September 24, 2013

Happy Halloween

Today I have for you a Halloween card that I made using the new Tim Holtz Stamps and Framelit dies. For my card I started with a 4 1/4" X 5 1/2" black card stock base. I used my Graphic 45 Steampunk Paper for my card as well. The rust color mat is cut at 4" X 5 1/4" and the black dotted paper is cut at 3 3/4" X 5". (the dotted paper is the reverse of the rust paper, got to love two sided paper)! Even though it is sold out in the store, just ask, and Kim can order you some and there are some other great pads, check out the 12 Days of Christmas paper pad. For my web, I embossed each layer with some WOW! embossing powder in  Black Glint embossing powder. The spider was embossed with the Black Ebony embossing powder. I stamped and cut the web out of white card stock. To age it just a bit I sprayed it with some Old Lace Glimmer Mist. I layered the cuts of the web with some foam dots between the layers. I then added a foam dot to the very center of my layered spider web and then adhered it to my card front with some Scotch Quick Dry Adhesive. To finish the spider I added some purple stickles to his body. My sentiment is from the same stamp and die set. I stamped it with some Memento Tuxedo Black ink. I used my eBosser and the Magnetic Shim to cut my die images out.  One of Kim's customers asked if we could do a video showing how to use this shim and the embossing mat. So while working on this project I shot a short video to show you how I use the shim. I hope it will help answer some of your questions.

Sunday, August 11, 2013

One Day at a Time

 I just recently received the 6 new stickles colors from Cutters Creek, and oh my are they ever beautiful. If you haven't ordered yours yet, you do not want to miss out on these. The colors are beautiful and will be great for the upcoming holiday crafting season. Now just to tempt you just a bit more, I made a color chart for you so you could experience the colors yourself.
Aren't they beautiful???? Now, are you ready for a project that uses some of these colors? Great because I have one for you!
I started with a piece of kraft card stock cut and folded to make a 4 1/4" X 5 1/2" card base. My patterned paper is from a My Minds Eye Bluebell paper pad that I received from the 6" x 6" paper pad club that I belong to through the Cutters Creek Yahoo Group. Kim usually has several clubs running at once. She does her best to keep the cost down to around $20. They are billed the same day each month and at the end if you have paid on time you receive a free gift. Just join the Cutters Creek Yahoo Group to find out more. I will spill a secret and let you all know that Kim has just opened sign ups for the new Distress Glitter club. Interested??? Join the group for details. Now back to the card! I used a scalloped chipboard oval from Want 2 Scrap (a free gift from a club!). I stained it with some Broken China Distress Stain (another club product!). I then sprayed it with some Sea Glass Glimmer Mist. Once it was dried I used the Ice Blue Stickles on the lacy scallop edges. I stamped the images with Memento Tuxedo Black Ink. They were colored with Copic and Spectrum Noir markers. I used the Ice Blue Stickles for the center of my flowers and to add some sparkle to my butterfly. The heart on the flower pot I used the Cranberry Stickles. I used some Scotch Quick Dry Adhesive to adhere my  scallop to my card and to adhere my images to the oval. My tickets are inked with some Tim Holtz distress ink in Faded Jeans and Tumbled Glass. To finish the card I stamped my sentiment with some Memento Tuxedo Black Ink and added some rhinestone bling. Now don't forget to join the Cutters Creek Yahoo Group to find out more about the clubs and all the products in the store. You won't regret it. It is a great way to add to your crafting supply without breaking the budget!!

Saturday, April 27, 2013

Hello Sunshine!

We have had some awesome weather the last few days and it just seemed like a good idea to make a card that  celebrated our sunshine. For my card I made a circle easel card. It was a fun a quick card to put together. The card base and all the pieces but the bee were made using dies and my eBosser. I used a Scalloped Spellbinder Die to make my card base, the front and the little part on the inside of the card so it would stand up. I also used a set of circle dies that Kim special ordered for me. Here are pictures of the die sets I used.
I started with a piece of  white card stock that I cut and score to make a 4 1/4" X 5 1/2" card base. I then took my Scalloped Spellbinder Dies and using the biggest die in the set I cut the die shape out of my folded card base, being careful to place the die about a 1/2" above the fold line on my card base. This created the hinge in my card and gave me the scalloped circle card. I then cut the largest die again out of a second piece of white paper so I had a complete scallop. I took my scalloped card base and scored it down the middle so I could fold it in half. I also scored it at 2" from the top of one of the scallops.  Here is a picture of the inside of the card so you can see the score lines.
Next I the circle die set the Kim special ordered for me. I cut the largest of the circle out of black. I cut the next size circle out of some patterned paper from the Echo Park Country Drive paper pad. (The store is currently out of stock but if you are interested in the paper pad please contact Kim through the Customer Service link in the store.) Once I had adhered the different layers to the single scallop which would serve as my card front I attached it to my card base. I used my Scotch Quick Dry adhesive to put all my pieces and layers together. While the glue does dry quickly you still have a few seconds to move your layers around to be sure they like up properly. This is one of my favorite adhesives and I use it on almost all my projects.
The honeycombed pattern paper is actually the reverse side of the  blue bee paper. To get these layers, I used the scalloped dies starting with the largest and going one step down for each layer. I cut the base layer in white, the next layer in black and the final layer out of the honeycombed patterned paper. When I cut these I cut only half of the die out. Once I had them all cut I trimmed them down so I could layer them. The white layer is approximately 2", the black layer is approximately 1 3/4" and the patterned paper layer is approximately 1 1/2". I stamped my sentiment with some Memento Tuxedo Black ink. The Memento ink is my go to ink and I strongly recommend it. Now for my little bee! He was cut at 2 1/2" from the Create A Critter cartridge. This is one of my favorite cartridges and Kim can special order it for you. I cut the base layer out of black, the second layer out of the yellow and the wing layer out of some heavy tracing paper that my DH gave me from his work. For the wings, I wanted a bit of sparkle to them so I used some Butterscotch Glimmer Glam to the wings to give them some sparkle. I added the bee to my card front with some foam tape and added some Black Stickles to the ends of the antennas. I sure hope you have enjoyed my card. I would love to hear what you think.

Saturday, April 6, 2013

Blow Out the Candles

20130406_3

Most of my family has birthdays in April and May so I am in need of a lot of Birthday cards.  Here is the one I made today.
My card base is 4 1/4” X 5 1/2” Kraft card stock. I added a blue mat cut to 4” X 5 1/4” and then the orange patterned paper mat cut at 3 3/4” X 5”. The patterned paper is from a My Minds Eye paper pad.
My cake is from the Silhouette store and cut with my Cameo. I used some textured dark brown core’denations card stock for my chocolate cake base. I used Kraft card stock for the base icing layer at the top and bottom of the cake. I cut the candles, flames and the trim frosting out of white card stock. I colored the candles and flames with some Tombow markers. I just didn’t feel like digging out all those different colors of paper. I assembled my cake using my Scotch Quick Dry adhesive (my favorite) and attached it to my card with some foam tape. Before adding the banner across the front of my cake I stamped it with my sentiment in Versamark ink and embossed it with some opaque white WOW! embossing powder. To finish the banner I used my white gel pen to add some faux stitching.

Sunday, January 27, 2013

Cardz tv Color Challenge


The Design Team at Cardz Tv is having a color challenge. The challenge is to make a  project using Red, Black, and White only. This is what I came up with to enter into the challenge.

I got the XO Tic Tac Toe image  from the Silhouette store and cut it with my Cameo. My card base is white card stock cut and scored to make a 4 1/4" X 5 1/2" card. I added a red mat cut at 4" X 5 1/4" and then added the black and white patterned paper cut at 3 3/4" X 5.

I cut the image at the size it opened up on the mat which was about 3 1/2". The image cuts an extra X and O besides the heart. I adhered these to the Tic-Tac-Toe game with some foam tape and then added stickles to them. I also added a small bordered bunched with a Martha Stewart scalloped heart punch and topped it with some red and white gingham ribbon. All my patterned paper is from an American Crafts 6" X 6" paper pad. Hope you like it.

Wednesday, January 2, 2013

Valentines Day Cards

It is hard to believe that 2012 is over with and we have entered 2013. If time moves as quickly has it has been Valentine's Day will be here before you know it. Here are a few easy cards to get you started on creating yours. All of my cards have a white card stock base and are 4 1/4" X 5 1/2". My mat layers are 4" X 5 1/4" and 3 3/4" X 5. All of my paper is from K & Company and are from older paper pads. All of my little critters are from Create A Critter 2. I cut the Teddy Bear and Koala bear at 3 1/2" and the Love Bug is cut at 3".
 For my Teddy Bear I used some onyx pearls liquid pearls for his eyes and a white gel pen to add some faux stitching to my heart. I used white distress stain to stamp my little sentiment on my heart. He is attached to the card with an Action Wobble.
For my Koala I used my Imagine and the Baby Boutique color pallet for my grey colors. The black and red I cut with my Expression. Again I added some faux stitching to my heart and the ribbon. I embossed the sentiment with some Opaque White WOW! Embossing Powder.
For my Love Bug I added some Glam Pink stickles to the heart shaped antennas. My sentiment on this one is stamped in Memento Tuxedo black ink and is tamped on the larger heart that cut out from the bugs body.
This is the Hero Arts stamp set I used for all of my sentiments. I got it awhile back and have been anxious to use it.This item is not a standard stock item in the store but Kim at Cutter's Creek can order it for you so don't hesitate to ask her.

Sunday, October 21, 2012

Halloween Decor Graphic 45 Style

I found these cute little canvas's and easels at a local craft store and just had to get them. I painted the easels and the canvas with some black acrylic paint. I then used the Graphic 45 Happy Haunting's Paper Pad for my images. I cut around part of the image and used some Matte Inkssentials Glue N Seal to seal my canvas and adhere my image. Then it was time to decorate.
For the square canvas I made some roses using a tutorial found here. I adhered them to the canvas with some hot blue and added some Diamond Ice Stickles to the edges of the flower petals.Then I added a couple of Rhinestone flourishes. I then embossed the edges of the canvas with some Black Glint WOW! Glitter Embossing Powder.
For the other canvas I again used the Matte Inkssentials Glue N Seal to seal my canvas and adhere my image. For this one I also made a rose and used some Stardust Stickles along the edges of the petals. I had some black tulle with some purple glitter in it and that cut and gathered to put behind the rose. I used some Majestic Purple Liquid Pearls to add some dimension to the canvas. I then outlined the edges of the canvas with some Black Diamond Stickles.

Sunday, August 12, 2012

Another Birthday Card

I have another birthday card for you today. This one was made using the card feature on the Birthday Bash Cricut Cartridge and was cut at 5 1/2". What I wanted to show you today on this quick video is an awesome new product I got from Cutter's Creek called Glitter Dust. It is in an aresole can and you spray it onto your image. I used the Iridescent on this card but it also comes in Pink, Gold and Silver. I should have my pink on Monday. I also used some stickles and some Opaque White WOW! Embossing powder on the inside of my card. The video is quick but it really shows of the Glitter Dust and the Embossing Powder.


Tuesday, August 7, 2012

Birthday Card

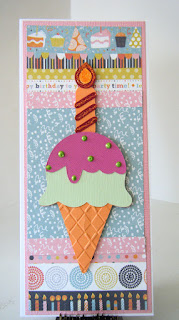
I have a fun birthday card for you today! I made this for my son's girlfriend. Sure hope she likes it. My card base is white card stock and is cut and folded to make a 4" X 9" card. This card will fit in a regular #10 business envelope. I added a pink mat cut at 3 3/4" X 8 3/4". My next dilemma was that the paper pad I wanted to use was a 6" X 6" paper pad but I need an 8 1/2" tall paper for my card. So what I did is I took two different coordinating papers from the My Minds Eye "Life's A Party" paper pad. This paper has not been added to the store yet but if your interested in it, let Kim know. Here is a picture of the paper pad.
 I cut the blue patterned paper in the middle of my card at 3 1/2" X 4". I then found a piece of paper in the pad that had strips for borders and cut that at 3 1/2" X 2 1/2" and placed that at the top of bottom of the blue piece on my card. Then the reverse of the border print paper had the same pattern as the blue but it was pink so I cut a 1/2" X 3 1/2" piece of that paper to place over the seams, My birthday ice cream cone is cut at 6 1/2". I ran the cone part through my Cuttlebug and embossed it with a Sizzix Argyle embossing folder. (This Cuttlebug embossing folder is very similar and would work well.) To finish my ice cream cone I added some Key Lime Liquid Pearls for my sprinkles and some Orange Peel and Paprika stickles to my candle. I added my Ice Cream Cone with some foam tape to my card front.

Tuesday, July 31, 2012

Ecstasy Craft Cards

I have another sneak peak for you of some of the awesome holiday Ecstasy Craft items that Kim will be adding to the store very, very, soon!!!
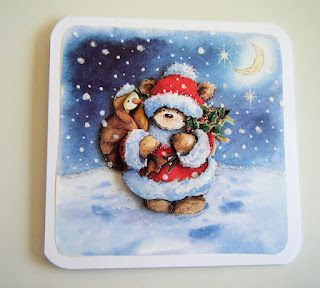
These are called Reddy Die-Cuts. As you can see I got 4 cards from one package. As you can see they come with a background paper to build your image on. Building the image is easy as 1,2,3. All of the punch out items are numbered in the order that you layer them. It took me just about an hour to make all 4 cards which is fast for me. The individual card toppers measured just under 4" so I cut 4 white card stock card bases at 4 1/4" X 8 1/2" and scored and folded them to make four 4 1/4" square cards and rounded the corners. These will fit in a standard size A2 envelope so you won't have to pay extra postage to mail a square card.
On this little guy I added some Frosted Lace Stickles between the snowline and the sky and also on the 4 larger snowflakes. (sorry it doesn't show up better in the photo).
On this one I again added some Frosted Lace Stickles to the snowline and I also added some Stardust Stickles to the stars by the moon.
For this one I added some Ultra Fine White Flower Soft to the snow along the top of the fence and also to some of the snow on the tree limbs.
On this one I again added some Stardust Stickles to the fireworks in the sky. Check out the dimension you get with these wonderful little layered images.These were quick and easy to make and are beautiful as is without any additions. It is a fun and quick way to make some cards to give as gifts or to mail to family and friends.
There are some great new Flower Soft products that have been added to the store just in time for your holiday crafting so be sure to check them out. Also be sure to check the  new CHA 2012 Release section of the store to find out the latest and greatest additions including these wonderful Ecstasy Craft items.

Saturday, June 23, 2012

4th of July Card

I have a quick 4th of July card for you today. Perfect to use as a party invitation or to just let someone know you were thinking of them. My card base is white Bazzill Simply Smooth card stock cut and scored to make a 4 1/4" X 5 1/2" card base. I added a dark blue mat cut at 4" x 5 1/4" and a red mat cut at 3 3/4" X 5". Both of these mats are Core' de nations Card stock (Cutter's Creek is out of this paper but Kim can likely order it for you). I then used a piece of the Whitewash Cut and Emboss card stock. I ran that through the Cuttlebug and embossed it with the Stars embossing folder and sanded it so that the red from the back side showed through. I cut the 4th of July image from the Stand and Salute cartridge at 2 1/2". I cut the shadow twice once out of white and once out of red and offset them just slightly. I cut the top layer out of a dark blue and added some Midnight Blue stickles to the blue layer. Popped up the sentiment with some foam tape. I also added some blue and white and red and white Doodlebug bakers twine to my card. Finally I added a couple of star buttons from my stash and threaded them both with more of the twine and tied a knot.

Wednesday, May 16, 2012

Cricut Cardz May Day Challenge


Welcome to the Cricut Cardz Challenge #108 at Cardz TV. This challenge is a May Day challenge, to make a card for any occasion using flowers from any cartridge(s) and using any colors you'd like. This is what I came up with.

My card base is a 5" x 7" white card stock. I used my corner rounder to round all the corners. I used the Lacey Labels cartridge to cut the navy mat and the white mat at 6 1/2". I ran the white mat through my Cuttlebug and embossed it with a floral embossing folder from Sizzix. My vase of flowers was cut at 6" from the Kate's ABC's. I used my Imagine and the All Wrapped Up cartridge for my colors. To finish the card I added some stickles to some of the flowers, stamped Hello in the lower right hand corner and added 3 pearls to the lower left hand corner. For the pearls, I took some white pearls and colored them with a Copic marker to get some blue ones to go with my card. I hope you will play along with us and look forward to seeing what you all come up with.

Sunday, April 15, 2012

Birthday Card

20120415_2In April and May I have a bunch of birthday in my family, so of course that means a bunch of birthday cards. So I have 6 birthdays, Mother’s Day and my Anniversary to make cards for by the end of May, so I figured I better get started and make them quick and easy. For this card I started with some Kraft card stuck cut, scored, and folded to make a 4 1/4” X 5 1/2” card base. I added a black mat cut at 4” X 5 1/4” and then some patterned paper cut at 3 3/4” X 5”. (One of my lovely online friends sent me this birthday paper pack. Thank you Lynn for the Birthday Extravaganza paper 4” X 6” paper pack). I added some bakers twine that I wrapped around the card. I used the Phrases cartridge and cut the Make a Wish sentiment at 1 1/2”. Once I adhered all the layers of the sentiment together I adhered it to my card with some foam tape. Finally I used some stickles to add some sparkle to the sentiment phrase. Thanks for visiting. Have a great week.

Monday, March 26, 2012

Happy Easter Basket


I took today off and ended up playing most of the day. Had a lot of fun and came up with this Easter Basket, I found the little basket at the Dollar store along with the egg picks. I used the Garden Soup Cricut Cartridge to cut my flowers out at 3". I tried to match the colors in the flowers on the basket. I used my glue gun and attached them to wooden skewers. I used my Tim Holtz scissors to cut the skewers off a little because they were too long. I cut my little bunnies from the Doodlecharms cartridge. I cut one bunny at 3" and one at 2". I used a black gel pen to draw in his whiskers and mouth. I used some pewter colored small pearls for the bunny's eyes and some pink chalk to add some light pink to the inside of his ears and to his cheeks. I cut the Happy Easter at 2" from the Easter Season Cartridge from 2010 and added some Star Dust stickles to it. To finish the basket I put in some of the crinkle cut grass and removed the remaining eggs from the picks and just placed in the basket on top of the grass.

I entered this project in the following challenges:

Go Fish Challenge Blog - Make an Easter Project
Fantabulous Cricut - Make a project with a gentle animal
Exploring Cricut Challenge  - Make a Spring Time project