Sunday, June 26, 2011
Hello Card
Friday, June 24, 2011
Blog Award

I was excited to find out that Glenda at Glenda's Cards awarded me with this wonderful blog award.Thank you so much Glenda. Be sure to visit Glenda's blog to see some wonderful projects. I love the teapot card she did recently. It is beautiful. To accept the award, the rules are to thank the person who honored you with the award, tell 7 random things about yourself, and pass the award on to 8 friends.
7 random things about myself, mmm... 1. I am an identical twin, 2. I love to cook, 3. Not too into sweets and chocolate, (weird I know!), 4. I do however love Gummy Bears, 5. Am getting acupuncture for my back and find it helpful (was leery at first), 6. Work for a local county government, 7. Been with my employer for 27 years.
I am giving this award to these talented people. Please give each of their blogs a visit.
1. Fran at Scallops and Swirls
2. Sheri at Twitterpated with Paper
3. Karen at Karen's Fun Blog
4.Mindy at Scrappy and Piggy
5. Linda at Paper Boutique
6. Sarah at Live, Love and Scrap
7. Janis at Pause, Dream, Enjoy
8. Edna at Create with Expression
Wednesday, June 22, 2011
Freedom Banner
I cut my letters out from the Plantin Schoolbook cartridge at 3". I used more of the dark blue card stock for the shadow and some Marine POW! Glitter Paper. This paper cut perfectly with my Cricut. I used blade depth of 6 and pressure at max. I did not use Multi-cut. This paper is not has thick as the other American Craft Glitter Paper. Both of these glitter papers are gorgeous and cut wonderfully with the Cricut. The glitter on the paper does not come off like other glitter papers. I used my Tweezer Bee Tweezers to adhere the two layers of the letters together. I love these little tweezers. They really help me align and layer the smaller Cricut cuts. I highly recommend these.
Finally I adhered the letters to the stars with some foam tape. Here is another product I hgihly recommend and that is the Tim Holtz Non-stick Scissors. These scissors are non-stick and I love cutting my foam tape with them. No more sticky scissors.
I used some regular kitchen twine to to hang my banner on my fireplace. I thought the twine went with the vintage them. I am really pleased how this turned out and the glitter paper letters and just the right touch of sparkle and shine to the banner. Here are a couple of close up shots of the banner.
I hope you enjoyed my project for you today and found a few new tools to help you with your crafting projects.
Monday, June 20, 2011
Sneak Peak
Sunday, June 12, 2011
Z-Fold Welcome Baby Card
Here is a look at the inside of the card.
I cut the onesie at 2" also from the Everyday Popup Cartridge. I added a purple mat and white cardstock and stamped my sentiment that says good things come in small packages. To finish the card I tied a pink ribbon around the card and added a prima flower pink pearl in the center. I want to apologize for the poor pictures. I killed my new laptop by spilling water on it and the pictures were on there and on facebook. I had to download these from facebook. I hope you join in the challenge this week at Paper Playtime.
Happy Father's Day Card
Sunday, June 5, 2011
Father’s Day Card
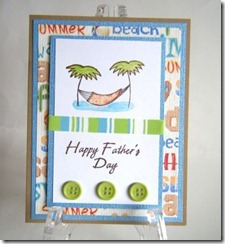
 I made a Father’s Day card this afternoon without using my Cricut. I decided to challenge myself to do something a little different. I started with a 4 1/4” X 5 1/2” Kraft card stock card base. I cut a blue mat 4” X 5 1/4” and the patterned paper which is from a DCWV paper stack I bought last summer was cut at 3 3/4” X 5”. I then cut another blue mat 3” X 4 1/4”. I used a stamp I had in my stash and stamped it with some brown ink on a piece of smooth white card stock cut at 2 3/4” X 4”. I colored the palm trees with a green colored pencil. I then stamped the image again on a piece of golden yellow patterned paper and cut out the hammock and glued that to the hammock on the image and added a little shadow underneath the hammock. I added a piece of ribbon and stamped Happy Father’s Day in brown ink and then added 3 lime green buttons that I attached with pop dots. It was a quick fun card to make. Thanks for visiting.
Saturday, June 4, 2011
Just Because Card
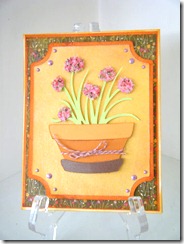
I recently got the Kate’s ABC’s Cricut cartridge and knew immediately what I wanted to do when I saw this image on the cartridge. This image reminded me of the chives in bloom that I grow on my back patio in pots.
My card base is an A2 4 1/4” X 5 1/2” cream card stock. My orange and patterned paper is from a Basic Grey 6” X 6” paper pad I got from Cutter’s Creek several months ago and is no longer available. I really encourage you to get some of the 6” X 6” pads that Cutter’s Creek sells like the new Echo Park pads. They are great for card making, the patterns are shrunk down to be in proportion to the size and work great for cards reducing waste. Check them out.
Back to my card. I used the Elegant Edges cartridge for the decorative mat and cut both the shadow and the base image from page 38 of the handbook using the oblong creative feature.
My yellow layer of the decorative mat was actually cut out of white card stock. I used some Wild Honey Distress Ink and my Inkssentials Blending Foam and the Alcohol Ink Applicator to apply the ink in a circular motion over my entire piece of white card stock. Then I sprayed it with some Sun Sister’s Glimmer Mist. Once I sprayed the card stock and lightly blotted it with a paper towel and let it dry.
While the card stock was drying I cut out my image from page 67 of the Kate’s ABC’s handbook. I cut all the layers at 3” and followed the colors as they worked for what I wanted to do. After adhering all the layers together I got out my Sweet Pea Flower Soft and my Flower Soft Glue and got to work. I applied the glue to the flowers and sprinkled the flower soft over the glue and tamped it down using my finger. I allowed it to dry and then gently tapped off the excess and loose flower soft.
To finish my card, I added a piece of twine from my stash to the pot and attached the image to my card front with some foam tape . I then added some pink I-Rocks Glitter Gems in two sizes using my heat set tool to each corner of my yellow mat. Love this gem set, it has several different colors and each color and several different sizes. I opted to use two sizes with a larger one in the middle. I haven’t stamped a sentiment yet as I haven’t decided who will be getting this card and for what occasion.
While the cricut cartridges are not listed on the Cutter’s Creek site Kim might be able to order them for you, just ask.


