Saturday, February 25, 2012

Birthday Card

20120225_8

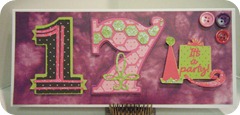
My daughter turns 17 next Thursday (I can’t believe it!). This is the card I made for her.

My white card base is a “tall” card cut and folded to 4” X 9” and will fit in a standard #10 business envelope. I found this tie-dye paper pack from DCWV and had to get it for her. She loves tie-dye things. I cut the 17 at 3” from the Letter Envy Cricut Circle cartridge that I received in the mail on Thursday. I used the Bubblegum Stripes Imagine cartridge for the colors and patterns on the layers. I also tried a new technique I saw and the It’s a Party sentiment was cut at 2”and is from the Birthday Bash cartridge. I used the Cricut Craft Room and the Bubblegum Stripes Imagine cartridge to color the two layers on the sentiment. I then layered them in the Craft Room software and print and cut them stopping my Imagine after it cut the outline of the image. I love this. To finish the card, I added some Star Dust stickles to the top layer of the numbers and to the hat and party blower. I used some Glimmer Glaze and glazed my buttons, let them dry and added them to my card. I am going to enter this card in to the Cardz TV Design Team challenge which is anything goes. I think she will love the card, she likes funky.
Wednesday, February 22, 2012

St. Patrick’s Day Card by Deanna M

20120220_5
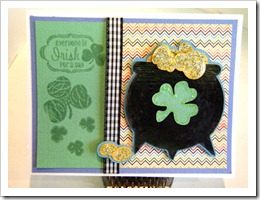
I have a fun little St. Paddy’s Day card for you today. My card base is  4 1/4” X 5 1/2” white card stock. I use the Bazzill Simply Smooth card stock for my card bases. I like it because it cuts well  and also works in my Imagine and Expression and because there is no texture, it embosses nicely and stamping on it is easy.
Anyway, back to my card. I know I didn’t use all traditional St. Patrick’s Day green for my card but I was wanting to challenge myself a bit so I added a blue mat cut to 4” X 5 1/4” from my scrap bin. Then I added the zigzag patterned paper from the new My Minds Eye On the Bright Side One 6” X 6” paper pad. The colors in it reminded me of a rainbow. I cut that at  3 3/4” X 5. I don’t know about you but I am loving the new My Minds Eye paper pads that Cutters Creek is carrying. If you haven’t checked them out yet, you should.
I added a narrow strip of green cardstock also from my scrap bin. I cut this at 3 3/4” X 1  1/4”. I ran a piece of black and white gingham ribbon to cover the edge of the green paper. I stamped my sentiment and the shamrocks with Cottage Ivy Memento Ink. I cut my Pot of Gold from the Simply Charmed cartridge at 3”. I did not cut the last layer of the pot as I did not want the face.
I covered the black pot with some Oil Slick Glimmer Glaze. If you are not familiar with Glimmer Glaze it is a member of the Tattered Angels products and compliments your Glimmer Mist. Cutters Creek can special order the Glimmer Glaze for  you. It comes a in a large selection of colors and is really fun to use to dress up a project.
Sorry for the detour,  I added some gold stickles to the sparkle up gold in the pot. Finally I cut a shamrock from the Paper Dolls Dress Up cartridge at 1 1/4” and adhered to the front of the pot and outlined it with some Firefly Stickles. I adhered the pot to the card with some of the clear gel foam pads.
Be sure and check out all the new goodies headed to Cutters Creek soon. Pin It

Monday, February 20, 2012

Birthday Card


The Cricut Cardz Challenge is A Stitch in Time, to make a project for any occasion, using any cartridges and colors we wanted and to use real our faux stitching on the project. Since I have a co-worker having a birthday later this week I decided to make her a birthday card. This is what I came up with.

My card is a 5" X 7" and made from white card stock. I added a hot pink mat cut at 4 3/4" X 6 3/4" and a lime green mat cut at 4 1/2" X 6 1/2". My patterned paper is from SEI and is cut at 4 1/4" X 6 1/4". The cupcake is from the Smiley Cards Gypsy cartridge and was cut at 3 1/2". I used the same hot pink and lime green that I used for my mats to cut the layers of the cupcake. The tag for my sentiment is from the Once Upon a Princess cartridge and was cut at 1 1/2" from the pink card stock. I made my own shadow for the tag by just increasing the size of the tag a 1/4" and cutting it from the green card stock.  I added some faux stitching to the pink mat and also around the green layer of the sentiment tag and the outside edge of the cupcake wrapper and added some white dots to the pink cheeks.  I ran the frosting layer through my Cuttlebug and embossed with the the Divine Swirls embossing folder. I cut my sprinkles from a light pink and added some cotton candy stickles to them. Finally, I outlined the frosting layer and the pink tag with some Glam stickles. I adhered the cupcake to the card with an action wobble. Thanks for visiting.

Monday, February 13, 2012

Subway Art Valentine's Day Card


So, I can't take credit for coming up with this idea. I saw a wall decor sign someone did like this on the Creative Critters Imaginations Blog and loved the idea but wanted to try it out on a card. This was so super simple and easy.

I used the All Wrapped Up Cricut Imagine cartridge for my dark pink color and the Word Collage Project cartridge for the card front. I flooded the image with the dark pink and set my Imagine to print only and sized it to 4.7". I then also flood filled one of the standard box images with the same dark pink and set my Imagine to print and cut and sized the box to 4 1/2".

My card stock base is white card stock cut and scored to  4 1/4" X 5 1/2". I cut the dark pink mat down to 4" X 5 1/4" and then trimmed down the collage to fit my card front and adhered it all together. I love how it turned out and by using the mat in the same color as the words it makes it appear as if the words were actually cut out. I love using this project cartridge this way. Thanks for visiting.

Saturday, February 11, 2012

Valentine's Day Treat Box


I wanted to make my Mom a quick little Valentine's Day goodie, so I grabbed two different kinds of dark chocolate for her and whipped up this Take Out box to put it in. I used the Sweet Tooth Boxes Project cartridge to cut the box. I cut it at 10 1/4" as recommended in the handbook and it held both bags of candy . After I scored and folded it. I followed the directions in the handbook and glued it all together. I added some extra glue to the bottom of the box and the sides. Then I used my Crop-a-dile Big Bite to punch a 1/8" hole on each side and added an eyelet for my ribbon. To finish the box I cut the heart from the Sweethearts cartridge at 3" and stamped my sentiment. On the other side I cut the hearts from the Love Struck season cartridge at 3 1/2" and applied some Hero Arts Prisma Glitter to the pink layer.
The patterned paper I used is from a K & Company Valentine's Day paper pack I picked up last year. I am really pleased how this turned out and I know my mom will love it.

Thursday, February 9, 2012

Find Joy Every Day Card


Here is a quick card I made using the Everyday Pop-Up Cricut Cartridge. I love this butterfly. I cut the base layer of the butter fly at 3 1/2" out of dark purple card stock and the top layer out of a bright lime green. I then used my Sakura Quickie G Glue pen and applied glue to the front of the green layer and then added some Hero Arts Prisma Glitter. I started with a 4 1/4" X 5 1/2" white card stock card base. I cut a 4" X 5 1/4" dark purple mat and then added my polka dot mat cut at 3 3/4" X 5". The polka dot paper is from a DCWV paper stack that I think I bought last year. I attached the body of the butterfly directly to the card and added one layer of foam tape just under the wings so they are slightly raised. Then I added two clear rhinestones to the end of the antennas. Finally I stamped my sentiment in some Crushed Concord Distress Ink. Thanks for visiting.

Monday, February 6, 2012

Cutters Creek Tuesday Tutorial Post

So the other night I couldn't sleep and got to thinking about how I have seen people make a marbleized looking paper with reinkers and photo paper. I got to wondering what I could come up with if I used the distress inks on photo paper, so I set out to find out. I started with several different Distress Inks. I used Spun Sugar, Victorian Velvet, Shabby Shutters, Peeled Paint, and Seedless Preserves which was part of the Fall Limited Edition colors. I also used my Foam Ink Applicator. I randomly applied the ink to my photo paper. When I finished I spritzed it lightly with water and then went back over the entire area with the Spun Sugar to be sure there were no white spots and to light blend the colors together.
I then cut a mat from the Elegant Edges Cricut Cartridge (I believe Kim can special order this if you are interested) out of the photo paper and also from a dark burgandy scrap paper for the shadow. For my card base, I started with Kraft card stock I cut, scored and folded to make a 4 1/4" X 5 1/2" card stock base. I then cut a mat our of the same burgandy card stock 4" X 5 1/4" and then cut a mat from the Prima Botanical 6" X 6" paper pad. For the image on my card I used an image from the Morehead Decoupage Ecstasy Craft line. While the particular set I used is not available the Ecstasy Craft images are great to put together a quick card. Check out the dimension you get once you are done layering the image.
I really love how the photo paper turned out and it works great with my image and paper. What a great way to create custom back grounds for your images. I hope you will give it a try and tryout the Ecstasy Craft line.

Sunday, February 5, 2012

Love is in the Air

I am so excited, Janis asked me to be guest designer for the new challenge at Paper Playtime. The theme is to use your Cricut and Hearts or Love. This is what I came up with.
I used the Birthday Bash cartridge to cut my card base at 5 1/2". I then cut a red mat and a patterned paper mat. The patterned paper is from a K & Company Valentine's Day paper stack from last year. Then using the Sweethearts cartridge, I cut all of the layers for the heart at 4". On my white card stock card base. I inked the card front with some Spun Sugar Distress Ink. I then used some Pearl Glimmer Mist on all my layers and then stamped the XOXO with some Memento Lady Bug ink. To finish the card I added some dark pink pearls to each corner of the card and the mat layer. I love how this turned out.

Scrappy Frogs Challenge

The new challenge at Scrappy Frogs is to make a project using die cuts. Here is what I came up with. I started with a 4 1/4" X 5 1/2" white card stock base. I added some heart patterned paper cut to 4" X 5 1/4". I then used my Tim Holtz On the Edge Doily Die to cut the back ground behind my little girl. I cut it out of red card stock and ran it through the Cuttlebug and used a Sizzix Three Dots embossing folder. I backed the die with some white paper at the top. I then cut my image from the A Child's Year Cricut cartridge. I cut the shadow in black and the main image in white. I cut this image at 3". I used a red Deco pen to add red to the two hearts and then stamped my sentiment in white ink. The sentiment is from the  Cardz TV Be My Valentine stamp set. Hope you will join in the fun at Scrappy Frogs.