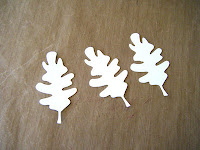
 Today is my day to do a Tuesday Tutorial post for the Cutter's Creek Design Team Blog. I decided to show you how you can transform your simple die cuts. I got my inspiration from the trees I could see on the other side of my fence, aren't they beautiful? I decided to make a fall card with leaves and I wanted to incorporate the colors from the trees into my leaves. I started by cutting a leaf from the Straight From the Nest Cartridge at 6" out of white card stock.
  Next I pulled out a bunch of my distress inks in fall colors. I chose Wild Honey, Rusty Hinge, Spiced Marmalade, Fired Brick, and Crushed Olive. Using my foam applicator I randomly applied some of the ink to my leaves.
 To give my leaves a more realistic look I went into my backyard a picked a few leaves off of a small tree and using my No More Shims Embossing Mat and embossed my leaves using the veins and stems on the leaves from my backyard. Finally I spritzed everything with some Glimmer Mist. I used Rum Punch, Honey Dew Melon, Jingle Bells, Sun Kissed Peach, and Sugar Maple to layer on some additional color and some glimmer to the leaves.
I then pulled some ivory card stock from my stash to make a 4 1/4" X 5 1/2" card base. My mat and patterned paper are from the My Minds Eye Sunshine Paper Pad. I pop dotted the orange leaves to the card and the attached the yellow leaf to the orange ones. I added my sentiment stamped in Distress Walnut Stain ink. The little nail heads and ribbon are from my stash. I am really pleased at how realistic the leaves ended up looking and love how easy that embossing mat was to use to get this look.


Great card Deanna! Love the leaves! : )
ReplyDeleteGORGEOUS!!!!!!!!!!!!!
ReplyDeleteThanks for sharing,
Judy Garrelts
WOW!!! These are fantastic!! They do look real! Awesome!!!! :)
ReplyDelete