Monday, October 24, 2011

Transform your Cricut Cuts

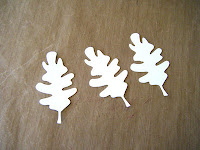
Today is my day to do a Tuesday Tutorial post for the Cutter's Creek Design Team Blog. I decided  to show you how you can transform your simple die cuts. I got my inspiration from the trees I could see on the other side of my fence, aren't they beautiful? I decided to make a fall card with leaves and I wanted to incorporate the colors from the trees into my leaves. I started by cutting a leaf from the Straight From the Nest Cartridge at 6" out of white card stock.
Next I pulled out a bunch of my distress inks in fall colors. I chose Wild Honey, Rusty Hinge,  Spiced Marmalade, Fired Brick, and Crushed Olive. Using my foam applicator I randomly applied some of the ink to my leaves.
To give my leaves a more realistic look I went into my backyard a picked a few leaves off of a small tree and using my No More Shims Embossing Mat and embossed my leaves using the veins and stems on the leaves from my backyard. Finally I spritzed everything with some Glimmer Mist. I used Rum Punch, Honey Dew Melon, Jingle Bells, Sun Kissed Peach, and Sugar Maple to layer on some additional color and some glimmer to the leaves.

I then pulled some ivory card stock from my stash to make a 4 1/4" X 5 1/2" card base. My mat and  patterned paper are from the My Minds Eye Sunshine Paper Pad. I pop dotted the orange leaves to the card and the attached the yellow leaf to the orange ones. I added my sentiment stamped in Distress Walnut Stain ink. The little nail heads and ribbon are from my stash. I am really pleased at how realistic the leaves ended up looking and love how easy that embossing mat was to use to get this look.

Saturday, October 22, 2011

Merry Christmas Card

Today I have for you a simple and quick Christmas card. I got the idea for this card from a magazine where I saw that they had stamped a simple Christmas tree shape on patterned paper. Of course I looked at that and said, I can recreate that with my Cricut and this is what I came up with. All of the patterned papers is from the My Minds Eye 12 Days of Christmas 6" X 6" paper pad which is two sided paper and I used both sides of the paper on my card. I started with a 4 1/4" X 5 1/2" cream colored card base. I cut a mat from some red paper, which is the reverse of the middle tree, from the paper pad at 4" X 5 1/4" and then cut a mat from the Merry Christmas paper at 3 3/4"X 5".  My trees are cut at 3 1/4" using the base layer of the Christmas Tree on the Celebrate With Flourish Cricut Lite cartridge and the reverse of the two red mats. My small red mat is cut at 2 1/4" X 5" and I used a scalloped border punch on it. I then cut a blue patterned paper, which is the reverse of the Merry Christmas paper. This was cut at 1 3/4" X 5" and I used the same scalloped border punch on it. I added the trees with foam dots and finished them with some Golden Rod Stickles on the stars and I painted the tree trunks with some Cowboy Glimmer Glaze. This card is colorful and went together quickly so would be easy to produce multiples.

Wednesday, October 19, 2011

Masculine Birthday Card

My boss's birthday is on Thursday so decided I should make him a card and get it in the mail since I have not yet been released to go back to work. Masculine cards are always hard for me but this is what I came up with.

My card base is white card stock cut and folded to 4 1/4" X 5 1/2" and is a portrait card. I used my Imagine and the Best Friends cartridge to print out the cloud paper and cut it to 4" X 3 1/2". The green patterned paper is from my stash and is cut 4" X 2 1/2". The hot air balloon is from the Summer in Paris Cricut Mini Cartridge and is cut at 4". I used my Imagine to color the balloon's layers. Once cut and removed from the mat I sprayed the brown layer lightly with some Coffee Shop glimmer mist and the blue layer with some Dragonfly Glimmer Mist. This just helped enhanced my colors on each layer and covered a few white edges that showed on the blue layer. I adhered the two layers together and pop dotted it to the front of my card and stamped happy birthday in some brown chalk ink. Pretty quick and simple card but seems to work for a man's card. What do you think? Thanks for visiting.

Sunday, October 16, 2011

Something that Flies

The current challenge over at Scrappy Frogs is Something that Flies. This is what I came up with. I stated with a 4 1/4" X 11" piece of pink card stock and scored and folded to make a 4 1/4" X 5 1/2" card base. I added a white piece of card stock cut to 4" X 5 1/4" that I inked the edges in black. Next I stamped some the birds in the bird cage randomly on the paper to create some patterned paper. I cut an oval out of black card stock and also white. I did a third stamping to create the worded back ground and then added the bird in the bird cage. Before adhering the white card stock to the card base I added some sheer pink and white polka dotted ribbon. Thanks for visiting and I hope you will join us in the challenge at Scrappy Frogs.

Saturday, October 15, 2011

Spooky Banner

It has taken me a while but I was finally able to finish a Halloween banner this afternoon. It feels good to be crafting again but I have to pace myself and go a little slower than I want but it is what it is.
I used the Birthday Bash cartridge to cut the banner shapes at 6". I used the Happy Hauntings Cricut cartridge to cut the word spooky out of purple for the "p" I cut the spider web from the October 31 cartridge at 4" and the pumpkin at 2 1/2". I cut both ghost from the Happy Hauntings cartridge and pop dotted them the the lower corner of each "O" banner. You can't really see it but the "Y" has the spider from Lyrical Letters cut at 3" in black glitter paper. I also cut the spider web out of black glitter paper. I will try tomorrow if it is brighter to get a better picture for you. All of my paper is from the DCWV Ghosts and Goblins paper stack and Mat stack. Thanks for your patience with me as I have been recovering from surgery. I hope to be back to my old self soon.

Wednesday, October 5, 2011

Missing in Action

Just wanted you all to know that I have not forgotten you. I am recovering from some surgery I had last week and hope to get back to crafting projects soon. I miss it! Stick by me I will be back soon. I also just wanted everyone to know how much I appreciate your visits and your wonderful comments. Thank you so much.