Saturday, November 26, 2011
Simple Christmas Ornaments by Deanna M
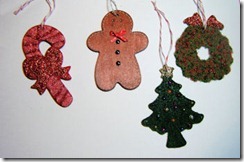
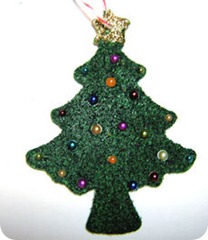
For the tree ornament, I covered it with some Flower Soft glue and generously covered it with some Pine Ultra Fine Flower Soft. I used some Gold Stickles on the star and then added a bunch of different sizes and colors of pearls to the tree for decorations. I added a piece of red and white striped twine to hang the tree and it was finished.
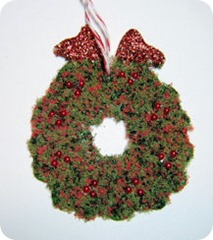
The wreath ornament was done similarly to the tree. However I used some Vintage Christmas Flower Soft on the wreath. I added some Candy Cane Stickles to the ribbon and finished it with some tiny red pearls that I applied in groups of three and again added the twine to hang the ornament from my tree.
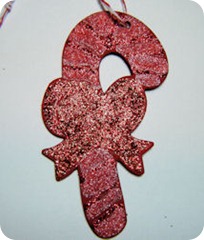
First, if I had to do the candy cane again, I think I would paint it white instead of red. For the candy cane I used some Candy Cane stickles to the ribbon. I used the Christmas Red stickles to add some red stripes and used the Frosted Lace stickles for the white stripes. This was a hard one to get a good picture of because of all the sparkle. I added the twine to hang this ornament as well.
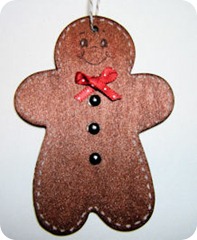
This little gingerbread man is probably my favorite. Instead of painting this guy I sprayed him with some Sugar Maple and Coffee Shop Glimmer Mist. He sure does sparkle. I then added some faux stitching with my gel pen. I stamped his face using the Snow Cuties Peachy Keen stamps. I added some little pink cheeks with a Copic marker. I gave him a little bow tie and used some black pearls as buttons.
Items available at Cutters Creek:
Flower Soft Glue
Vintage Christmas Flower Soft
Pine Ultra Fine Flower Soft
Pearls
Stickles
Peachy Keen Snow Cuties Stamp
Blush Copic Marker
Crop-a-Dile
Twine
Friday, November 25, 2011
Mini Gift Bag
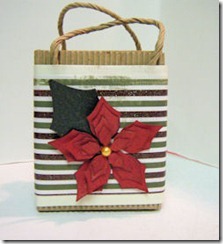
I came across these cute little corrugated boxes that look like a small bag at my LSS today. So of course I had to get some. I also just recently got the Spellbinders Layered Poinsettia Die and wanted to try it out. To start I cut a piece of cream pattern paper 3 1/2” X 12”. Then I cut the stripped glitter pattern paper 3” X 12” and adhered them together. My patterned paper is from Recollections. I then used some 1/4” Scor-Tape and ran a line all around the outside edges of my patterned paper and used that to adhere it to my box.
I then cut the poinsettia using my Cuttlebug. I inked the edges of the flower and the ribs with some Fired Brick Distress ink. I inked the edges of the leaf and its veins with the new Evergreen Bough Distress ink. I sprayed all the layers with some Twinkle Yellow Clear Glimmer Mist. I used some clear foam tape squares to adhere the layers of my flower together and to add the leaf. To finish my flower I added a yellow pearl for the center. I used more clear foam tape to adhere the flower to the front of the box. I am really pleased how it turned out and can think of several uses for these boxes, including put a gift card in them, filling them with chocolates, or even using it for a small silk flower arrangement. Thanks for visiting.
Wednesday, November 23, 2011
Happy Thanksgiving
Just wanted to wish every a very Happy Thanksgiving! Hope you have great food and a great time with your family and friends. I should be back this weekend with some new projects to post.
Tuesday, November 15, 2011
Snowman Ornament
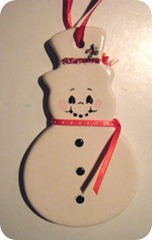
I got home from work yesterday and my Snow Cuties stamp set was waiting for me in the mail from Cutters Creek. The faces are so cute and I found this ornament over the weekend and just had to dress it up. Using Stazon ink I stamped the face on each side of the snowman and added some pink cheeks with a Copic marker, added some ribbon for a scarf. I dressed the hat up with some Holly and Christmas Red stickles. When it dried I added a red rhinestone to the hat and some black nail heads for the buttons.
Thursday, November 10, 2011
Let’s Talk Turkey
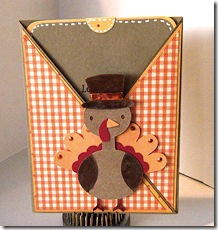
I recently heard about a new challenge blog at Simply Crafts. The current challenge is to make a project using the Turkey from the Create A Critter Cricut cartridge. This is what I came up with.
I saw a tutorial not long ago for a Criss Cross card and have been wanting to try one out. My paper is from a DCWV paper pack I bought last fall. My card base is Kraft card stock. My finished card is 4 1/4” X 5 1/2”. I used the “Let’s Talk Turkey” stamp from the CardszTV Thankful for You stamp set that I received in the mail today. Thanks for visiting.
Tuesday, November 8, 2011
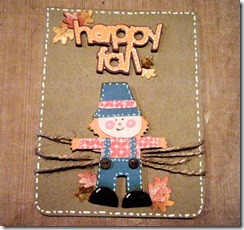
Happy Fall! Card
The current challenge at the Scrappy Frogs Challenge Blog is to make a project using Kraft card stock. This is what I came up with.
I started with a 4 1/4” X 5 1/2” Kraft card stock card base. I cut the Scarecrow from the Simply Charmed Cricut cartridge at 3”. I colored all the layers with patterns and colors from the Kate’s Kitchen Imagine cartridge and used my Imagine for all my cuts. I added some small buttons to his overalls. Then I cut the phrase from the same page in the handbook at 1 1/2”. I cut some leaves from the Doodlecharms cartridge at various sizes between .5” to .9”. I then used some glimmer mist and distress inks to give them some extra color and shine. I added some twine around the card and did some faux stitching using my white gel pen. I used pop dots to adhere the scarecrow and phrase to my card front. I hope you will join us in the challenge.
Wednesday, November 2, 2011
KAISERCRAFT Advent Calendar
Now that you know how to get the products let me show you what I made.
The kit came with all of the pieces necessary to assemble the wooden box and the chipboard drawers and numbers. All I needed to supply was paint, paper, and embellishments.
To get started I painted all the wooden pieces of the calendar with some green acrylic paint I had on hand. The green was a little too bright for me so after it completely dried I sprayed all the wooden pieces with some Jingle Bells Glimmer Mist which gave me the look I wanted. (It is hard to see in the photos.) I then sprayed it with a sealer to protect the wooden sections. I painted all the pieces before cutting them apart. I used my Tim Holtz Scissors to cut the little sections apart and they worked wonderfully.
I had some help from my son in assembling the wooden part of the box. While he worked on putting that together I went to work on the little drawers. I used Scor-Tape to hold my drawers together and to help hold my paper when I covered the drawers. I used paper from the Graphic 45 Christmas Emporium 8" X 8" paper pad to cover my boxes. I cut my paper in two sections. I cut a piece 1 5/8" X 6" and covered the back and sides of the box and wrapped it around the front to cover the two outer edges of the front. I then cut another piece 1 5/8" X 1 5/8" to cover the front. This gave me enough pieces of 5 boxes from each piece of 8" X 8" sheet of card stock. I had the hardest time with the little U shape on the front of the drawers. I tried measuring it and thought for sure a 1" round punch would work perfectly to punch the holes, nope, just a little too big. I think a 3/4" circle punch might work though. I ended up tracing the cutout on to the back of each piece of paper and hand cut them. Of course some of them ended up slightly off center but that is okay.
Using the Scor-Tape I adhered the paper to the boxes and placed them in the wooden slots. I then decided to run all the numbers through my Xyron upside down so I had the adhesive on the fronts and glitter them with some red and green glitter I had in my stash. I adhered them to the drawer fronts with some Scotch Quick Dry adhesive.
For the center of the calendar I found this piece of We Wish You A Merry Christmas paper in my stash. Sorry there was no name on in it and I don't remember where I got it. But I thought it went great with the calendar so cut a piece 8 3/4" X 8 3/4" and adhered it to the center of my calendar.
Of course while I was working on the project my new Cricut Imagine Santa Village cartridge arrived and I had to use it. I love the buildings in the cartridge and chose what I took for Santa's house. I cut the house at 5" using the layers feature on the Imagine and used the clear 3D foam pads to adhere all the layers together which gave the house some great dimension. To further jazz up the house I applied some Ultra Fine White Flower Soft to the snow on the ground and chimney of the house. Along the roof line I just sprinkled some clear glitter to add some sparkle. What is Christmas Countdown calendar without Santa himself making an appearance. I cut the Sleigh at 2 1/2" using the layers feature and also assembled it with the clear 3D pads. I again used my Ultra Fine White Flower Soft and Flower Soft Adhesive, and applied it to the trim on Santa's coat and hat as well as his beard.
Finally using the flip feature on my Imagine I cut the reindeer in layers and adhered it with the clear foam pads as well. I then cut a short piece of the Doodlebugs Twine from the Christmas Assortment, in a red/green/white pattern and adhered it to the the reindeer just under his harness and also just under Santa's hand so it looked like Santa was holding the reins to his sleigh as he took off for his one night of adventure.
Items available at Cutters Creek:
Jingle Bells Glimmer Mist
Christmas Emporium Paper Pad
Scotch Quick Dry Adhesive
Tim Holtz Scissors
ASI Kool Tak Clear Foam Pads
Flower Soft and Flower Soft Adhesive
Doodlebug Design Twine
Xyron
Also please remember that Cutters Creek can special order most KAISERCRAFT products and many of the Imagine Cartridges.
