Tuesday, January 31, 2012
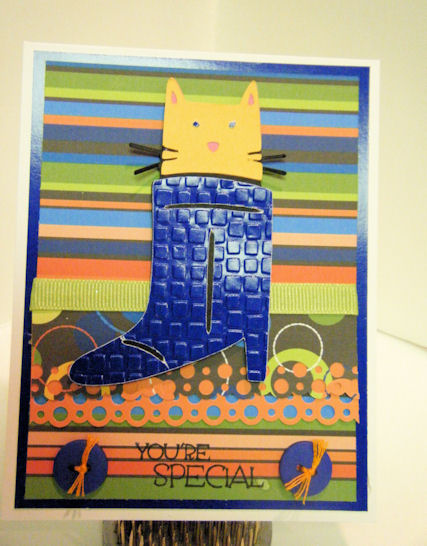
You're Special Card
Sunday, January 29, 2012
Vroom, Vroom...

I decided to make a tall card. My card base is 4" X 9" and is from Kraft card stock. I then used some paper from the Tim Holtz Kraft Core card stock from the Nostalgic Collection by Core'de nations. I cut the paper at 3 3/4" X 8 3/4" and ran the top 3/4 of the paper through the cuttlebug and embossed the paper with the Tim Holtz Clock & Steampunk Set and then lightly sanded it so the kraft stock showed through. I adhered the truck to the card with some foam tape. To finish the card I had some gray nail heads that I painted with some Sea Kelp green Glimmer Glaze and stamped my sentiment from the Pink Stampers Boy Crazy stamp set with some Memento Tuxedo Black Ink. Thanks for visiting.
Saturday, January 28, 2012
XOXO Banner


For the middle rosette I cut the XOXO from the Tie the Knot cartridge at 1 /2". I used the same colors for the shadow and base layer and white for the layer on the first X. I sprayed these also with the Tattered Rose and Black Cherry glimmer mist and thistle stickles to the white layer of the X. I adhered all these cuts with some gel foam tape. Finally I adhered each rosette to a piece of cream colored ribbon also lightly sprayed with Tattered Rose glimmer mist. I used some Beacons 3 in 1 glue to adhere the rosettes to the ribbon. I also made a loop from a small piece of the ribbon and attached it to the top layer to hang the banner. I am really pleased how this turned out. I always have a hard time taking good photos of my banners but in person it is really shimmery. Thanks for visiting.
Saturday, January 21, 2012
Kiss Me! Card
I just received a couple of new Valentine Stamp sets from Mary at CardzTV. When I saw the Kiss Me! stamp I knew I had to do a frog card. Here is what I came up with.
 I started with a piece of Kraft card stock, cut, scored, and folded to make a 4 1/4" X 5 1/2" portrait card. I added a pink mat cut at 4" X 5 1/4" and the patterned paper cut at 3 3/4" X 5". The polka dotted patterned paper is from a K & Company Valentine paper pack I bought last year. The frog is from Create-a-Critter and is found on page 24. I cut the frog and all his layers at 3 1/2". I also cut the heart from the Create-a-Critter cartridge and it is found under the Accessories on page 36 of the handbook. I cut the heart at 4 1/2". Once I assembled the frog I adhered him to the front of my card with some foam tape. I added cotton candy stickles to his cheeks and red stickles to his heart. I also used my white gel pen to add some faux stitching around the card and the frogs tummy and some doodle dots on the frog. I stamped my sentiment with some Cottage Ivy Memento Ink and added a couple of red buttons. I also added the googly eyes that my friend Lynn sent me. I love the little eyelashes on the eyes. Makes the frog look a bit flirty don't you think? Thanks for visiting.

Monday, January 16, 2012
Hello Kitty Valentine's Day Card
So I heard that Cutters Creek was getting in more Action Wobbles and thought it would be fun to share I card I made this afternoon using an Action Wobble.

I started with a piece of what Bazzill Card stock cut and scored to make a 4 1/4" X 5 1/2" card base. I added a hot pink mat cut at 4" X 5 1/4" and then the patterned paper mat cut at 3 3/4" X 5". I cut the Hello Kitty Image at 4" and adhered it to my card front with an Action Wobbles. I added some Glam Pink Stickles to the heart. Finally I stamped my sentiment with the Festive Berries Distress Ink that was part of the Winter Limited Edition colors released in November. It is a great red.
Not sure what an Action Wobble is? Let me show you.

 They have a little spring in them that allows movement on the object they are attached to. Here is a quick video (my first) of the action wobble in action. Aren't they fun.

I started with a piece of what Bazzill Card stock cut and scored to make a 4 1/4" X 5 1/2" card base. I added a hot pink mat cut at 4" X 5 1/4" and then the patterned paper mat cut at 3 3/4" X 5". I cut the Hello Kitty Image at 4" and adhered it to my card front with an Action Wobbles. I added some Glam Pink Stickles to the heart. Finally I stamped my sentiment with the Festive Berries Distress Ink that was part of the Winter Limited Edition colors released in November. It is a great red.
Not sure what an Action Wobble is? Let me show you.


Sunday, January 15, 2012
Just me thinking of you card
The Cardz TV Design Team Challenge at Cardz TV is to make a project that uses Ribbons, Rhinestones, and/or Rick Rack. Here is what I came up with.
 I started with a white card base cut and folded to 4 1/4" X 5 1/2". I added a dark wine colored mat and then the patterned paper mat both of which are from an older Basic Grey 6" X 6" paper pad. I used the Lacey Labels cricut cartridge and cut the mat for my little bird at 3 1/2". My bird is the first bird in the handbook for the 3 Birds on Parade Cricut cartridge. I cut the little bird and it's layers at 3 1/4" I added some pink cheeks and a few doodle dots to the wings of the bird. I added a dark wine color ribbon and some mosaic tiles to the mat. Thanks for visiting.

Saturday, January 14, 2012
Warm Fuzzies Card

Wednesday, January 11, 2012
Sending You Sunshine Card

Monday, January 9, 2012
Double Dutch Fold Card
My Cutters Creek Design Team Tuesday Tutorial post for you today is a card I saw on Splitcoast Stampers called a Double Dutch Fold Card. Of course I had to give it a try.
 This card fits in a standard A2 envelope. I started with a piece of Bazzill White card stock cut at 4 3/16" X 9" and scored at 5 1/2". I also cut a piece of the white card stock 2" x 8 1/2" scored at 2 1/8" and 6 3/8". I used my ATG Gun to adhere the the larger piece to the smaller piece centering it between the folds of the smaller piece. When finished the top folds down and the two smaller sides fold in like a gate fold card. I then cut a dark turquoise mat from Core' denations card stock. For the larger flap I cut the blue mat at 4" X 3 3/4". The smaller flaps I cut the blue ( think I didn't write it down sorry) at 2" X 1 7/8". The polka dotted patterned paper is from the Echo Park Paper Pad. The patterned paper was cut 1/4" smaller than the blue mat. I cut my cupcake from the Sweet Tooth Cricut cartridge at 3 1.2". I cut the heart out of red paper from my stash and then used some Magenta Stickles on the heart to give it some sparkle. Finally I add some faux stitching and doodle dots to the chocolate layer.
 I sure hope you will give the card a try. It was a lot of fun to make something a little out of the ordinary. I made this card for a co-worker who has a birthday next week. I am also entering this card in the Simply Crafts challenge.


Sunday, January 8, 2012
Scrappy Frogs Challenge
The challenge this month over at the Scrappy Frogs Challenge Blog is to make a project using lace. Here is what I came up with.
 My card is a 4 1/4" X 5 1/2" white card base. I used a piece of pink patterned paper from the Victoria's Garden Echo Park paper pack. I inked the edges with some spun sugar distress ink. I used the Sophie cartridge for the two birds. I cut the bird image at 3". For the crowns on the birds I used some Glimmer Glaze. I added a piece of sheer lace with small roses on it under the birds along with some pearls. I also added a couple of pearls to the top of the roost the birds are on. Thanks for visiting and I hope you will join us in the Challenge at Scrappy Frogs

Tuesday, January 3, 2012
Love You! Valentines Day Card.
Well for a lot of us the holiday decorations are put away and the kids have gone back to school. I had to go back to work today (bummer!) So it is time to start thinking about the next upcoming holiday, Valentines Day. It is also time to start using all those new crafting goodies you all got over the holidays. To help you out on both counts, I have this Valentines Day card to share with you all.
 I started with a 4 1/4" X 5 1/2" white card stock base. I added a black mat cut at 4" X 5 1/4" and then one more white mat cut at 3 3/4" X 5" and finally a patterned paper from the My Minds Eye Sunshine 6" X 6" Paper pad. I inked the edges of all the mat layers with some Brushed Corduroy Distress Ink. For the image on my card, I used the Paper Trimmings cartridge (a circle exclusive sorry). I cut both layers at 3 1/2" and cut the bottom layer from white card stock and the open top layer from red card stock. Using the same cartridge I cut a circle at 2 1/2" out of black card stock. The Love sentiment is from the Tie the Knot cartridge (which I believe Cutters Creek customer service can special order for you, just ask) and cut at 2". Now to glitz up the card I a bit I sprayed the white background of the heart frame image and the Love with Pearl Glimmer Mist. Pearl is still one of my favorite colors and a great color for those just getting started with Glimmer Mist. It is a wonderful way to has simmer and shine and a glittery look to something without having to break out the glitter and glue. For my black circle I first spritz the black with some Slate Glimmer Mist. Then I used some Oil Slick Glimmer Glaze (this is a special order item again, just ask Customer Service at the Cutters Creek site for help). I am so pleased with the effect I got from the glaze on the circle. It really darkened the color and left the circle with this nice shiny glaze to it. I strongly urge you all to give the glaze a try sometime. Now for the red layer on the heart frame and the heart from the sentiment. To be honest I first spritzed both of them with some Rum Punch Glimmer Mist. While I loved the sparkle it was really just a tad to light and didn't give me the affect I was looking for. So what to do? I took out my Bordeaux Glimmer Glam (another special order item from Cutters Creek) and brush on a couple of coats of it on my two red pieces. Love the look and depth of color I got. One more fun way to add shimmer and shine to a project. I layered all the images together and after adding a piece of red ribbon for color to my card front adhered the heart frame image with some ASI Kool Tak Clear Foam Pads. To finish the card I added some red rhinestones from Want2Scrap and some smaller white pearls from my stash.

Monday, January 2, 2012
Hello Card
Here is a card I made using my Imagine, the Enjoy the Season's cartridge and the Sophie and Elegant Edges, Cricut cartridges.
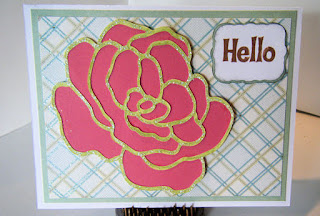
I started with white card stock cut and folded to make a 4 1/4" X 5 1/2" card base. I added a green mat cut to 4" X 5 1/4" and a patterned paper mat cut to 3 3/4" X 5". Both the green mat and the patterned paper mat are from the DCWV Linen Stack. I cut the rose from the Sophie cartridge. I flooded the base layer with a red color from the Enjoy the Season's cartridge and the top layer with a light green. I cut the flower at 3 1/2". I used some Stardust stickles on the green layer and allowed it to dry before adhering them together. The mat for my sentiment was cut from the Elegant Edges cartridge at 1 1/2". I lightly inked the edges with some Iced Spruce distress ink. The rose was added to the card front with some foam tape.

I started with white card stock cut and folded to make a 4 1/4" X 5 1/2" card base. I added a green mat cut to 4" X 5 1/4" and a patterned paper mat cut to 3 3/4" X 5". Both the green mat and the patterned paper mat are from the DCWV Linen Stack. I cut the rose from the Sophie cartridge. I flooded the base layer with a red color from the Enjoy the Season's cartridge and the top layer with a light green. I cut the flower at 3 1/2". I used some Stardust stickles on the green layer and allowed it to dry before adhering them together. The mat for my sentiment was cut from the Elegant Edges cartridge at 1 1/2". I lightly inked the edges with some Iced Spruce distress ink. The rose was added to the card front with some foam tape.
Subscribe to:
Posts (Atom)