
Showing posts with label ATG. Show all posts
Showing posts with label ATG. Show all posts
Saturday, July 6, 2013
New Goodies, New Card
I received some new goodies from Kim the other day and OF course I had to play a little this weekend. This is what I made.
 I started with some green card stock cut and scored to make a 4 1/4" X 5 1/2" portrait card base. I add a yellow mat cut at 4" X 5 1/4" then I added another green mat cut at 3 3/4" X 5". I then cut another piece of yellow card stock at 3 1/2" X 3 1/2 and ran it through my eBosser and embossed it with my new Anna Griffin Matelassé embossing folder. (I love this one, and Kim can and will order if for you, just ask her. You can contact Kim through the store site here.)
I adhered all my layers together with my ATG gun. After I adhere the embossed yellow mat, I added a piece of Washi Tape to the base as a border. (OK, I admit, this is my free gift from Kim at the end of the club, but she can likely order this too.)
Next I stamped a small piece of card stock cut to 2" X 2" with my flower image with some Memento Tuxedo Black Ink. I colored my flower image with some chalk. I then went back and using a blue water colored pencil to add a bit of shading. I blended everything together with my Dove blending pen. I matted my image on another piece of green card stock cut to 2 1/4" 2 1/4" and adhered it to my card front with some Kool Tak clear foam squares.
Finally I added my sentiment using some VersaMark embossing ink and the new Saraha WOW! Embossing Powder I just received from Kim. The new Desert Sand Limited Edition set. LOVE IT!!! So sparkly. Okay, so now confession time, I really had bad luck and did not enjoy using embossing powders on my projects until Kim started selling the WOW! embossing powders. The others I tried to use just didn't melt and give me the results I expected. The WOW! embossing powders melt beautifully. If you haven't tried them yet, you should, you won't regret it.
I would love to know what you think of my project and this embossing folder. I think it is beautiful and am so excited that I now own it.

Saturday, June 29, 2013
Thank You card
My crafty mojo decided to take a short vacation. Imagine that! I spent some time looking through my latest PaperCraft magazine and found some inspiration. Here is what I made for you.
 I started with a coral card stock card base cut and scored to make a 4 1/4" X 5 1/2" card. I then cut a white mat at 4" X 5 1/4". I used some Doodlebug Twine and some Washi Tape from We R Memory Keepers (Kim can order this). I created a banner out of the Washi Tape. When I cut my "V" shape in the end of Washi Tape I make a small cut right in the center of my tape, I then cut into the V from each lower corner. Makes it easier for me to get my "V" shape centered.
Next I cut another piece of the coral paper at 3/4" X 4" and ran it through my eBosser and embossed it with the border embossing folder that came with my Anna Griffin Foundry embossing folder. I am part of a Cuttlebug Embossing folder Club that Kim is currently running. If you are interested in any of the Anna Griffin embossing folders, just let Kim know and she can order them for you.
I adhere my coral embossed strip of paper with my ATG gun. I stamped my sentiment using some Coral Pigment Ink from my stash.
The card is simplistic in design but I love it.This was a quick easy card to make.
Now a short quiz. How many of you that order the Washi Tape dispenser actually have your Washi Tape on it????? I finally took the time this weekend to put all my tape on the dispenser and I LOVE IT!!! It makes using the Washi Tape so easy. It spins around so selecting multiple colors is a snap. So if you haven't added your tape to your dispenser you should. If you don't have a dispenser check with Kim to see if she can still order them.

Tuesday, December 27, 2011
Happy New Year!
I sure hope everyone has been having a great holiday season. I had a little time to craft and put together this New Year’s card to send to a friend.
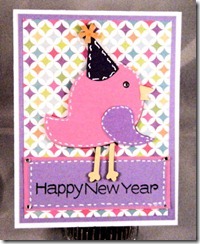
My card is 4 1/4” x 5 1/2” portrait card made from Smooth Bazzill Card stock. The solid colored paper is from my scrap bin. I cut a purple mat at 4” X 5 1/4” and the patterned paper is cut at 3 3/4” X 5” and is from the Echo Park Summer Days paper pad. Finally I cut a pink mat 1 1/2” X 3/3/4” and a purple mat at 1 1/4” X 3 1/2”. I used my ATG Gun to adhere the layers together. I cut the bird at 4” from the 3 Birds on Parade Cricut cartridge and adhered the layers and added some white stitching with my gel pen. This image has a cupcake it cuts out in the birds hand but I didn’t want the cupcake so I cut it off and did not cut the other cupcake layers. To finish off my card, I added some Want2Scrap Rhinestones to the birds eye and the four corners of the sentiment layer. I stamped the sentiment in some Memento Tuxedo Black ink. I added the bird to the front of my card with some foam tape. I hope every had a great and prosperous new year!
Items from Cutters Creek:
Smooth Bazzill Card stock
Echo Park Summer Days
ATG
Want2Scrap Rhinestones
Memento Tuxedo Black
Thursday, July 14, 2011
Celebrate Everything!

Subscribe to:
Posts (Atom)