Showing posts with label Create-a-Critter 2. Show all posts

Thursday, October 27, 2016

Happy Thanksgiving

Hey everyone, Deanna here with another inspirational post for the CardzTV Gallery blog.  Today I have for you a cute little Thanksgiving card.  Here is what I made.

I started with a piece of Kraft card stock cut and folded to make a 4 1/4" X 5 1/2" card base.  I added a brownish orange mat cut to 4" X 5 1/4" and then the patterned paper mat cut at 3 3/4" X 5".  Next I added the blue acorn mat cut a 1 1/2" X 5".

I decided to cut this cute pilgrim squirrel from the Create A Critter 2 Cartridge.  He is cut at 3 3/4".  I cut all the layers and adhered him together with some liquid glue.  I used a light pink marker to give him some rosy pink cheeks and a white gel pen to add the little white dots to the pink area.

My sentiment is from the Big Holiday Wishes stamp set. 

Sunday, February 9, 2014

Forever Young


I had a chance to make a fun birthday card this weekend.

My card base is white card stock cut and scored to a 4 1/4" X 5 1/2". I added a blue mat cut at 4 1/8" X 5 3/8" and a blue polka dot mat cut at 4" X 5 1/4". Then another blue mat cut at 3 7/8" X 5 1/8" and then the striped mat cut at 3 3/4" X 5". My lady bird is cut at 3 1/2" from the Create a Critter 2 cartridge. I embossed the wing with a sizzix dots embossing folder and used some glossy accents to enhance the birds eye. I also added a small dimensional flower sticker to the bird's ribbon on her hat. My lady bird is attached to my card with foam tape.

Monday, May 20, 2013

Happy Birthday Card

One of my friends at work is turning 65 this week and I told her I was going to make her a card that celebrated her special birthday. This is what I came up with.
My card is a  5" X 7" white card base. I added a dark purple mat cut at 4 3/4" X 6 3/4" and a patterned paper mat cut at 4 1/2" X 6 1/2". For my 65 I used the Cricut Craft Room and the Craft Room Basics and the shadow  feature to weld together the 65 purple base. I then cut the main layer out of a reddish pink card stock.Papers are from my stash. I sprayed the this layer with two coats of the Pink Glitter Dust Spray. My numbers were cut out at 4". I used Scotch Quick Dry adhesive to adhere my number layers together. I also used the adhesive to attach my numbers to my card front. My banner is cut from the Create-A-Critter 2 cartridge. (Kim can order this for you). I cut it at 3 1/4" out of some lime green card stock. I stamped my sentiment with some VersaMark embossing ink (Kim can probably get this for you). I formed my clear stamp so it followed the curve of the banner and stamped it. Since purple is my friends favorite color I embossed the image with some Presido Purple WOW! Embossing Powder. I attached my banner to my card using some 3D pop up glue dots. I used one glue dot on each end and two glue dots stacked in the middle so the banner has a wavy appearance. This was a fun card to make. I hope you enjoyed it.

Wednesday, January 2, 2013

Valentines Day Cards

It is hard to believe that 2012 is over with and we have entered 2013. If time moves as quickly has it has been Valentine's Day will be here before you know it. Here are a few easy cards to get you started on creating yours. All of my cards have a white card stock base and are 4 1/4" X 5 1/2". My mat layers are 4" X 5 1/4" and 3 3/4" X 5. All of my paper is from K & Company and are from older paper pads. All of my little critters are from Create A Critter 2. I cut the Teddy Bear and Koala bear at 3 1/2" and the Love Bug is cut at 3".
 For my Teddy Bear I used some onyx pearls liquid pearls for his eyes and a white gel pen to add some faux stitching to my heart. I used white distress stain to stamp my little sentiment on my heart. He is attached to the card with an Action Wobble.
For my Koala I used my Imagine and the Baby Boutique color pallet for my grey colors. The black and red I cut with my Expression. Again I added some faux stitching to my heart and the ribbon. I embossed the sentiment with some Opaque White WOW! Embossing Powder.
For my Love Bug I added some Glam Pink stickles to the heart shaped antennas. My sentiment on this one is stamped in Memento Tuxedo black ink and is tamped on the larger heart that cut out from the bugs body.
This is the Hero Arts stamp set I used for all of my sentiments. I got it awhile back and have been anxious to use it.This item is not a standard stock item in the store but Kim at Cutter's Creek can order it for you so don't hesitate to ask her.

Monday, December 31, 2012

Happy New Year


WOW! Hard to believe today is the last day for the year 2012. I made this cute little card using Create A Critter 2. I started with a white card base cut and folded to make a 4 1/4" X 5 1/2" card. I added a purple mat cut to 4" X 5 1/4". The patterned paper is cut at 3 3/4" X 5". I cut my little penguin at 3". I added some faux stitching with a spica pen.

Wishing everyone a Happy New Year! Hope 2013 is good to all of you.

Thursday, October 11, 2012

Trick or Treat!

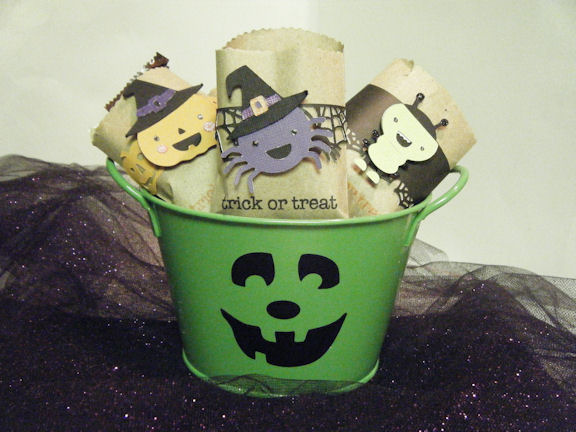
So today I have for you a quick fun little Halloween treat bags for you. I started with the Mini Kraft Bags. They were the perfect size to hold two little fun size snickers bars.I then stamped different sentiments across the front of the bags, such as Trick or Treat, or It's all in the Treats. I used Persimmon, Seedless Preserves, and Black Soot Distress Inks to stamp my sentiments.I cut belly bands using punches, and just plain Halloween paper. I cut my strips at 1 1/4" X 6" and after placing my Candy Bars in the bag wrapped the band around the bag and adhered it with a piece of Kool Tak Tape. I then cut some small images from the Create a Critter 2 cartridge at 2" and adhered them to the front of my bags. Finally I dressed up the images with some stickles. My container was a bright lime green metal bucket that I had and I cut a pumpkin face from the Pumpkin Carvings Season Cricut Cartridge out of some black vinyl and adhered it to my bucket. These would make great treat bags for co-workers or for a class party. They were really quick to make.

Saturday, September 22, 2012

Happy Fall Ya'll


This little squirrel is from the Create a Critter 2 Cricut cartridge. Isn't he just too cute with his little hat?

My card is a 4 1/4" X 5 1/2" Kraft card stock card base. I added a purple mat cut at 4" X 5 1/4" and then the leaf patterned mat cut at 3 3/4" X 5". My patterned paper is from a Cloud 9 paper stack I bought a couple of years ago.

I cut my little squirrel at 3 1/2" and adhered him to my card front with some foam tape. My sentiment is from a Cardz TV Stamp set and was stamped in Memento Rich Cocoa. I didn't have a button that matched my paper so I took a white button and sponged Ginger Alcohol Ink on it and let it dry. I threaded a piece of brown striped twine through the button and tied a knot. A quick easy fall card.  Thanks for visiting.