Showing posts with label Tim Holtz Distressed Ink Pads. Show all posts

Thursday, August 27, 2015

Frankly Frightful


Where do you get your inspiration from? I find it all around me.Like this card.  I was just scrolling through some of the images in Cricut Design Space and came across this image.  It just said Easel Card to me so that is what I made.  When I find inspiration like this I can't wait to get started on my project.


For this Easel Card I started with two pieces of Kraft card stock. One piece I cut to 4 1/4" X 11.  I then scored this piece at 2 1/4" and 5 1/2".  I cut a second piece of card stock at 4 1/4" X 5 1/2".  This piece became my card front.

Next I cut a black border at 4 1/8" X 5 3/8".  My pattern paper is from an Echo Park paper pad that I have had for a couple years.  I found this piece with the big moon and a black scary tree with ravens in it and bats flying.  I cut the paper at 4" X 5 1/4" and adhered it together.  Next I added some yellow card stock behind the windows so it looked like there was a light on in the house.  I then adhered the house to my card front and used some yellow stickles in the windows.  Once the stickles dried I used a dauber and some black soot distress ink to go over the yellow to dull it down a bit.  The pumpkins that I adhered to the porch of the house are from the Jolly Jack O Lantern Memory Box die.  I adhered the house to my card front using some foam tape.

I then added my little stop to the inside of the card.  It is stamped with Frankly Frightful from the Cardz TV stamp set with the same name.  I added the remaining two pumpkins to the left side of the easel stop and stamped my sentiment on the right hand side.

I hope you enjoyed my card. Come back and visit again soon.

Monday, June 29, 2015

Wedding Guest book

I have been super busy these past few weeks making wedding invitations for my son and his fiance's wedding August 1st.  They also asked me if I could do the guest book.  This is what I have come up with so far.  They are planning a rustic and small wedding and want to use lots of burlap for their decorations.


I started with a piece of 8" X 8" chipboard that I covered with plain burlap.  I then added a strip of printed burlap that had a lace pattern on it.  In the middle of that I added some Ivory lace and then another smaller piece of lace with an ivory ribbon running through it.

The purple flower was actually a white crocheted flower that I sprayed with some purple fabric paint.  The button was a black button with a design around the outer edge that I then used my finger and some silver alcohol ink to stain it silver.  I adhered the button to the center of the flower using glossy accents.  I also added some silk baby's breath in purple and white to the larger purple flower..  I inked a couple of Tim Holtz tickets with some vintage photo distress ink and using Glossy Accents adhered them just underneath the flower.  On the other side of the flower I added one of the message keys that says LOVE and again, lightly stained it with the Silver Ink.

The Today, tomorrow and forever was one of the items that came with my Minc. I ran it through the Minc and foiled it with silver foil. I then distressed the white tag with Vintage Photo distress ink and adhered it with Glossy Accents.  I set a metal coffee mug on it to weight it down while it dried and ended up with this marbled effect on the sign. I also ran the Mr and Mrs through the Minc. the XO's scatter across the bottom are from a Memory Box die called Hugs and Kisses.

The bottom picture is the pages for the inside of the guest book.  I am going to use my Cinch to bind it all together.

Thanks for stopping buy.

Sunday, August 31, 2014

You Put a Spell on Me!

So the we have had some very fall like weather the last couple of days. Cloudy, rain, wind, AND I saw some of the trees with their leaves changing color to those coral, red and orange colors so familiar with Fall. However, what type of card did I make? A Halloween card.

I found this cute circle card in the Silhouette store and of course I had to make it. The file cut as is makes a 5 1/2" round card. My base layer is the light gray, then I cut the scallop out of black, the circle out of the light gray and the top layer out of black. Once I had the card put together, it just screamed that it needed a little pizazz. So, I added some Firefly Stickles glitter to the bats eyes. Once that dried and then added some Glossy Accents to add some dimension to the eyes.

Next came the sentiment. I chose the "You put a spell on me" sentiment from the CardzTV stamp set "Trick or Treat". I stamped the sentiment in some tangerine ink on the gray paper. I used some Black Soot distress ink to ink around the edges of the sentiment after I rounded the corners. Next, to jazz it up a bit more, I used some Times Square Glimmer Glam and brushed it over the whole sentiment. The Glimmer Glam added some sparkle and shine but also helped the sentiment square look a little spookier and distressed. Finally to finish the card, I added some Cantaloupe Liquid Pearls to each of the big scallops.

I hope you are having a great Labor Day weekend! Come back and visit again.

Tuesday, July 8, 2014

Makin' Waves

Today I have a fun summer card for you! The image is an SVG file that I cut with my Silhouette. I cut him about 5" wide. My card base is white card stock folded to make a 5" X 6" card base. I added a black mat cut at 4 3/4" X 5 3/4".  My patterned paper is from my stash. The blue is cut at 4 1/2" X 5 1/2". The reverse side of the blue wave paper is the brown patterned paper. I took a strip of the brown pattern paper and tore it and then cut it to 4 3/4". I then inked the paper with some Tea Dye Distress Ink. For his glass, I added a coat of Glossy Accents to it. I then added some Stampendous Mica Pearlized fragments so his drink had some ice cubes in it. I also sprinkled some Distress Glitter in Rock Candy on the wet Glossy Accents. Once it dried I added a second coat to add some additional dimension to the glass. To add the look of sea spray I added some of the Stampendous Frantage Embossing Powder in Shabby Blue. I stamped my sentiment in some Memento Tuxedo Black ink. To finish my card I added some rhinestones and a small shell from my stash. To attach my surfer penguin I used an Action Wobble so he could "surf".
Thanks for visiting us today. I would love it if you could leave me a comment and let me know what you think.

Tuesday, June 3, 2014

Father's Day Card

Father's Day is fast approaching so today I have for you a fun Father's Day card.  I found these ties in the Silhouette store that had the alphabet cut into them.  You can make the same card with your Cricut using the Simply Charmed cartridge. This cartridge has a tie image that you can cut. Then use your favorite font cartridge to cut the letters. This font reminds me a bit of the font on Birthday Bash. Need a cartridge, just contact Kim and she can special order you one. My card base is Kraft card stock cut and scored to give me a 4 1/4" X 5 1/2" card base. I added a white mat cut at 4" X 5 1/4" and the patterned paper mat cut at 3 3/4" X5". I inked the edges of the two mats and the ties with some Tim Holtz Tea Dye Distress Ink. I cut my ties twice, Once out of white card stock with the letter. Then I cut the patterned paper tie. Both of these were cut at 1.15" X 3". I adhered the tie layers together than added the knot. I used a black gel pen to add some stitching to my ties. I then adhered them to my card with some foam squares. To finish the card I added some copper colored mosaic squares to each corner of the card.

Wednesday, March 26, 2014

Celebrate Spring

A friend of mine ordered several of the new Memory Box stencils by mistake thinking they were dies. When she got them she had no idea what to do with them. I told her how I would use one so she told me to take it home and make something with it and bring it to show her. So this is what I came up with.
The stencil set was called Garden Birch Trees. Cutters Creek can now order Memory Box items so ask if you would like to order this. I started with a white piece of card stock and used some Washi Tape to tape the stencil to my paper. I used my Foam blending tool and some Tumbled Glass and Broken China Distress Ink to create my sky. I then used Shabby Shutters and Mowed Lawn to create the grass on my card. When I removed the die I had these great white Birch Trees. The next step was to figure out what to add to the card. I used a stamp with a bird on a branch from Hero Arts and stamped it with Mowed Lawn Distress Ink. I then used a small bird stamp and stamped it up into the trees using Broken China. Finally I add a small butterfly that I stamped in Mustard Seed Distress ink. I used my Lemon Spica pen to add some glitter to the butterfly. My sentiment was stamped with Broken China Distress Ink as well.

Friday, December 13, 2013

All Hearts Come Home for Christmas

I have one more Christmas card for you today. My card base is Kraft card stock cut and scored to make a 4 1/4" X 5 1/2" card base. My dark red mat is cut at 4" X 5 1/4" and the patterned paper is cut at 3 3/4" X 5". The red mat and the patterned paper is from My Minds Eye. The images on my card are from the new Tim Holtz Sizzix Framelits Stamps and Dies. The set I used is called Holiday Joy. I cut all the dies using my eBosser and the magnetic mat. I used markers to color my tree stamps so I could have green trees and brown trunks. The deer was stamped with Gathered Twigs Distress Ink, this is a great brown and a wonderful addition to your Distress Ink pads. For the snowflakes I stamped them with some Versamark and embossed them with some WOW! Neutral Ultra Shimmer Glitter embossing powder. I adhered the trees directly to my card stock using some Scotch Quick Dry Adhesive. The snowflakes and the deer are adhered with some foam squares. My sentiment is stamped with Cottage Ivy Memento Ink. I hope you all will try these new Sizzix Framelits Stamps and Dies. They are so versatile. The die set I used for my card today could just as easily be made for a spring, summer or fall card simply by changing the papers. I think the images from this dies and stamp set would make a great masculine card for a birthday as well. Kim still has a few left in the store, so hop on over and check them out. Buy yourself a little Christmas present or ask someone in your life to call Kim for help in surprising you.

Thursday, September 19, 2013

Color's of Fall

It is time once again for a new challenge over at CardzTV. This challenge is Color's of Fall, to make a project using fall colors only, red, orange, gold brown, or purple. Here is what I came up with for you today.

I started with a piece of Kraft card stock cut and scored to make a 4 1/4" X 5 1/2" card base. I added a dark rust mat cut at 4" X 5 1/4". My patterned paper is from a K & Company paper pad I have had for 2 or 3 years. I cut the leaf paper at 3 3/4" X 5".

My leaf is from the A Child's Year Cricut cartridge and was cut at 3 1/4". I used the Cricut Craftroom software when I cut this leaf because I wanted a base layer of the leaf to add some stability so I used the hide contour feature and hid all the vein cut lines.  I cut the top layer out of white card stock and the base layer out of a peach colored card stock.

I used some of the Tim Holtz distress inks in various fall colors to ink my white leaf. It really gave it a realistic look and helped the veins stand out. I let my leaf dry overnight ( mainly because I ran out of time to finish it). I then used some Versamark ink and my WOW! Ultra High clear embossing powder to add two layers of the the embossing powder to my leaf front. This gave it a shiny enameled look.

I adehered the leaf to the card front with some foam tape. I added a rust colored ribbon and stamped my sentiment. My sentiment is from the Thankful for You stamp set.

Now, head on over to CardzTV to join in the challenge and for a chance to win a set of CardzTV stamps!!! While you are there be sure to check out the four new sets that are just releasing.


Sunday, August 25, 2013

Aged to Perfection

My stepdad is turning 83 this week so I thoughI should get a card made for him. This is what I came up with.

 My card base is Kraft card stock cut and scored to make  9" x 4" card base. I like using Kraft card stock as  base for my masculine cards. it seems to go well with the masculine colors I use for my cards. Now here is a tip for you. I really wanted to use patterned paper from my Swagger paper pad (Kim  an order this for you) but it was a 6" X 6" paper pad and my card base was bigger.  What I did was I took 2 pieces of the blue paper and cut them to 3 3/4" in width. I left one at 6" and cut the other one to 2 3/4" and adhered both pieces to my card base. Next I took two different patterned papers and cut them in varying heights but all at 3 1/2" wide. I then alertnated the papers leaving  small gap between them. No seam from the blue show through and I was able to use my smaller paper on a bigger card.

My bottle was cut at 7" from the County Fair Cricut cartridge. (Kim can order that for you too). I cut the base out of some yellow card stock, I inked the cork top with some Tim Holtz Gathered Twigs Distress Stain. The bottle was cut out of some dark  from the Tim Holtz Kraft core card stock. I covered the entire green bottle with some Glossy Accents and let it dry overnight. Once the bottle was dry I used my Glossy Accents to adhere all my layers together. I then wrote on the label Est. 1930 the year he was born.

 The last thing I did was cut a tag using Tags, Bags, Boxes, and More.I cut my tag out of Kraft card stock at 2". Once cut I spritzed it with water and wrinkled it up then smoothrd it back out and hit it with my heat tool to dry it. After it was dry I distressedthe edges lightly with a pair of scissors then inked it with some Tea Dye distress ink. I stamped my sentiment with some Vintage Photo distress ink I rubbed some kitchen twin withmy blending tool to give it an aged look then tied the sentiment tag do the bottle. I adhered the bottle to my cardbase with some foam tape and added a glue dot to the back of the tag so it would stay where I wanted it too.

 All of the adhesives I used in the making of my card I got while I was part of Kim's adhesive club. It was a great way to stay supplied with some great adhesives and maintain my budget.

 One final word on Glossy Accents,  my son was repairing the little wooden slides for a couple of dresser drawers. He wanted to use some wood glue to help hold the new slides in because the screws were short. He also wanted to add some adhesive to the cracked slides. However we couldn't find the wood glue. Glossy Accents to the rescue. The glossy accents and a couple of wood clamps and a half hour and presto, repair complete.

 Cutters Creek Products  I Used:
Glossy Accents
Distress ink
Foam Squares

Sunday, August 18, 2013

Totally Wicked

Ever since I received the new Graphic 45 Steampunk paper pads I have been itching to use it. Today was the day. I found this great Steampunk owl stamp at Michael's today on clearance.  So of course I had to use it and my paper.
My card base is black card stock cut and folded to make a 4 1/4" X 5 1/2" card base.  The next two layers are from the 6"X 6" Steampunk paper pad. The dark rust mat was cut at 4 1/8" X 5 3/8". The yellow patterned paper was cut at 4 " X 5 1/4".
I stamped the owl on some white card stock and colored it with my Spectrum Noir markers. I used my Spica Glitter pens to add some sparkle to the owl's eyes, the buckles on his hat and the watch. Once I was done coloring the image I inked the background with Persimmon, Seedless Preserves, and Black Soot Distress ink. I also inked the edges of the yellow patterned paper with the Black Soot distress ink.
To finish my card I added a sentiment chipboard tag to my card that I added some ribbon to. Finally I add some chipboard embellishments to the upper corners.
I had do much fun making this card. I am just starting to experiment with coloring and the markers.  I hope you enjoyed my card.

Sunday, August 11, 2013

One Day at a Time

 I just recently received the 6 new stickles colors from Cutters Creek, and oh my are they ever beautiful. If you haven't ordered yours yet, you do not want to miss out on these. The colors are beautiful and will be great for the upcoming holiday crafting season. Now just to tempt you just a bit more, I made a color chart for you so you could experience the colors yourself.
Aren't they beautiful???? Now, are you ready for a project that uses some of these colors? Great because I have one for you!
I started with a piece of kraft card stock cut and folded to make a 4 1/4" X 5 1/2" card base. My patterned paper is from a My Minds Eye Bluebell paper pad that I received from the 6" x 6" paper pad club that I belong to through the Cutters Creek Yahoo Group. Kim usually has several clubs running at once. She does her best to keep the cost down to around $20. They are billed the same day each month and at the end if you have paid on time you receive a free gift. Just join the Cutters Creek Yahoo Group to find out more. I will spill a secret and let you all know that Kim has just opened sign ups for the new Distress Glitter club. Interested??? Join the group for details. Now back to the card! I used a scalloped chipboard oval from Want 2 Scrap (a free gift from a club!). I stained it with some Broken China Distress Stain (another club product!). I then sprayed it with some Sea Glass Glimmer Mist. Once it was dried I used the Ice Blue Stickles on the lacy scallop edges. I stamped the images with Memento Tuxedo Black Ink. They were colored with Copic and Spectrum Noir markers. I used the Ice Blue Stickles for the center of my flowers and to add some sparkle to my butterfly. The heart on the flower pot I used the Cranberry Stickles. I used some Scotch Quick Dry Adhesive to adhere my  scallop to my card and to adhere my images to the oval. My tickets are inked with some Tim Holtz distress ink in Faded Jeans and Tumbled Glass. To finish the card I stamped my sentiment with some Memento Tuxedo Black Ink and added some rhinestone bling. Now don't forget to join the Cutters Creek Yahoo Group to find out more about the clubs and all the products in the store. You won't regret it. It is a great way to add to your crafting supply without breaking the budget!!

Friday, May 10, 2013

My Version of a Gate Fold Card

When I set out to design this project, I knew I wanted to do something a bit different then my typical A2 card. I did some blog hopping and decided I wanted to make a gate fold card. But I decided I wanted to create my own version of a gate fold card and that is what I did.
I started with a piece of white card stock cut to 5 1/2" X 12". I die cut one edge using a Tim Holtz on the edge butterfly die. (Check with Kim if you are interested in this die). My next thought was how to dress up the butterlies. Once again Tim Holtz to the rescue. I placed several different colors of distress stain (I used Peacock Feathers, Squeezed Lemonade and Shaded Lilac) I then spritzed the distress stains with water and and swished my butterflies in the stain. I then let them dry. I added some Buttercup and Lavendar Lace Liquid Pearls to the bodies of the butterflies. Once the butterflies were all dried I scored my card stock at 3 1/2" from each end. I heavily inked all the edges of my card with Peacock Feathers Distress Ink (this is one of my favorite colors).  I added a black mat and then my patterned paper mats. I also did the inside of the card.
My next dilemma was how to finish the card. It just needed a bit more. I took another piece of white card stock and again applied some distress stains to my mat. This time I used Peacock Feathers, Seedless Preserves, Salty Ocean and the Burnish Pewter Metallic stain (again Kim can order these for you, just ask). I again squirted the stains with water on my mat and just swished the paper across my mat to color the entire page. I then spritz the paper with a bit of water to get the colors to flow. I allowed the paper to dry thoroughly. I cut two butterflies using my Silhouette cameo. I cut the base layer using the stained paper I created. The top layer was cut using the tracing paper I have it is a bit transparent.
To finish the front of the card, I cut a mat using Elegant Edges (again Kim can order this for you) at 3". I cut the shadow out of black and the base layer out of white. I inked the white mat with the Peacock Feathers distress stain and stamped my sentiment and the butterfly. I used my Turquoise Spica pen to enhance the lines of the butterfly and use the Clear Spica pen to add sparkle inside the wings.
I sure hope you enjoyed my version of a Gate Fold card. I would love to see you all create your own version as well and share it with me. I think this card would work well for a Mother's Day card, Birthday Card, or even a Graduation Day card. What do you think?

Friday, March 29, 2013

New Techique for Patterned Paper

So I recently signed up for an online card class that was taught by Kristina Werner and Jennifer McGuire called Pattern Play. It was a class about how to use patterned paper. I wanted to share with you one of the techniques I learned in the class. For this technique the goal is transform patterned paper to give it an entirely new look. To make my card, I stared with a piece of white card stock cut and scored to make a 4 1/4" X 5 1/2" card. I added a dark blue mat cut at 4" X 5 1/4". For the orange mat, I stared with a piece of patterned paper cut to 4 1/4" X 5 1/2".  I used a Hero Arts Leaf and Branch background stamp (yes, Kim can get Hero Arts products, just ask) and stamped it on my patterned paper with some Versamark. I added some Clear WOW! embossing powder. Here is a before and after shot of the paper I used. Next I used some Distress Inks in Rusty Hinge, Spiced Marmalade, and Ripe Persimmon and my blending tool to apply some ink to my embossed patterned paper. The embossed areas will resist the ink.  On the left is the paper I started with, on the right is what I ended up with after I embossed it and added the ink. The other step that I did based on what I learned in the class was to take my iron set on dry, medium heat and some printer paper and I laid the printer paper over my embossed patterned paper and ironed it a couple of times, moving the printer paper as I did this to take off the glossy embossing powder.
To finish my card, I cut a fan from the Cricut Pagoda cartridge (yes, Kim can special order this for you, just ask) at 3". I added it to my card front with some foam tape. Then I took a Tim Holtz ticket that said Dream and inked it with some Tea Dye and Vintage Photo distress ink ad added it to my card. Finally I added some dark blue pearls from my stash. Kim has a wide selection of pearls in multiple colors and sizes here in the store. I hope you will give this technique a try. It is a great way to change up a patterned paper that may now be working for you.

Tuesday, March 19, 2013

Quick and Easy Easter Basket

Welcome Tutorial Tuesday! Hope your week is off to a great start.  Today I have for you a quick and easy Easter basket. Perfect for a hostess gift, gift for co-workers, friends, just about anyone, or the center of your Easter table. I happened to come across this great tutorial at Scor-Pal on making a box. I knew I wanted to make a simple basket and wanted it 4" across the bottom and I wanted 3" sides. Based on the formula in this tutorial (4+3+3 which is the box size plus two times the height size) I knew I needed to cut a 10" square to make my box and then score each side at 3". I then cut the flaps as indicated in the tutorial.
This picture is from the tutorial
I adhered my box using scor-tape. My handle which was just the 2" X 12" strip of patterned card stock I cut off to make my 10" square. I attached my handle to my box behind the outside flap so the bottom of my handle was hidden. Now that the basket was together, it was time to decorate it. I cut my rabbit from the Easter 2010 Cricut cartridge at 2 1/2".  I ran the rabbit through my Xyron sticker maker upside down so the sticky was on the front of my bunny. Okay so now I have a confession to make. I thought that at some time in the past I had purchased the Earth colored Ultra Fine Flower Soft. However, if I did, I sure couldn't find it and was not where I store my flower soft. So now I had a dilemma. I wanted to make my rabbit furry, so what to do? I took some of white Ultra Fine Flower Soft and added several drops of  ginger alcohol Ink to it in a plastic sandwich bag and rubbed it around in the bag to get the color I ended up with. However, I also ended up with ginger colored hands and it had a bit of an odor to it from the alcohol ink. So while it worked in a moment of panic I plan to get some of the Earth colored Ultra Fine Flower Soft when Kim has it back in the store. Just much simpler to us.Once I had my bunny sticky and the flower soft the color I wanted I added it to the front of the bunny and pressed down on the flower soft (that's how I got the colored hands) to be sure it stuck to the adhesive. I then added a bow at his neck and a google eye to him and adhered him to my basket.
Next I cut the grass. The grass is also from the Easter 2010 cartridge and was cut at 1 1/4". Each strip is actually 2 of the images that I flipped and welded together on my Gypsy. You could do the same thing with the Cricut Craft Room if you don't have a Gypsy or Design Studio. I cut my grass out of some Core' denations paper and the light green is actually the back side of the card green. I adhere the grass to my box at the bottom and then fluffed up the grass to give it some dimension For my Easter eggs, I cut these from the Doodlecharms cartridge using real dial size and 3/4" and 1". Before cutting the eggs I grabbed some scraps of card stock in pink, yellow and lavender. I used my WOW! Funky Border Strips clear stamps and several colors of distress ink to create some patterned paper to cut my eggs from. If you haven't tried any of these clear stamps you should. WOW! makes them so they work really well with their embossing powders (just a suggestion all you WOW! club members). Kim carries several of their stamps sets. It is worth checking out.
On the lavender paper I used the Peacock Feathers Distress ink and the small dot border stamp. On the Yellow paper I used Shaded Lilac and the small squares border stamp. On my pink paper I used the Squeezed Lemonade and the Pickled Raspberry distress ink and the single row of dots border stamp. I first stamped the Raspberry and left about an 1" between the two rows, then went back and stamped the Lemonade between the Raspberry. Once I had the eggs cut out I used my Spica Pens to add a little glitter to the eggs and then adhered them to the front of my basket. I hope you enjoyed seeing my basket and will check out the awesome products used from Cutters Creek. And remember if something is ever out of stock just contact Kim through the Customer Service link and ask if she can order it for you. She is great about special ordering so never hesitate to ask. I hope you all of a great rest of your week. I would love to know what you think of my basket.

Sunday, March 10, 2013

Masculine Birthday Card


Today I have for you a masculine birthday card I made for a co-worker. Masculine cards seem really hard for me to make. Awhile back I came across a 6 X 6 paper pad by Authentique called Original and it was all blues and browns and it seemed perfect for masculine cards. I finally had a chance to try it out this weekend. Let me know what you think.

I started with a piece of 8 1/2" X 11" card stock that I cut at  4 1/4", giving me a 4 1/4" X 11" piece of card stock. I scored that a 5 1/2" but rather than making it a portrait style card I mad this one landscape so my width is 5 1/2" . Next I added a piece of blue patterned paper from that paper pad cut at 4" X 5 1/4".. The other thing I loved about this paper pad is it was two sided. So cut a strip of the patterned paper at 1" X 4". The lid blue strip on my card is the reverse side of the blue patterned paper. Then I took another piece of paper from the pad, this one looks like it had metal buttons on it and cut it at 4" X 3/4". I inked the edges of all my papers with some of the Gathered Twigs distress ink. Next I cut a 2 1/2" square from the buttoned patterned paper an used the back side which is a rich chocolate brown fro the mat behind my sentiment. I then cut a 2 1/4" square out of white card stocked that I inked the edges heavily with the Gathered Twigs distress ink. I stamped my sentiment with Chipped Sapphire Distress ink and adhered it to my brown mat. I added some bronze nail heads at the top and bottom of the sentiment mat and adhered all of that to my card from with some foam tape. Because it was a masculine card I did no more.

I hope you liked the card and feel a bit inspired to try your hand at making a masculine card.

Friday, February 22, 2013

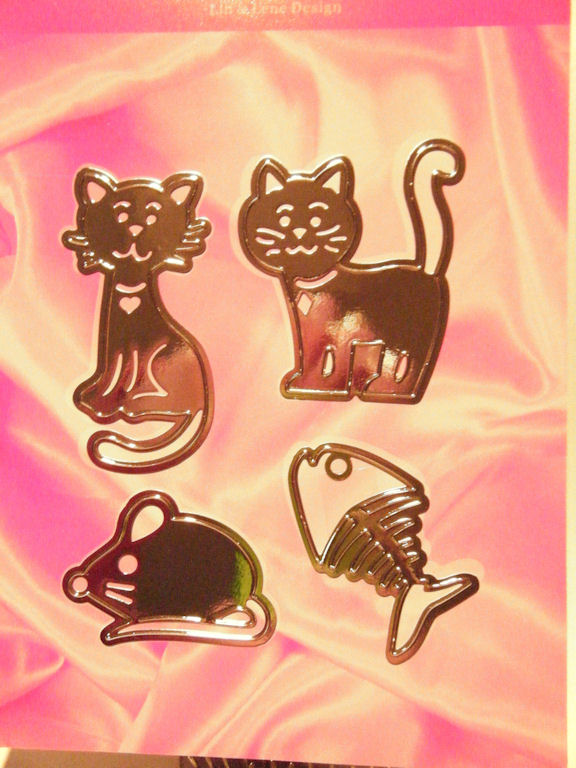
Lin and Lene Designs Dies

I ordered a couple of adorable dies by Lin and Lene Designs and they came yesterday. This card is what I made with one set of the dies.

Want to see them? Here you go.


Now on to my card.  I started with a kraft card stock card base cut and folded to make a 4 1/4" X 5 1/2" card. I added a white mat cut at 4" X 5 1/4" and then the blue gingham mat (from a My Minds Eye paper pad) cut at 3 3/4" X 5".  I used a black fine tip marker to add some faux stitching lines around the white mat of my card.

Using my eBosser I cut and embossed the two dogs from the set. These dies are stencil dies so once they were cut and embossed I used some black soot Distress Ink to ink over the openings in the dies to add some color. I also used a turquoise colored marker to add the blue color to the one dog. This was actually pretty quick and easy to do. I added them to my card front with some foam tape. I then cut a conversation bubble using my Silhouette Cameo and stamped my sentiment in it. I used my black marker to add some doodle lines to the conversation bubble and adhered it straight down to my card with my ATG gun. To finish the card I added 3 small black buttons to the lower right hand corner. I made this card for male co-worker who has a birthday in about 10 days. 

I had hoped to have the kitties done too today but my little helper has been a tad hyper, but shhhh... he is asleep right now.

Saturday, February 16, 2013

Distressed Card

I received some new WOW! stamps and of course I had to try them out. The sets I bought were Everyday Sentiments, Funky Border Strips and French Music. This is what I came up with. This card style is a bit out of my comfort zone, I don't make a lot like this one. However, I had a lot of fun working on it.

My card base is a light tan card stock cut and folded to make a 4 1/4" X 5 1/2" card base. I added a dark brown mat cut at 4" X 5 1/4" from the Tim Holtz Nostaglic Collection Core'dinations card stock. And another tan mat cut at 3 3/4" X 5".

For my final layer, I started with some white card stock cut at 4" X 5". I used some Tim Holtz distress ink in old paper, antique linen, tea dye, and vintage photo to ink up my paper. I started with my lightest color and worked my way to the darkest color layering the color as I went. I then lightly spritz the paper with some water and allowed it to dry. Next I took some of the Tim Holtz Distress Stain in tarnished brass and inked around outer edges of my paper. I allowed it to dry for a few minutes then turned the paper over and spritzed it with water until it was fairly damp and then crumbled it all up. I spritzed from the back so my ink on the front wouldn't react to the water. I carefully opened up the paper and dried it with my heat tool. Once it was dry I took my blending tool and some Vintage Photo and lightly went over the top of my paper to enhance the wrinkles I had created.

Using Vintage Photo and the French Music stamp I stamped the inked paper. Because of some of the creases, and wrinkles I got a very broken up image which was what I wanted. I then cut it down to 3 1/2" X 4 3/4" so it would fit the front of my card. I took my scissors and distressed the edges of the paper and the adhered all my layers together.

I wanted my sentiment to be the focal point of my card. So using my Cricut and the Elegant Edges cartridge and the Oblong creative feature I cut a scallop and shadow at 3". The shadow was cut out of the dark brown and the top layer was cut out of the light tan.

I inked the edges of the tan scallop with some Tea Dye Tim Holtz Distress Ink and used Vintage photo to stamp my sentiment. Because this ink lightens a bit when it dries, it was a perfect choice to use with the sentiment to carry my distressed theme.

I added some rhinestone flourishes to the front of my card. These were actually clear rhinestones that I colored with a Spectrum Noir marker GB10.

My flowers are a 3d Rose cut that I cut with my Silhouette Cameo. The paper is Core'dinations Gemstone card stock, but not sure of the name of the color but it is a light golden  yellow.

I rolled my flowers and adhered a gold pearl in the center of each flower. I didn't have enough small gold pearls to trim my scallop so I used some Gold Pearl Liquid pearls for that. I adhered the sentiment mat to my card using some foam tape.

I hope you like it. I had a lot of fun working on this one as it was a bit more of a challenge for me.

Friday, February 1, 2013

Painting With Liquid Pearls

So when I was sick last month I spend a lot of time just watching card making youtube videos. I found a couple of videos the used liquid pearls to paint with and of course I had to give it a try. I used my eBosser and the magnetic mat to die cut my violets. I then ran them back through the eBosser after removing the magnetic mat and topping the die with the rubber embossing mat and embossed them. It worked wonderfully. To paint my violets I first laid my craft mat down. I then put some of the Squeezed Lemonade distress ink on my mat then I squirted a little dab of the Daffodil and White Opal liquid pearls in the center of the distress ink. I think added some water with a misting bottle just to the side of the ink and liquid pears. Using my brush I I mixed the ink and liquid pearls together adding a bit of water as I went. Then I painted it on the center of my violets and let them dry. After they were dry I used some Seedless Preserves distress ink and some Majestic Purple and more of the White Opal liquid pears and repeated the mixing process and then painted that color to the outer edges of my violets and then let them dry. For the stems and leaves I used Mowed Lawn distress ink and Avocado and White Opal liquid pearls. Again I mixed them together and added water to get the colors I wanted. Added the color to my leaves and stems and let them dry. While they were drying I put my card base together. I started with a white card stock card base cut, scored and folded to make a 4 1/4" X 5 1/2" card base. I cut a lavender mat at 4" X 5 1/4" and the patterned paper mat at 3 3/4" X 5". My patterned paper is from a Prima paper pad. Next I used my Elegant Edges Cricut Cartridge to cut out a scalloped mat and it's shadow for my violets to be placed on. The mat was cut at 3". I ran the lavender mat through my eBosser and embossed it with the Swiss Dots Cuttlebug folder. I added my violets to the mat and attached it to my card with some foam tape. Finally I cut out a zigzag border using yellow and dark purple card stock my Silhouette Cameo and adhered them to my card. I added some Lavendar Lace Liquid Pearls to the dark purple card stock. I stamped my sentiment with the Seedless Preserves . Finally I added some Lemon colored Kaisercraft Pearls to the centers of my flowers.

Saturday, December 15, 2012

Poinsettia Die Card

I recently picked up the Tim Holtz Tattered Poinsettia die and the embossing folder that matches the die. Here is what I did with it.

I started with a cream colored card base cut and scored to 4 1/4" X 5 1/2". I added a red mat cut to 4" X 5 1/4" and a patterned paper mat cut at 3 3/4" X 5". The patterned paper is from an Echo Park paper pad.

I ran my poinsettia die through my eBosser and cut the flower layers out of white card stock. I then inked them using the Festive Berries Distress Ink and Peeled Paint for the leaves. I used some Tarnished Brass distress stain for the flower center. Once I had them all inked and allowed them to dry for a few minutes I embossed them with the embossing folder and my eBosser. I just love how the flower looks after it is embossed. I will say that the flower is fairly fragile once it is embossed and I did tear off a leaf but just glued it to the back of the flower where it was supposed to go. Once I had my flower all put together I sprayed it lightly with some Gold Glitter Dust. It is really pretty in person.

I stamped my sentiment with some Memento Lady Bug red ink.

Friday, November 30, 2012

Embossed Resist Christmas Card


I picked up this Penny Black stamp today and knew right what I wanted to do with it. I started with a piece of white card stock cut to 4" X 5 1/4". I stamped my image with some Versamark and then embossed it with some WOW! Clear embossing powder.

Next, I used my Tim Holtz Blending tool and some distress ink to ink the entire piece of card stock. I used Tumbled Glass, Broken China, and Chipped Sapphire on my card. I then used some Rouge Liquid Pearls and randomly added some red berries to my tree for a pop of color. Once those were dry I used my big Chisel tip Zig Two-Way glue pen and created a snow drift under my tree and added some Hero Arts Prisma glitter to it and let it dry. Finally I stamped my sentiment with some Colorbox White ink and then embossed it with some WOW! Neutral Ultra Shimmer Glitter embossing powder.

Finally I adhere my card front to a piece of white card stock cut and scored to make a 4 1/4" X 5 1/2" card.