Showing posts with label Create-a-Critter. Show all posts

Friday, January 22, 2016

Bitten by the Luv Bug

I have a fun new Valentine's Day card for you today.  It was a lot of fun to make.

I started with a red card stock base cut and scored to make a 4 1/4" X 5 1/2" card base.  I cut a black mat at 4 1/8" X 5 3/8" and the striped mat was cut at 4" X 5 1/4.

My image is from the Create a Critter cartridge and was cut at 3 1/2". I made him into a print and cut image.

I wanted a mat to stick him on and I just received some new dies in the mail so of course I had to use them for my mat.  The dies are the Postage Stamp Rectangle dies by Memory Box.   I cut the largest die out of black and the next smaller size out of some aqua blue patterned paper.  My paper for this card is from Doodlebug.  I attached the two mats together and attached them to my card with some foam tape,  Finally I adhered the image to the blue mat and stamped my sentiment with some Memento tuxedo black ink.

Thanks for stopping by.

Thursday, April 16, 2015

Butterfly Kisses

It is time for a new 3D Challenge over at CardzTV  T-his weeks challenge is to create a 3D project using flowers.  I had a lot of fun with this one and hope you do too.  Here is my project.

.
I found these daisies in the Silhouette store.  They were designed with just two cuts, the flower and the center.  They way they were intended to be put together was to put a straw through the holes.  However wouldn't you know it, my straws were just a tiny bit two small. SO I had to improvise.

I cut one end of the straw down both sides about 1/2" and spread the straw apart and pushed down on the ends so they were flat.  I used some glossy accents to attach my straw to the yellow center with the hole in it.  Now I had to figure out how to cover the holes.  The yellow centers were cut at 1 3/4".  So I used a 1 1/2" scalloped punch to punch a scallop out of this bright pink color. Then I used a 1 1/4" circle punch to punch another yellow circle. Finally I stamped this second yellow circle with a Peachy Keen stamp face. I used the 1" size stamp and Memento Tuxedo Black ink.  Using my white gel pen I added some freckles to the pink cheeks.  The pink cheeks were add with a rose colored Prima Watercolor pencil and blended with a Dove blending pen.

Next I cut out this cut butterfly from the Create a Critter cartridge.  I used my Explore and Design Space to  flatten the butterfly so I could do a print and cut on it.  I cut the butterfly out at 2".  I added some Raspberry Stickles to the dark pink areas on the butterfly's wings and some Lime green stickles on the very end of his antenna's.  Once the stickles was dry I glued the butterfly to a straw. 

I found this little biodegradable pot at my craft store and thought it would be perfect for this project.. I added some floral oasis inside the pot to hold my flowers. I bent each straw slightly so that you could see the flowers cute faces.  I added some leftover green Easter grass to cover the oasis.  Next I put my butterfly in the center of the pot.  For my sentiment I used some white and pink butterfly Washi Tape and some Staz-on black ink I stamped my sentiment unto the Washi tape and the carefully wrapped it around a straw.  I cut the end of the tape to make it look like a flag.  My sentiment is from the Think Spring CardzTv Stamp Set.

Now it is your turn. Show us what you can do with a 3D Challenge using flowers.  And don't forget to hop over to Mary's Stamp blog and get your stamps ordered..  Please leave me a comment and let me know what you think of my project. I love hearing from you.  Don't forget to visit the other Design Teams blogs to see what they made for the challenge.

Wednesday, February 27, 2013

New Crafty Cardz Challenge

It is time for a new challenge over at Crafty Cardz Challenge . The new challenge is to make a Child's Birthday Card!! Here is what I came up with.

My card base is Kraft card stock cut and folded to make a 4 1/4" X 5 1/2" card base. I added a bright green mat cut at 4" X 5 1/4" and then the patterned paper mat cut at 4 1/8" X 5 1/8". I wanted just a little of the green to show up.I then added a small strip of orange to the card that I cut at 1" and then trimmed on edge with some decorative scissors. My Dinosaur is cut from the Create-A-Critter at 3 1/2"  and added to my card front with some foam tape. I then cut a start shape at 2" using the shadow feature on Accent Essentials and a 1 1/4" circle also from Accent Essentials. Stamped my sentiment with some lime green ink and adhered it directly to my card.

Now it is your turn. I hope you will join us in the challenge.

Friday, January 25, 2013

Meet Smokey and a Thank You Card


Our new little 8 week old puppy joined our family today. We named him Smokey because of his gray eyebrows. We found through a friend at work. After met Smokey and fell in love she went out and bought us a Petsmart Gift Card so we could take him shopping. I made this card to thank her for her generosity and for helping us find Smokey.

My card is a 4 1/4" X 5 1/2" card. I used Kraft card stock for the base. I added a blue mat cut at 4" X 5 1/4" and a patterned paper mat cut at 3 3/4" X 5". My little dog is from Create A Critter and is the closest I could find that looked like Smokey. He is cut at 3 1/2". My sentiment is stamped in Memento Tuxedo Black ink and I added some silver nail heads to each side of the sentiment.

Friday, May 18, 2012

Birthday Card

One of my co-workers has a birthday next week and this is the card I made for her. I think this little turtle is so cute. He was cut from the Create-A-Critter cartridge at 2 1/2". I cut the base layer, layer 2 and layer 3. I didn't want the face layer because I wanted to add his face with a peachy keen stamp.

My card base is white card stock cut and folded to 4 1/4" X 5 1/2". I added a lime green mat cut at 4" X 5 1/4" and then my patterned paper cut at 3 3/4" X 5". I added some faux stitching around the green mat and some doodle dots to the turtle with my white gel pen. I also colored in his eyes and gave him some pink cheeks and freckles. I attached the turtle to my card with an action wobble.

I think she is going to love him! Thanks for visiting.

Saturday, May 12, 2012

Celebrate Sunshine


YEAH! We are finally getting some spring and summer weather. 85 today and 88 tomorrow.

The challenge going on at Simply Crafts is to make a card using the Sun from the Create-a-Critter cartridge. This is what I came up with.

My card base is white card stock cut and folded to make a 4 1/4" X 5 1/2" card base. My yellow mat is the same paper as my sun's face and is from Core'denations and is cut at 4" X 5 1/4". My patterned paper is from the new Echo Park Hello Summer paper pack. The paper is two sided and I used both sides on my card. I cut the cloud paper at 2" X  5" and the striped paper at 2 1/8" X 5".

My sun was cut at 3". I cut the base layer out of orange card stock and the face layer out of yellow. On the face layer I used the hide contour feature on my Gypsy to hide the face so I could stamp it with my Peachy Keen stamps. I used my white gel pen to add some faux stitching around the sun and colored in his eyes. I also used some pink chalk to give  him some rosy cheeks and some freckles with my white gel pen. My little sun is attached to the card with an action wobble.  I stamped my sentiment with some Memento Tuxedo Black ink. The stamp set also has this cute little bee that I added to the upper corner of the clouds and I colored him in with a copic marker. To finish the card I added 3 small buttons threaded with some twine.

Saturday, March 10, 2012

Simply Craft Kite Challenge

The March challenge at Simply Crafts is to make a project using the kite from Create-A-Critter Cricut Cartridge. This is what I came up with.


My card is a 4 1/4" X 5 1/2" kraft card base. I used the Enjoy the Seasons Imagine cartridge and cut the blue cloud behind the cloud at 4 1/2". I then flood filled the kite base with a dark pink color from the Enjoy the Seasons color pallet and flood filled the second layer of the kite with a yellow and white dotted pattern from the cartridge. I cut the kite and the 1st layer only at 4 1/2". Since I didn't want the face layer I chose to not cut it. I stamped my kite with a Peachy Keen stamp from the Everyday Character Assortment. I added some rosy cheeks with some pink chalk.  I used a white gel pen to add the whites of his eyes and some doodling to the cloud. I used a black gel pen to add some faux stitching to the card base and to the kite. I cut the little kite bows off that cut out with the base layer and tied some twine bows and adhered those instead.

To finish the card, I added some yellow buttons and adhered my little kite to my card base with an action wobble so he could fly! Finally because he made me smile I added my sentiment. I just love how this turned out. Here is a short video that shows my card and also shows him "flying" on the action wobble.


Saturday, January 21, 2012

Kiss Me! Card

I just received a couple of new Valentine Stamp sets from Mary at CardzTV. When I saw the Kiss Me! stamp I knew I had to do a frog card. Here is what I came up with.
I started with a piece of Kraft card stock, cut, scored, and folded to make a 4 1/4" X 5 1/2" portrait card. I added a pink mat cut at 4" X 5 1/4" and the patterned paper cut at 3 3/4" X 5". The polka dotted patterned paper is from a K & Company Valentine paper pack I bought last year. The frog is from Create-a-Critter and is found on page 24. I cut the frog and all his layers at 3 1/2". I also cut the heart from the Create-a-Critter cartridge and it is found under the Accessories on page 36 of the handbook. I cut the heart at 4 1/2". Once I assembled the frog I adhered him to the front of my card with some foam tape. I added cotton candy stickles to his cheeks and red stickles to his heart. I also used my white gel pen to add some faux stitching around the card and the frogs tummy and some doodle dots on the frog. I stamped my sentiment with some Cottage Ivy Memento Ink and added a couple of red buttons. I also added the googly eyes that my friend Lynn sent me. I love the little eyelashes on the eyes. Makes the frog look a bit flirty don't you think? Thanks for visiting.

Monday, September 5, 2011

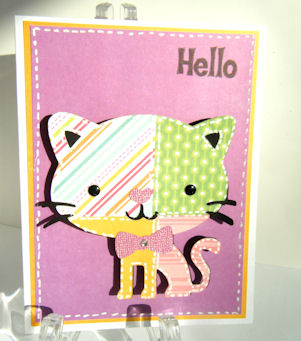
Patchwork Kitty

So for Tutorial Tuesday I wanted to give you an idea on how to use some of those scraps building up in your scrap bin. If you are like me, you hate to recycle a piece of paper that you just might be able to use on another project. Here is what I have for you.
To make my patchwork kitty, I started with a 4" X 6" piece of regular bond, printer paper and ran it through my Xyron. You could also use a large adhesive label but I didn't have any so had to improvise and it worked beautifully. I then cut 2" X 2" squares from some of my scrap paper. My paper for this project is from several Echo Park Paper Pads.
 I then randomly picked up my squares and attached them to my paper using the adhesive applied by the Xyron. Here is how it looked.

I then selected my imagine which was the Kitty from Create-a-Critter. I cut the base layer out of black card stock (another scrap) and then the top layer from my patchwork paper I made. I grabbed a scrap of pink for the bow and the kitty's nose. My card base is  4 1/4" X 5 1/2" white card stock. The yellow and purple paper are from the Echo Park Summer Days Paper Pad. I used my white gel pen to add some faux stitching around the outside of the card as well as to "stitch" all the seams and along the outside of the kitty. I added some black nail head embellishments from my stash for her eyes and a silver rhinestone from the new Want2 Scrap embellishments, to the kitty's bow. I used some Memento Tuxedo Black Ink to stamp my Hello. I attached my kitty to my card front with an Action Wobble I hope I have inspired you to trying something new with those scraps. Thanks for stopping by. Be sure to come visit us again as we will be featuring projects using the Echo Park Paper Pads all month.

Monday, August 8, 2011

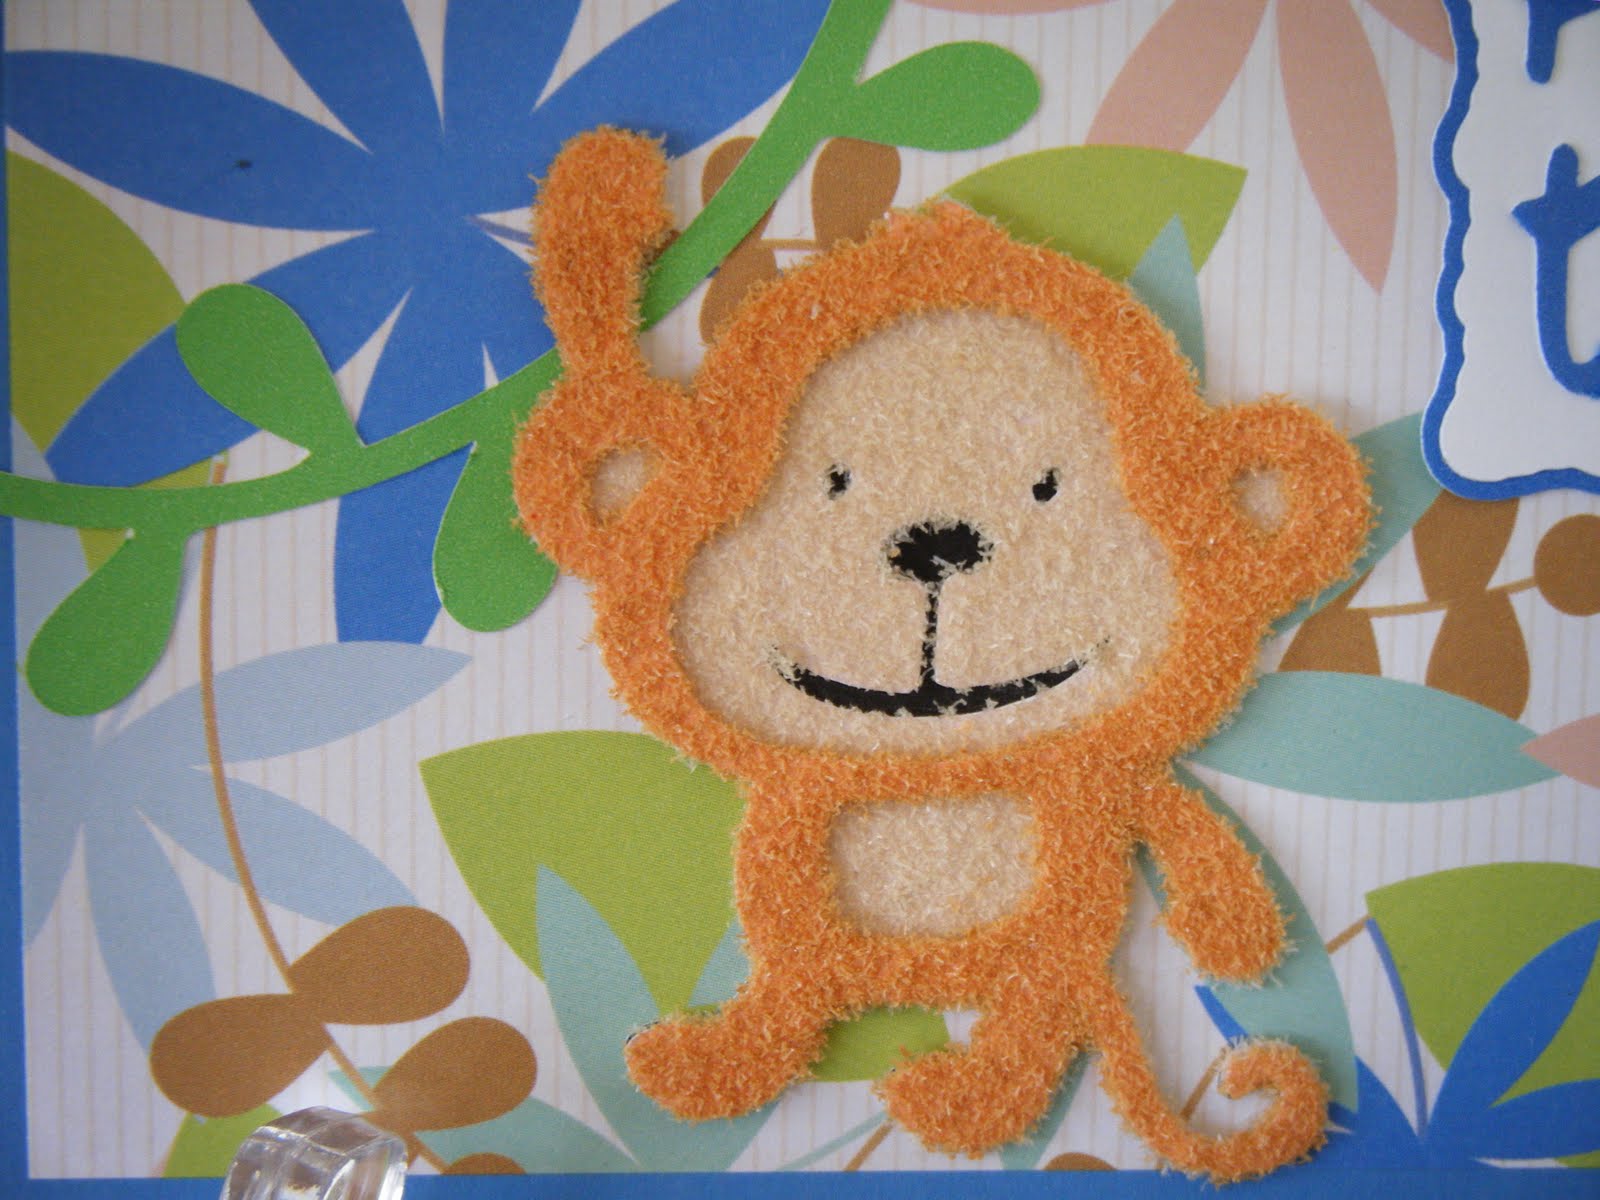
Hang In There Card


This week my Cutters Creek Design Team post is for Tuesday Tutorial using Flower Soft. The tutorial I have for you today uses the Ultra Fine Flower Soft as flocking. I love the dimension and texture it gives to my Cricut cuts.  I started with the monkey from the Create-a-Critter cartridge and cut him at 3". I used my Imagine to color each layer (love that!). The base layer was cut with black. The next I colored to match as close to the flower soft I chose to use.

Next I ran my layers I wanted to flock upside down in my Xyron so the adhesive was on the front of my image.
I used Sand Ultra Fine Flower Soft for the main layer of my image, and Toffee Ultra Fine Flower Soft for the outer outline layer to flock the monkey. I liberally covered my image with the flower soft and patted it down to be sure I had a good covering and then tapped off the excess.
I did the same with the other layer. Here is what they look like now that each layer is flocked.
Once I adhered my layers together with some Flower Soft Adhesive. I put my card together. My card is a standard 4 1/4" X 5 1/2" card. My base is white card stock. I then added a blue mat cut to 4" X 5 1/4" and cut my patterned paper from my scrap bin to 3 3/4" X 5". I used my ATG Gun to adhered the layers together.
The vine was cut at 3" as well and colored using my Imagine. For the mat for my sentiment I used the Elegant Edges cartridge (which Kim can special order for you just ask). I colored the shadow layer with a blue color and left the top layer uncolored as I wanted it white. The mat was cut at 2". My sentiment is from the Wild Card cartridge and was colored with the same blue as my shadow layer and was cut at 4".

I just love the velvety texture I get by using the Ultra Fine Flower Soft as flocking. The Ultra Fine Flower Soft can be used to add texture and dimension to any of your projects. I hope you give it a try.

Saturday, March 26, 2011

Spring Chick!

20110326_4

After spending time blog hopping through several spring time blog hops and the fact that the sun actually came out today, I decided I had to make a spring card.

I started with a Kraft card stock card base scored and folded to 4 1/4” X 5 1/2”.  My patterned paper is a scrap in my stash. It is two sided paper so the yellow mat is actually just the reverse of the flowers.  The yellow mat was cut at 4” X 5 1/4” and the patterned paper was cut at 3 3/4” X 5”.  The chick and the egg are both from Create a Critter Cricut Cartridge. I used my Imagine and some RGB codes to flood the layers with color. The orange  and black are stock colors on the Imagine. The chick and its layers and the egg were all cut at 3”. I used some canary colored flocking powder to flock my baby chick to give him a fuzzy look. I used some spray adhesive to apply the flocking and actually gave the chick two coats of flocking. The lighter colored belly of the chick is flocked using Ultra Fine Flower Soft in Sand.  I ran the lower half of the egg through my Cuttlebug and embossed it with the Swiss Dots folder. The top half I left as is so I could stamp my sentiment on it. I adhered the chick and the egg top with one layer of foam tape and the lower half of the egg is on two layers of foam tape.  Thanks for visiting.

Sunday, March 13, 2011

Paper Playtimes Challenge

This week over at Paper Playtimes we were given 3 different challenges to choose from. The choices are, 1. use green and purple, 2. use pink and glitter, or 3. use a critter and a rhyme. I chose the third challenge for my first design team project. This third challenge is in honor of Dr. Seuss’s birthday. Horton Hears a Who was my inspiration for this card.  Here is what I came up with.
20110306_4 I started with a 5” X 7” pre-folded white card base. I topped that with a blue mat cut at 4 7/8” X 6 7/8”. I used my Imagine and the 8:10 proportional rectangle and flooded it with this pattern from the Better Together Imagine cartridge.  This pattern reminded me of the little wishes that Horton in Horton Hears a Who carried.  My elephant was cut at 3” and is from the Create a Critter Cricut cartridge. I used my imagine to flood each layer of the elephant with color. The top layer is filled with a blue swirly pattern. All the colors and patterns on this card are from the Better Together cartridge.  I added some bright yellow ribbon to my card and layered my little elephant together. The elephant is pop dotted to the card and I added some googly eyes and gave him a little hint of pink in his checks with some chalk. I added some faux stitching around the end of the card and sentiment and some doodle dots to the elephant.  I printed out my sentiment on the computer and used the RGB codes for my font color so it matched the dark blue on the elephants ears. The sentiment I chose was, “I meant what I said, I said what I meant, and elephant’s faithful one-hundred percent”. I thought that was a inspiring and would perfect to thank a friend for being there for you through thick or thin.
I had a lot of fun creating this card and hope you will hop on over to Paper Playtime Blog and play along with us.

Sunday, October 31, 2010

Turkey Card

Here is a quick Thanksgiving card I made using the turkey from the Create-a-Critter cartridge. He was cut at 3 1/2". I cut all his layers. The card base itself is 4 1/4" X 5 1/2" Kraft card stock. The orange mat is cut at 4  X 5 1/4". The patterned paper is a scrap from my stash and is cut at 3 3/4" X 5". The golden paper behind the turkey is cut at 2 3/4" X 5.  I added some orange rhinestones to the turkeys back tail feathers. I also added some rust colored pearls for his eyes and added some doodle dots with a copper colored gel pen. I added a dot in the center of each of the turkey's red tail feathers with the gel pen as well.  I haven't added a sentiment to the outside and am not sure I will. For his hat, I added some orange stickles where the cut was for a hat band to dress him up a little. Thanks for visiting.

Sunday, August 29, 2010

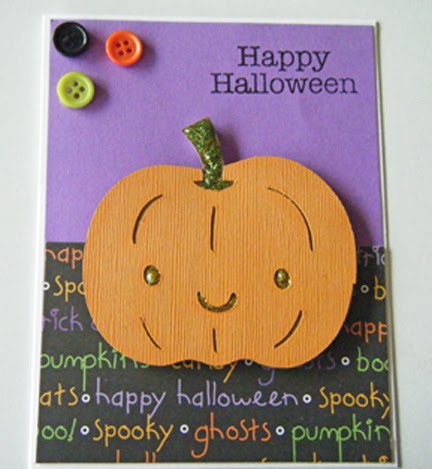
Cheery Pumpkin Card

I wanted to cut the pumpkin from the Create-a-Critter cricut cartridge so decided to do a quick, simple Halloween card. My card base is 4 1/4" X 5 1//2" white card stock. I used a purple mat cut at 4" X 5 1/4" and the patterned paper is from my stash and is 2 1/2" X 4. I cut the pumpkin at 3". I chalked the edges and lines of the pumpkin and added some yellow stickles to the eyes so they looked like they glowed. I also added some lime green stickles to the stem to give it some bling. I used some foam tape to attach the pumpkin to give it some dimension and added some buttons. the sentiment is from a Hero Arts clear stamp set.

Friday, July 30, 2010

Just Because Card

I posted last weekend a picture of the Post-It note cover I made for my mom. This is the card I gave her with it. She has been having a rough time of it so wanted to cheer her up. This is a joy fold card. I got the measurements and information on how to make the card from this blog. The patterned paper is from the Flower Shower DCWV paper stack. The bird on the front is from the Create-a-Critter cartridge and is cut at 3".  The birdhouse is one of the accessories on the cartridge and is cut at 1 1/2".  The sentiment says Sending You Sunshine and Laughter. I gave it to my Mom this past week and she loved both the post-it note cover and the card. Thanks for looking.

Thursday, July 22, 2010

Another Christmas in July Card

Mary at CardzTv is having her last Christmas in July challenge this week. You can use any colors you want but you must have a Christmas tree on the card. I am also entering this card for the Fantabulous Cricut Monday Challenge which was also a Christmas in July challenge.

I decided to use the tree from Create-a-Critter. I cut the tree at 2 1/4". using the real dial size button on my Gypsy. I also used the hide contour feature to hide the face on the top layer of the tree. I also cut the string of Christmas lights at 1/2" and the star at 1" which is also from Create-a-Critter. Again, with the star I used the hide contour feature on my Gypsy to hide the larger of the two stars as I only wanted one. The white card base is 4 1/4" X 5 1/2". The red mat is 4 1/8" X 5 3/8". The patterned paper is from a My Minds Eye Christmas paper pack I bought last year and is cut at 4" X 5 1/4". The other red mat was cut from Just Because Cards cartridge and I used my Gypsy to resize it to 3 1/4" X 5". I ran this through my Cuttlebug and embossed it with the Swiss Dots folder. The word Joy was cut at 1 1/4" from the Storybook cartridge. I shadowed it in white so it would show up on the red mat. I added some gold stickles to the star and matching stickles to each of the light bulbs to give them some shine and sparkle. Thanks for looking.

Sunday, July 18, 2010

Christmas In July Challenge #3


Here is a card I made for the Christmas in July Challenge at Cardztv. The challenge was to create a Christmas card and to use ribbon, buttons, or lace. I have been wanting to cut the little penguin from the Create-a-Critter cartridges and thought this would work great for this challenge. My card is 4 1/2" X 6" and is blue Bazzill card stock. I then added a white mat cut 1/4" smaller then the card base and a patterned paper mat again cute 1/4" smaller than the white mat. The patterned paper is from a DCWV Christmas stack I had on hand. I cut the penguin and his layers at 3 1/2". The hat is from the Paper Doll Dress Up cartridge. I used my gypsy to and the real dial size button to re size the hat to fit the penguin. I applied some liquid applique to the areas on the hat where the fur trim and the pompom are. I heated the liquid applique with my embossing gun to give it the puffy textured look. I added a little pink chalk to give the penguin some rosy cheeks. The stamp is a $1 Clear G Studio stamp I picked up from Michael's last holiday season. I added a sheer white ribbon to the side of the card. I had fun making this card. Thanks for looking.

Wednesday, July 7, 2010

Octopus Birthday Card

I just love all the cuts on the Cricut Create-a-Critter cartridge. Here is a child's birthday card I made this afternoon. The card base is 4 1/2" X 6". The patterned paper is from Stampin Up and is 4" X 6. I thought the colored circles looked like bubbles in water. The octopus and it's layers were all cut at 2 3/4" The Happy Birthday is also from the Create-a-Critter cartridge and was cut at 1 3/4". I used my Gypsy to enlarge the base cut slightly so I could create a small black shadow. I off set the word birthday slightly to also create a shadow. I used my tiny bubbles Cuttlebug embossing folder to emboss the top layer of the octopus. The buttons are from my stash. Thanks for looking.

Sunday, June 27, 2010

Ruff Day?

Here is a shaped card I made today using the Create-A-Critter cartridge. I used my Gypsy to weld the shadow of this little dog. I placed one image on my screen mat at 5" then copied and pasted the image again to my mat. I used the flip button to flip the shadow image and moved it until it just overlapped the first image and then grouped and welded them together. I then cut each layer of the little dog again at 5" so I had all three layers and placed them glued them to the shaped card. I added a ribbon color and a dog tag. The tag is cut from the Sentimental cartridge from the desk key. I printed the sentiment on my computer and used the center point function on my Cricut Expression to cut out the scalloped image around the words at 1 1/2". I cut the tag again using the shift key again 1 1/2" from a darker brown. The finished size of the card is approximately 5" X 5". Thanks for looking.

Sunday, June 20, 2010

Welcome Little One

Here is another baby girl card I made this weekend. I think this little lamb is so cute. The card is 4 1/2" X 6".  The little lamb and all it layers were cut at 3" from the Create-a-Critter cartridge. The sentiment was cut at 1 /2" and is from the Nursery Rhymes cartridge. I added a sheer white ribbon to dress up the card. Card base is pink Bazzill card stock. I added a white mat cut at 4 1/4" X 5 3/4" and piece of pink gingham patterned paper cut at 4" X 5 1/2". I cut the sentiment from the same stock as the card base and cut the shadow cut from white card stock. Thanks for looking.