Showing posts with label Sweethearts. Show all posts

Wednesday, July 18, 2012

Tag, You're It! Challenge


The new Cricut Cardz Challenge is to make a card using a tag or tags and any cartridge, color and theme you want. This is what I came  up with.

I start with a white card stock cut and folded to make a 4 1/4" X 5 1/2" card base. I cut my tag from the Sweethearts cartridge at 5". I used my Imagine and the Floral Emporium cartridge for all my solid colors and patterned papers. My queen was cut at 3 1/2" from the Once Upon a Princess Cartridge. I used a copic marker to add color to her cheeks and I painted the layers of her crown with some Glimmer Glaze. I stamped my sentiment "The Queen Rules" with Memento Tuxedo Black ink. I attached her to the tag with some foam tape and attached the entire tag to the front of my card.

I sure hope you will play along with us for the challenge, it was a lot of fun.

Saturday, February 11, 2012

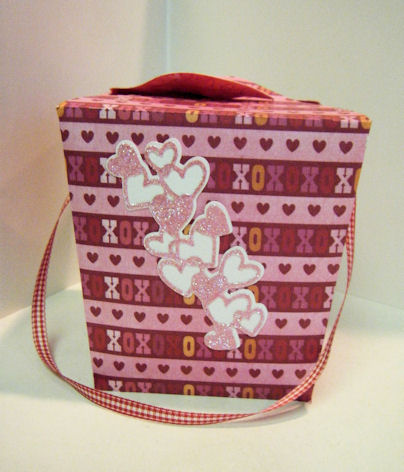
Valentine's Day Treat Box


I wanted to make my Mom a quick little Valentine's Day goodie, so I grabbed two different kinds of dark chocolate for her and whipped up this Take Out box to put it in. I used the Sweet Tooth Boxes Project cartridge to cut the box. I cut it at 10 1/4" as recommended in the handbook and it held both bags of candy . After I scored and folded it. I followed the directions in the handbook and glued it all together. I added some extra glue to the bottom of the box and the sides. Then I used my Crop-a-dile Big Bite to punch a 1/8" hole on each side and added an eyelet for my ribbon. To finish the box I cut the heart from the Sweethearts cartridge at 3" and stamped my sentiment. On the other side I cut the hearts from the Love Struck season cartridge at 3 1/2" and applied some Hero Arts Prisma Glitter to the pink layer.
The patterned paper I used is from a K & Company Valentine's Day paper pack I picked up last year. I am really pleased how this turned out and I know my mom will love it.

Sunday, February 5, 2012

Love is in the Air

I am so excited, Janis asked me to be guest designer for the new challenge at Paper Playtime. The theme is to use your Cricut and Hearts or Love. This is what I came up with.
I used the Birthday Bash cartridge to cut my card base at 5 1/2". I then cut a red mat and a patterned paper mat. The patterned paper is from a K & Company Valentine's Day paper stack from last year. Then using the Sweethearts cartridge, I cut all of the layers for the heart at 4". On my white card stock card base. I inked the card front with some Spun Sugar Distress Ink. I then used some Pearl Glimmer Mist on all my layers and then stamped the XOXO with some Memento Lady Bug ink. To finish the card I added some dark pink pearls to each corner of the card and the mat layer. I love how this turned out.

Saturday, January 28, 2012

XOXO Banner

I have been wanting to use my Ribbon and Rosettes cartridge that I got for Christmas and finally had a chance to when I made this Valentine's Day Banner.  I used the heart rosette and cut it at 3 1/2". I cut 6 sections and adhered them together with Scotch Quick Dry Adhesive. My patterned paper is from a K & Company Valentine's Day paper pack that I got two years ago and also from one from last year. I then cut the heart from the Sweethearts Cartridge at 4". I cut the shadow out of pink and the main layer out of white. I then spritz everything with some Tattered Rose Glimmer Mist. I also used the George and Basic Shapes cartridge to cut a 3" circle that I adhered to the back of the Rosettes. I used Scotch Quick Dry Adhesive to attach the hearts to the front of my rosettes and the circles to the back of the rosettes.

For the top and bottom rosettes I cut the cupid from the Sweethearts cartridge at 3 1/2". I cut the shadow from black and the cupid from red. I then sprayed the cupid with the Tattered Rose and Black Cherry glimmer mist and the coated it lightly with the Pinata Glimmer Glaze that I just got from Cutters Creek. (It is beautiful). Finally I added some Thistle Stickles to the heart for added glitz.


For the middle rosette I cut the XOXO from the Tie the Knot cartridge at 1 /2". I used the same colors for the shadow and base layer and white for the layer on the first X. I sprayed these also with the Tattered Rose and Black Cherry glimmer mist and thistle stickles to the white layer of the X. I adhered all these cuts with some gel foam tape. Finally I adhered each rosette to a piece of cream colored ribbon also lightly sprayed with Tattered Rose glimmer mist. I used some Beacons 3 in 1 glue to adhere the rosettes to the ribbon. I also made a loop from a small piece of the ribbon and attached it to the top layer to hang the banner. I am really pleased how this turned out. I always have a hard time taking good photos of my banners but in person it is really shimmery. Thanks for visiting.

Saturday, February 5, 2011

A Valentine's Day Card

The challenge this week at Cricut Cardz Challenge is to make a Valentine's Day card for a man. Here is what I came up with. I started with a premade 5" X 7" card base. I added a light blue mat also cut at 5" X 7". The paper was cut at 4 3/4" X 6 3/4" and is from a K & Company Valentine paper pack left over from last year. The car image was cut using my Imagine and the Sweethearts cartridge. I used the color pallet from the Yummy Imagine cartridge for the colors for the different layers of the car. I cut the car and the layers at 4.2"  I used my Zig two-way glue pen to adhered all the layers of the car image together and adhered it to the card with some foam tape. The sentiment is also cut from a piece of the K & Company patterned paper. I cut each letter out separately and adhered them to the card with my Zig two-way glue pen. Using my Imagine helped me put this card together quickly. Thanks for looking.